To create an order, select the Purchase Orders, Stock Orders, Subcontractor Orders, or Stock Requests option on the Orders Menu. Although these options are separate, they share the same screen and once the screen is opened, a different order type may be selected. Basic information about the order is first set up on the Orders Info Tab and then the detail of each item purchased is set up on the Line Items Tab.
[SR] If this order is a Stock Request, then this field is not required and will be disabled.
| 1. | Be sure that the proper order type has been selected and then select Add to create a new order. |
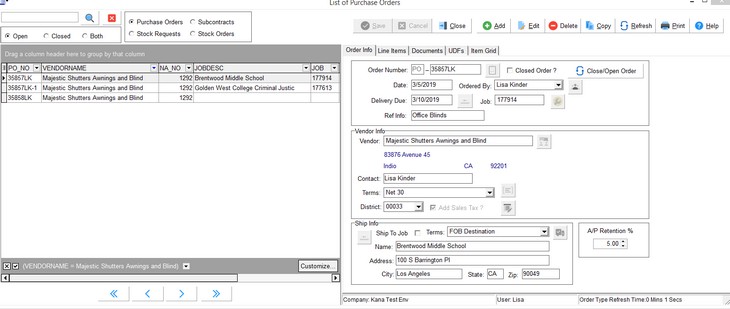
Order Number - The order number is prefaced with a two-letter code for the order type. The order number itself is user-defined and may contain up to 10 alphanumeric characters. Order numbers may not be duplicated.
Closed Order ? - This field indicates whether an order is still 'open' or 'closed'. Typically the 'open' status indicates that the order has not been received or paid in full but any order can be marked as 'closed'. The orders can be displayed on the List of Orders screen by this status and all of the Order reports use this status as a filter.
Note: AccuBuild does NOT automatically close an order when it is paid in full. You must manually close every order by clicking on the Close/Open Order button.
Enhanced Column Sorting and Filtering - This feature is unchecked by default which will speed up the screen and make it faster to manage large datasets. You can still group records (drag the column into the gray area above the columns) and sort and filter on the groups, however, the in-line column filtering (a dynamic list of the values within the field such as job numbers or vendor names) on non-grouped fields will not work when the 'enhanced' box is not checked. You can turn on this option at any time by checking the box.
•For Fastest Response Time - leave UNCHECKED AND NO GROUPINGS; in-line column filtering will be disabled.
•If CHECKED and no groupings, the in-line column filtering works.
•If grouping fields, the sorting / filtering features seem to get enabled by default which ignores the checkbox state.
•The system will respond faster if you display only the open orders. This means you should mark each order as closed when the order has been completed. This is especially true with displaying the related documents on the Document Tab of each order.
Date - AccuBuild will display the current date by default. Change the date as applicable for the order.
Ordered by - Every order must be linked to a Purchasing Agent. The list will default to the first name in the list but you may choose any name on the list.
Delivery Due - Enter the date that the delivery is needed or leave this field blank.
Job - Select the appropriate job number from the list, if applicable. If the job field is left blank, then purchase orders, stock orders and stock requests can be used to charge goods to multiple jobs. Only one job number can be assigned to a subcontractor order. Note: Prior to Version 8.4.0.0 Purple Patch, the stock orders could NOT be coded to a job number.
Ref Info - This field is optional. This field will hold a maximum of 20 characters.
Vendor - Select the vendor from the list and the vendor mailing information will be displayed.
oExisting Orders - All existing orders will show the vendor on the order regardless of the Inactive setting on the vendor.
oNew Orders - Only active vendors will be available when a new order is created.
oCopy Button - The system will NOT allow you to make a copy of an order when the vendor on the order is marked as inactive. You will need to activate the vendor before you can make the copy.
Contact - Enter the name of the person with whom the order was placed in this field. This field will automatically default to the contact name entered with the vendor information in the Clients system. [SR]
Terms - This field will be automatically updated with the payment terms that were entered with the client information but this information may be changed as needed. [SR]
District - This field will be automatically updated with the sales tax district that was entered with the client information but this field may be changed as needed. This field is required and must be filled in even if sales tax will not be included on the order. The tax code is made up of two-digit state code along with a three digit district code. AccuBuild will compare the state code to the state that the job number is assigned to (if any) and generate a warning whenever the two states do not match. [SR]
If you will be paying the sales tax when the vendor invoice is received, then be sure to leave the check mark in the 'Add Sales Tax' box. The corresponding sales tax percentage will then be printed on the order as well as the calculated sales tax amount. The sales tax amount will not be prorated to the various expense accounts (as dictated by the individual items on the order) until the accounts payable invoice(s) for this order have been entered. [SR]
If the sale tax is not to be paid, then AccuBuild will print 'Resale' on the order along with your reseller's permit number. AccuBuild will automatically accrue the sales tax expense when the invoice is entered. The tax amount will be accrued in the general ledger account as defined by the sales tax district code but it will not be added to the accounts payable invoice. The tax amount will be prorated to the various expense accounts as defined by the items on the purchase order. If you do not wish to accrue the sales tax, then either change the accrued amount to zero during the invoice entry, or set up a sales tax code with the tax rate equal to zero and use this tax code when creating the purchase order. [SR]
Ship To - This information represents the location where the material should be delivered. This information will default to your company's name and address as defined by the 'Client Number' field on the System Administrator > Configuration > Accounting Tab. (Your company's name and address must first be set up in the Clients module. This client number is also used when setting up the contract billing information on a job.) If the order should be shipped to the job site address, then click on the Erase button (to clear the default shipping info) and then click on the 'Ship To Job' box. The shipping information will then be updated with the job address information. [SR]
Terms - This field informs the vendor who will be paying the shipping costs. [SR]
| 2. | Select Save to record the purchase information or select Cancel to erase your entries. To change order information, select the order and then click on the Edit button. Only orders that have an 'Open' status may be edited. 'Open' orders without any attached accounts payable invoices may be removed from the system by highlighting the order on the browse screen and then clicking the Delete button. |
Once the purchase information is saved, the List of Orders screen will automatically move to the Line Items tab in preparation for entering individual parts to the order.
| 3. | Select Add at the bottom of the screen to enter a new line item on the order. |
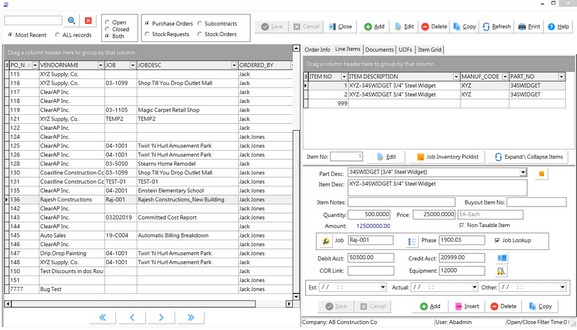
Item No
This field is used for reference purposes by the receivers and payable invoices. Each item added to an order is printed on the order in line item order.
Part Desc
Right click on the Part Desc field to display your choices for selecting a part number. You may select the an inventory item based on the Part Number, Description, UPC Code or Manufacturer Code. The inventory part number is made up of two parts: the first four digits represent the Manufacturers Code and the second part is the vendor's part number. Note that when sorting an alpha-numeric field, that upper case letters will be listed before lower case letters.
Part numbers are required for stock orders and stock requests but are optional on purchase orders. Parts must be entered into the inventory list in the inventory module before they can be viewed in the grid. (Click on the icon to the right of the Part Desc field to add a part to the inventory list without leaving this screen). This field may be left blank on all subcontractor orders.
Note: Use the Job Estimate Picklist button to choose items created from the import of parts from DoveNet or Buyout Items imported from the Job Import Estimate option.
For Stock Requests, part numbers can be selected as described above or they may be chosen from a list that is created when Stock Order items are coded to a job. Click on the Job Inventory Picklist button to view these items. Items are removed from this list as requests are fulfilled.
Item Desc
After the inventory part number is entered, AccuBuild will display the description of the item in the 'Item Desc' field but the description may be changed as desired. This field can be as long as required in order to describe the item. This is especially helpful for subcontractor orders where the entire scope of work can be described on one line item. Press the Tab key to move to the next field.
Quantity
Enter the number of the items being purchased.
Price
Enter the unit price of the item. If a part number was entered, and a default price has been set up in the inventory master file, then the price and the unit description will be updated automatically, but the unit price may be changed as desired.
Quantity Description
If a part number was entered, then the quantity description will be automatically entered. If no part number was selected, then you may manually choose a quantity description in the field next to the unit price field. If you save the entry without a unit of measure, the unit of measure will default to "Each".
Non Taxable Item
Each item on an order will default to be taxable. Simply remove the check mark on this field to denote the item as non taxable.
Note: It is recommended that freight be added as a separate line item on your order if you will be paying freight. This amount can be annotated as an estimated cost until the invoice is received, at which time the order amount should be updated with the actual cost of the freight. Adding freight to the order items will insure that the freight is properly reflected in the Committed Cost reports.
Job
This field will be automatically updated with the information entered on the Purchase Info tab. If no job number was entered on the Purchase Info tab, and the order is either a purchase order or stock request, then any job number can be entered in the 'Job' field for any line item. This feature allows for items to be ordered for multiple jobs on a single order. Only one job number can be assigned to a subcontractor order and the job number must be defined on the Purchase Info Tab. [SO]
Phase
The phase number is required if a job number has been assigned to an item. The default value for the phase number will depend on the type of order (see the rules below), however, the phase may be changed as desired. You may also wish to enable the Job Lookup option. This option will list only the job cost phases that have been set up on the selected job. (This option can be defaulted in the System Administrator > Configuration > Accounting menu option.) [SO]
Purchase Orders
If an inventory part number is used, then the phase is pulled from the inventory category file. If a part number is not used, then the phase will be pulled from the vendor's invoice defaults.
Stock Requests
The phase is pulled from the inventory category associated with the part number.
Subcontractor Orders
Since a part number is not generally used on a subcontract, the phase will be pulled from the subcontractor's invoice defaults. Although only one job can be assigned to a subcontract order, multiple phases may be entered on the same order.
Debit Acct and Credit Acct
These fields are required and will be updated automatically based on the type of order, but the accounts may be changed as desired. Please refer to the document titled System Rules for Expensing Orders in the Frequently Asked Questions (FAQs) section of this manual for a complete description of how these fields are updated. [SO]
COR Link
Use this field to link a line item on a Subcontract or Purchase Order to a Change Order Request in the Project Management module.
Equipment
| Use this field to link a line item on a Subcontract or Purchase Order to an item in the Equipment List. When the invoice is then posted to this item, it will update the historical transactions on the piece of equipment with the expense. |
| 4. | Select Save to record the line item information or select Cancel to erase your entries. A line item on an order with an Open status may be changed by selecting the Edit button that is located next to the Item No field. Item 999 that holds the standard order text can also be modified on each order. Click the Delete button to remove line items from an order. Line items cannot be removed if a payable invoice has been attached to the order or if the order has a 'Closed' status. Additional line items can be added between two existing line items by selecting the Insert button. |
| 5. | Once all of the line items have been entered, select the Print button to print the order. The order is now ready for receivers and invoices to be posted against it. If the order is a stock request, then the order is ready to be fulfilled. |
Printing Issues
If you are printing the MAR Version of the Order, the order will preview on the screen first. If the order fails to preview, then the company logo may be the problem. Your company logo is intended to print on the Order, and if it is too large, the preview will fail and other errors will be generated if you attempt to preview a second time. Therefore, you should test your logo after it has been installed in AB. Go to Clients > Properties to view your company logo. If the AB logo appears on this screen, then your logo has NOT been installed. If you do not see any logo, or if your logo cannot be seen in its entirety in this screen, then the logo file (rbcologo) must be re-sized and reinstalled in the company folder.
RECENT SOFTWARE UPDATES FOR 9.7.0.0 RELEASE
●ENHANCEMENT - PO Line Items Screen Filter Options [PMID Ref No: 7243]