The Purchase Orders, Stock Orders, Subcontractor Orders, and Stock Requests options on the Orders Menu are used to enter new orders into the system and to update and review existing order information. Although these options are separate, they share the same screen and once the screen is opened, a different order type may be selected.
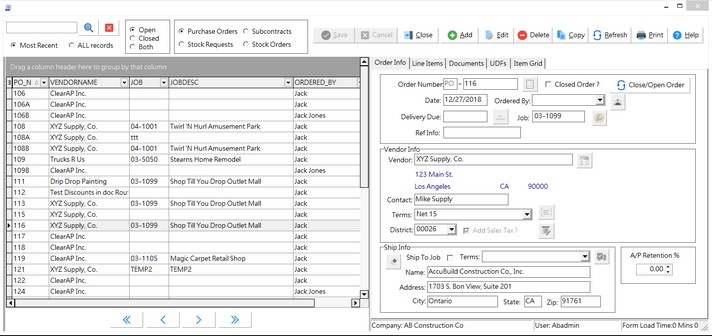
Master Record Grid - When one of the above menu options is selected, the Orders Center screen will display in the Master Record Grid all of the orders that have been created in the system based on the order type. The type of order is abbreviated with a two-letter code that is displayed next to the order number on the Info Tab. To view other types of orders from this screen, simply select the order type (Purchase Order, Stock Requests, Subcontracts, Stock Orders) at the top of the screen. The screen will change dynamically with each order type selected.
•Order Status - AccuBuild will automatically display only the 'Open' orders but this display can be changed to show only the 'Closed' orders or the open and closed orders at the same time. When an order is created, it is automatically marked as an open order and information on the order can be changed as often as desired. To prevent accidental changes to an order, the order can be marked as 'closed' by selecting the 'Closed Order' field on the Info Tab. This feature can be turned on and off as necessary. The open/closed status is then used in certain report features and input screens. Some reports will allow you to be selective in reporting on open orders only and certain input screens will warn if a closed order is accessed.
•Most Recent Records - When the Orders Center is opened, the system will default the display to show the last 150 Orders created based on the order date ('Most Recent' option). You may choose to display display 'ALL Records' as needed.
•Best Practices: By limiting the number of clients that are displayed on the screen, all of the functions of the Orders Center work much faster by reducing the time it takes to refresh all of the new detail grids when changes are made. For best performance, always leave the Most Recent option selected. If the Order you are looking for is not in the current list, use the Search Controls to locate the Order. You can enter the Order number, the vendor name, the job number or the job description to help with locating the Order. When using the Search Controls, ALL Orders (not just the most current records) are searched based on the Record Type (Purchase Orders, Subcontracts, Stock Requests, Stock Orders) and the Open / Closed status.
NOTE: The Search function works for any part of the search field. For example, if your are trying to locate an order for a vendor that has the word Lumber in their vendor name, you can simply type in Lumber and the system will return any orders where the vendor name OR the job description has the word Lumber in it.
All the Master Center Screens (ie. Employees, Jobs, Clients, etc) share the same look and basic functionality.
Using the grid: All columns in the grids can be grouped, filtered, sorted and arranged.
•Group the data by dragging one or more columns into the gray area at the top of the grid
•Filter the data within a column by clicking on the down-arrow on the column. Values found in the column will be displayed; click on the value to display the record. Choose the Custom option at the top of the displayed list to enter your own filter criteria.
•Select which columns are visible by clicking on the icon on the left side of the first column on the grid.
•Click on the column header to change the sort order.
•The grouping, visibility and display of the columns will be saved on a user by user basis so each user can customize their own view.
oFilter selections will be reset to default when the screen is closed.
•Master Grid Pop Up Menu - right click on the Master Grid to display the pop up menu
oUse Ellipsis on Cell Overflow - any cell which has too much text to fit in the field will be indicated with ellipsis (...) at the end of the text.
oAdjust Cell Height on Overflow - the cell height will be adjusted to accommodate all of the text in the field
oRestore Grid Defaults - reset the user's custom grid settings on the Master Grid to the default settings
oRestore ALL Grid Defaults - reset the user's custom grid settings on the Master Grid AND non master grids to the default settings. Non master grids cannot be individually reset to the default configuration.
Order Center Buttons
|
Add |
Select the Add option to create a new Order.
|
|
Edit |
Select the Edit option to change the Order information contained on any tab except the Item Grid Tab which is read only.
|
|
Delete |
Select the Delete button to an Order from the system. The system will not allow you to delete an Order if there are any historical transactions dated in the current fiscal year.
Refer to the topic titled Deleting Orders for complete information on this function.
|
|
Copy |
Select an existing order and then select the Copy option to quickly create a new order based on the selected record. No invoice or receiver history will be copied to the new record.
The system will ask if you wish to change any information on the new record.
•If you answer 'No', the system will copy the information found on the Order Info Tab and Line Items Tab to a new order. A new order number will be assigned and the current date will be used for the order date. You may then use the Edit option to change the new order information.
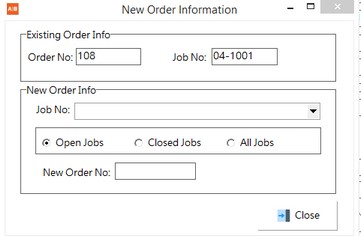
•If you answer 'Yes', the system will display a new screen where you can assign a new Order No or Job Number to the PO. The system will copy the other information found on the Order Info Tab and Line Items Tab to a new order. The new detail items will be assigned the new job number if one was selected. The current date will be used for the order date. You may then use the Edit option to change the new order information.
Note: When the new order record is created, the grid will display both the original order and the new order so you can easily review both records. Click the Refresh button to display all records for your selected record type and display choices.
|
|
Refresh |
Select the Refresh option to update the Orders list with any new Orders or Order changes from other users in the system.
oStatus Bar at the bottom of the right side screen is used to identify the company and user information for the screen, as well as track screen refresh time.
|
|
Once the Order information has been created, select the Print button to print the order. The order is now ready for receivers and invoices to be posted against it. If the order is a stock request, then the order is ready to be fulfilled.
|
|
|
Help |
Select the Help option to access the online system documentation.
|
|
Save |
Select the Save option to record your new master record or to save your changes to an existing record.
|
|
Cancel |
Select Cancel to ignore your record changes.
|
|
Close |
Select Close or the 'X' located at the top right of the screen to close the screen.
|
|
Search |
Use the Record Type option at the top of the screen to display master records in the grid for Purchase Orders, Subcontracts, Stock Orders or Stock Requests.
The 'Most Recent' records will be displayed by default for the selected Record Type. The 'most recent' records are defined as the last 150 Orders created based on the order date. You may choose 'ALL Records' to display the full list for the selected record type but this may slow down the screen performance if your Orders database has an extremely large number of records.
The Search function works for any part of the search field. Enter characters in the Search Option field and click the Lookup Button to search and display ALL records (not just the most recent) for the selected Record Type (Purchase Orders, Subcontracts, Stock Orders or Stock Requests) where the search value is found in any of the following fields: ▪Order Number ▪Vendor Name ▪Job Number ▪Job Description
Use the 'Red X' cancel button next to the Lookup Button to display all records for the selected Record Type. |
Orders Center Data Tabs
Please refer to the documentation for each data tab for a complete description of all fields.
|
Orders Info Tab |
|
Detail Items Tab |
|
Documents Tab |
|
UDFs Tab |
|
Item Grid |