As of Version 10.0, new Master List Centers have been created to replace the primary master list screens in order to greatly enhance usability and lookup functionality.
•Employee List
•Client List
•Job List
•Chart of Accounts
•Orders List
•Inventory List
•Equipment List
Master List Centers - General Enhancements
Each of these Master List Centers share a set of general enhancements common to all along with specific enhancements for each screen type:
•Non-modal screens - All Master List Centers are non-modal screens so the user can switch between screens without closing the open screen. Keep in mind that you cannot display two copies of the same Master List Center at the same time. For example, if you have opened the Customer List and set the filter to display customers only, then try to open the Vendor List from the Payables menu, the system will display the customer list that you already have open. Simply change the filter at the bottom of the screen to display the vendor list.
•Improved Performance - All Master List Centers have been refreshed to improve screen speed performance.
•Full Screen Mode - All Master List Centers are intended to be used in Full Screen Mode. Shrinking the screen may impede the view of data grids, buttons or other options.
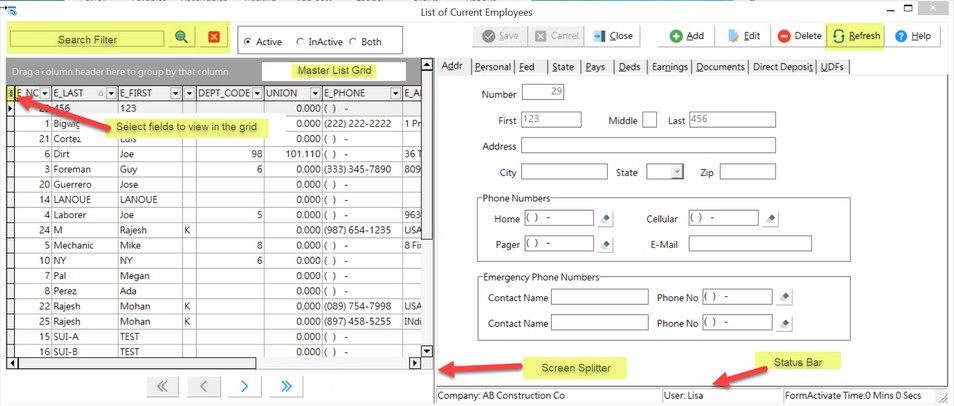
•Advanced grids - New grids added for data grouping, filtering, and field selection
•Splitter Bars - Splitter bars have been added between left and right side of screens for expanding left side grid view
•Master List Grid - The grid on the left side has been expanded with additional master list fields including all User Defined Fields
•Status Bar - Located at the bottom of the right side screen, this status bar is used to identify company and user information for the screen.
oRequired when multiple companies are opened at the same time.
oStatus bar will also track the screen refresh time.
![]()
•Refresh Button - vc
•Grouping Data - Create groups or summaries of the data by dragging a column(s) into the top part of the screen. This will automatically display dollar and unit totals based on the group created and the filters set. Drill-down on each group to view the details.
•Filtering – Click on the column header to view the filters available for each field. Use the Custom option to set filters based on formulas such as a range of due dates etc. The filters are displayed on the footer of the grid with a 'close' box next to it which can be selected at any time to completely remove the filter. You may also uncheck the box next to the filter to temporarily turn off the filtering but this will leave the filter available in the footer area.
•Sorting – Click on any column header to sort the data. A small, gray arrow is displayed next to the column heading to indicate the ascending / descending order of the sort. Only one column can be sorted at a time.
Navigating the Grid
•Arrange Columns - Customize your view of the data by moving columns in the order that you wish to see them. To move a column, simply hold down the left mouse button on the column header, and drag the column into position. Release the left mouse button when finished moving the column.
•Hide Columns - The default visibility of these fields can be controlled through the Properties button (see below) by your system administrator. Columns can be hidden from view by each user by clicking on the various fields on the Field List Menu which can be found to the left of the first column.

•Grouping Data - Create groups or summaries of the data by dragging a column(s) into the top part of the screen. This will automatically display dollar and unit totals based on the group created and the filters set. Drill-down on each group to view the details.
•Filtering – Click on the column header to view the filters available for each field. Use the Custom option to set filters based on formulas such as a range of due dates etc. The filters are displayed on the footer of the grid with a 'close' box next to it which can be selected at any time to completely remove the filter. You may also uncheck the box next to the filter to temporarily turn off the filtering but this will leave the filter available in the footer area.
•Sorting – Click on any column header to sort the data. A small, gray arrow is displayed next to the column heading to indicate the ascending / descending order of the sort. Only one column can be sorted at a time.