The Schedule Payments option is used to select unpaid invoices for payment.
| 1. | On the Automatic Payment Checks screen, enter the Check Date and then press Enter. |
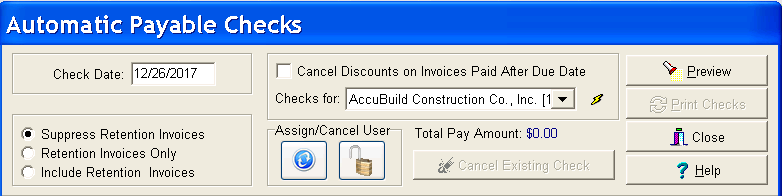
| 2. | Select the invoice criteria. |
•By default, retention invoices are hidden from view on this screen. You may choose to include the retention invoices in your view or to view retention invoices only. Note: Retention invoices are created automatically if you use the Subcontractor Payment Sheet or Order Invoice entry on Subcontract Orders options. Retention invoices cannot be created through the invoice option in the Payables module.
| Note #1: Each progress billing created through the Subcontractor Payment Sheet process will post two separate invoices to the aging schedule: one for the net amount (gross amount less retention withheld) and one for the retention withheld. The retention withheld invoice will be 'hidden' from view when you pay your progress billings so that you do not accidentally pay retention before it is due. When you are ready to pay the retention, you should create another subpayment sheet using the Retention button. This will create a separate subpayment sheet for the full amount of the retention held to date on the subcontract that you can print and give to your subcontractor along with the check. This invoice will show zero retention withheld and the current amount due will equal the total of the retention amounts that were previously withheld. Behind the scenes, the system is moving the retention amount from the Retention column to the Current column on both the a/p aging schedule and the Subcontractor Payment Sheet Summary report. When you pay the retention, be sure to select the 'Include Retention Invoices' option so that you can see all of the retention entries for your sub. This will include the invoices where the retention was originally withheld as well as the in/out retention invoice that you created with the Retention button above. The net amount of all of the entries should be the amount of retention you need to pay your subcontractor. Be sure to select all of the invoices for payment and not just the 'current' portion of the retention invoice, otherwise the other retention invoices will stay on your aging schedule indefinitely. |
Note #2: It is important to follow the steps in Note #1 if you are planning to give your subcontractor a copy of the payment sheet that reflects that retention is being paid. Again, the primary purposes of this step is to print an invoice for the subcontractor to explain what is being paid, and to move the retention amount from the Retention column to the Current column on the A/P Aging Report and Subcontractor Payment Sheet Summary report. Due to the fact that the system has already created retention invoices with each subpayment sheet, it is not required that you do create the separate Retention invoice in order to pay the sub. The retention amounts will remain in the retention column on the A/P Aging Report until paid. The Subcontractor Payment Sheet Summary report will continue to show the retention amount in the Retention column along with the payment status. When you pay the retention, be sure to select the 'Include Retention Invoices' option so that you can see all of the retention entries for your subcontractor. This will include the invoices where the retention was originally withheld but there will not be an in/out entry as described in Note #1 above. The net amount of all of the entries should be the amount of retention you need to pay your subcontractor.
| Note #3: If you followed the steps in Note #1 to create an retention invoice for your sub, and failed to select all of the retention invoice entries for that subcontractor when you paid the retention, then invoice entries netting to zero will remain on the A/P Aging Schedule indefinitely. The best way to remove these 'extra' entries is to create a handwritten A/P check to the sub with the net amount of the check as zero. You can then use the 'Payable Link' option on the handwritten check screen to attach to each individual retention invoice. Once all the applicable retention entries have been selected and your entries net to zero, you may post the check. The invoices will be marked as paid and removed from the A/P Aging Schedule. Be sure to date the handwritten check the same or after the last invoice date that you are trying to clear. It is best to work with the printed aging schedule (full detail) in front of you when trying to make the check entry to ensure that you selecting the correct invoices. |
•Cancel Discounts on Invoices Paid After Due Date - If you have set up invoices with discounts, and have not paid those invoices in time to take the discount, then you may click on this option so that the discount amounts will be ignored when the invoices are selected for payment. This option is applicable to all invoices that are unpaid, not just those displayed by a selection criteria (refer to the next section). If this option is selected, the discount amounts will still be displayed on the screen but the Proposed Payment Journal will reflect that the discount is now zero and the printed check will not include the discount. Regardless if the 'Cancel Discounts' option is selected, the Payment Status box at the bottom of the screen will display 'Discount Expired' if the invoice has not been paid before the proposed payment date (due date). Note: Discount amounts may be set up when an invoice is entered into the system but it is not posted into the general ledger until the invoice is paid. Therefore, adjusting the discount amount on this screen will not adversely impact the original posting of the invoice to the general ledger.
•'Checks for' - Choose from a variety of options to filter the invoices on the screen. For example, the 'All vendors, all jobs' criteria lists all payable invoices found in the system. Select the 'Invoices due on' criteria to select only those invoices that were entered with a certain proposed payment date. The list of filter options will include the vendor names and job numbers that have unpaid invoices entered into the system. Be sure to click on the refresh button (the lightning bolt icon) after choosing a filter criteria. Although you may not choose multiple criteria at the same time (ie. 'ABC Contractors AND Job 123'), you may select the first criteria ('ABC Contractors') and select your invoices for payment, and then select the next criteria (Job 123) and select more invoices for payment. AccuBuild will remember each invoice that you have selected for payment even if you have changed the selection criteria.
•Use Advance Grid Screen for Scheduling Payments - This option, which is found on the Payables > Properties screen, changes the functionality of the Schedule Payments grid so that you can click on any column to sort the invoice information. Group the data by moving any column into the gray area above the columns. Once filtered, use the Pay or Pay All options to select invoices for payment. When using this option to mark invoices for payment, the Total Amount to Pay field will show the totals for the current invoice filter. Hint: You can click the lightning bolt button at the top of the screen to refresh the total for all marked invoices.
| 3. | If all of the displayed invoices are to be set up for payment, then select the Pay All button at the bottom-left corner of the screen. Select None to quickly remove all invoices within the current selection criteria from the list of invoices to be paid. To mark an individual invoice for payment, click on the desired invoice and then click the Pay button at the bottom of the screen. When an invoice is marked for payment, AccuBuild will update the 'False' status in the 'Pay It' column with a 'True' status. An invoice must have a 'True' status before it can be included on a check. |
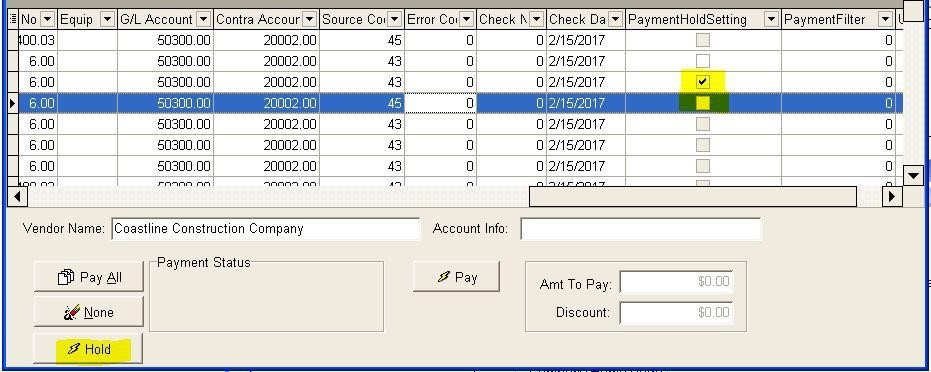
•Vendor Name - As each invoice is selected, the vendor name is displayed at the bottom portion of the screen along with the vendor's Account Info.
•Discount - This field holds the original discount amount that was set up when the invoice was entered but this amount may be changed as needed. Use the 'Cancel Discounts on Invoices Paid After Due Date' option at the top of the screen if you want AccuBuild to automatically ignore the discounts on all invoices that have not been paid by the due date.
Option for Discounts: Post 'Net' Cost after Discounts to Job Cost System
Use this option to allow cash discounts to be credited to the job cost instead of the traditional Cash Discounts account per the accepted accounting standard. Please check with your CPA before enabling this new setting as the normal standard is to track cash discounts under a separate account and NOT allow them to be credited to the jobs.
When this setting is enabled, the posting process for A/P checks including automatic, hand-written, and voided checks will include an additional set of transactions in the job cost and general ledger historical files which will credit the job cost amounts and debit the cash discount amounts. The transaction date for the cash discount is the date of the check. These additional transactions will contain a description that begins with the word 'Discount' to help identify them. Note: This setting only affects vendor invoices that contain discounts which are coded to a job.
•Amt to Pay - This field will default to the full invoice amount but the amount may be changed in order to make a partial payment on the invoice. Select Save to record the entry or Cancel to ignore your changes.
•Payment Status - Please notice that when an invoice is highlighted, the Payment Status box at the bottom of the screen may display profile violations. Violations are incomplete or expired profile items that have been flagged for check printing reminders in the Clients system. This information is displayed so that user may decide whether or not the vendor's invoice should be set up for payment. If the invoice is set up for payment, then a reminder of the profile violation will be printed on the Proposed Payment Journal and it will be displayed again on the screen when the check is printed. The messages are simply reminders and will not prevent a check from being written.
•Total amount to pay - This field is located under the Checks for field and displays the running total of all the invoices selected for payment.
4.Selecting Invoices for Payment: Mark one or more invoices for payment. The selected invoices will be assigned your UserID and no other users in the system will be able to process the invoices you have marked. The invoices will still be visible to other users in the Schedule Payment screen, however, the Pay Now / Don’t Pay button will be dimmed on the record. Look for the UserID in the grid to view the user assignment. You may need to refresh the screen (use the lightning bolt icon at the top of the screen) to update the grid.
5.Changing Invoice Assignments: When you select an invoice that is being processed by another user, you will see two buttons appear at the top of the screen for Assigning the invoice to your User ID or Releasing the Payment from the assigned User and clearing the Pay Now setting.
a.Assignment Option: This option is used to assign invoices that are marked by another user to your User ID. When the Button is clicked, you will have two options:

| ○ | Assign Option - This option will assign the current selected payable record to the current logged in user. Only one record at a time can be updated with this option. |
| ○ | Assign All - This option will assign ALL payable records matching the User ID on the selected invoice record to the current logged in user. This can be very useful when a user needs to process payments for invoices that were scheduled by a different user in the system. |
| ■ | Hint: Use the column filter functions on the grid to select specific invoices to assign to your UserID; then select Assign All. Example: UserID 1 has twenty invoices selected for payment for various vendors but you (UserID 2) need to pay invoices on one of those vendors immediately. In the Schedule Payments grid, set the filter on the Vendor No column to the specific vendor. Because these invoices are already assigned to UserID 1, the Pay Now/Don’t Pay option will be dimmed and they will need to be reassigned to your UserID before you can pay them. Use the Assign All option to reassign the records that are currently displayed in the grid to your UserID. |
| ○ | Cancel - Select this option to exit without making any changes. |
b.Release Option: This option is used to release invoices that are marked by another user by clearing the User ID Field and setting the Pay Now flag to false. When the Button is clicked, you will have two options:
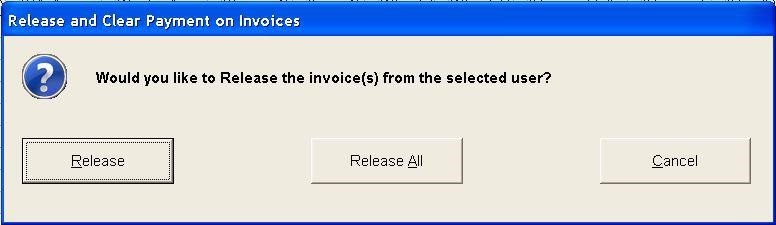
| ○ | Release Option - This option will clear the UserID field on the selected payable record and set the Pay Now flag to false. Only one record at a time can be released with this option. |
| ○ | Release All - This option will clear the UserID field on all invoices that are currently displayed in the grid and set the Pay Now flag to false. |
| ○ | Cancel - Select this option to exit without making any changes. |
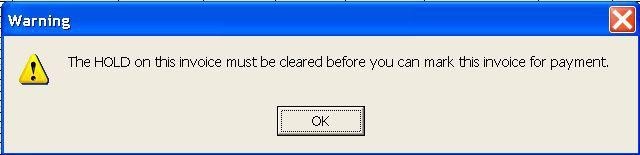
6.The HOLD setting can also be set and cleared from any of the Schedule Payments Screens for Paper Checks, ACH Payments, and Corpay Credit Card Payments. Use the Hold / Clear Hold Button on the lower left side of the screen for updating the payment hold status. If the selected invoice is already on hold, then the button caption will be changed from Hold to Clear Hold .A new column on the Schedule Payments grid has been added which shows the Payment Hold Setting and this field will be checked on any invoice where the invoice record is set for Hold .If you attempt to pay an invoice that is marked for hold, a warning screen will be displayed and you will need to remove the hold before you can mark the invoice for payment.
| IMPORTANT NOTE: The Hold feature is applied at the Vendor Invoice Number level, so if there are multiple distribution entries on a Vendor Invoice, then ALL related entries are processed as a group for the Hold and Clear Hold options. |
7.After all of the desired invoices have been marked for payment, select the Preview button to print the Proposed Payment Journal. Review the report to make sure that all of the invoices have been properly selected. If an invoice was missed, simply follow the same steps to add the invoice to the check run. If an invoice was inadvertently added to the check run, select the invoice and click the Don't Pay button at the bottom of the screen to change the 'Pay It' status of the invoice back to 'False'.
| The Proposed Payment Journal will also display whether there are any Profile or Lien Release violations. Drill down on the warning to view which specific items are causing the violation message. |
| 8. | Select the Print Checks button at the top of the screen to begin the check printing process. After the checks have been printed, the system will display a prompt to post the checks. This prompt can be canceled if the checks are to be posted later from the Payables Menu, but remember, that the checks must be posted in order for the check register or any ledger to be updated. Other options will be enabled on the Payables menu to allow you to reprint the checks, print mailing labels and remittance statements, and to post the checks through the accounting system. |