| 1. | Select File > System Administrator > User Maintenance and then select Add. |
•User Name - Enter the unique 'login' name of the new user. This field is alpha/numeric and may contain up to 31 characters including spaces.
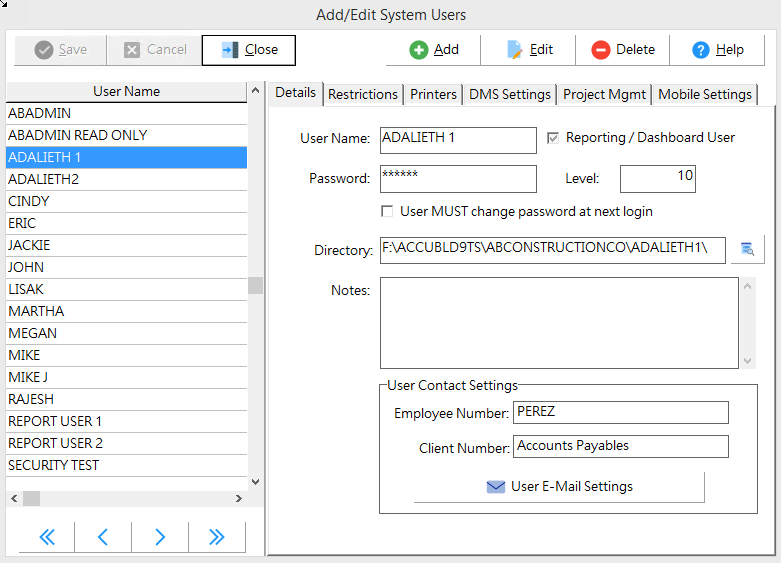
•Reporting / Dashboard User - Select this option to create a user with Read Only access.
oA read-only AB license must be used with this option. Refer to the topic 'Create a User with Read Only License' for more information.
•Password - The user password security features have been enhanced (9.7.0.1 Blue) to require longer passwords for new users and a new reset password option has been added that forces the user to change their current password before they can log into AccuBuild.
oThe password for NEW users (as of 9.7.0.1 Blue) will require a password between 6 to 12 alpha/numeric characters. Previously the minimum number of characters was 4. Existing passwords will NOT be affected, however if the password reset option is set for an existing user, then the password reset screen WILL require at least 6 characters for the new password.
oSpaces and special characters may not be used in the password.
oIt is recommended that each user be given a unique password although it is not required. Also, the same password can be setup for the same user in multiple companies.
oA new checkbox entitled “User MUST change password at next login” has been added which allows System Administrators to force users to change their password on the next login. When this option is checked, the user will be prompted for a new password when they log in and if they fail to provide a new password, they will NOT be allowed to continue the login process.
▪The new password must be different than the existing password.
▪The new password will be saved in the user's file for all subsequent logins and the 'change password' checkbox will be cleared on the user's record.
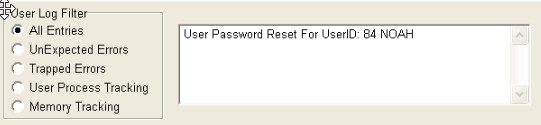
▪The system will log the password change in the File > Browse User Activity Log as a Record Type 2 - User Process Tracking Record and will log the User ID of the user that logged in and changed the password.
•Level - Enter a security level between 0 and 10 for the user; level 10 has access to everything. Security levels may be set for each menu item in the Menu Settings option. In addition, you may use the Restrictions tab to set up access in conjunction with the user level. Also, user access may be defined with a User Group. Users who are added to a user group will inherit restrictions as defined by the group.
•Directory - Each user for each company must have a separate directory. It is recommended that the user directory be set up as a subdirectory of the company directory. Simply enter the user's directory name at the end of the selected path and AccuBuild will create the subdirectory. For example, if ABC Company has created a company directory called ABC on the network drive F, then the path would be F:\AccuBld8\ABC\. Type in 'Mary' at the end of the path name to create Mary's user directory.
•Notes - This field may be used to document the user's system access capabilities, etc. This field is simply a text file and may contain unlimited text.
In Version 7 of the AccuBuild Software, the area below the Notes field will display the version of the Borland Database Engine installed on each workstation that has access to AccuBuild. While AccuBuild attempts to install the BDE with the 'workstation version' option on the software CD, other programs utilize the BDE and it may have already been installed on the workstation. It is extremely important that the same version of the BDE is installed on all workstations. Please review the BDE Network Configuration notes if AccuBuild displays a message that mixed versions of the BDE are running.
•User Contact Settings
oEmployee Number - Link the user's employee number/name to this field if you will be using AB Mobile time entry. If users are limited to only entering time for themselves (User Maintenance > Mobile Settings Tab > Current User Only option) then the user setup MUST include a link to the employee number/name.
▪Note: The employee record must be created in the Payroll system before it can be linked to the user record.
▪Note: The Misc_Float1 field in the users.adt table will store the employee number
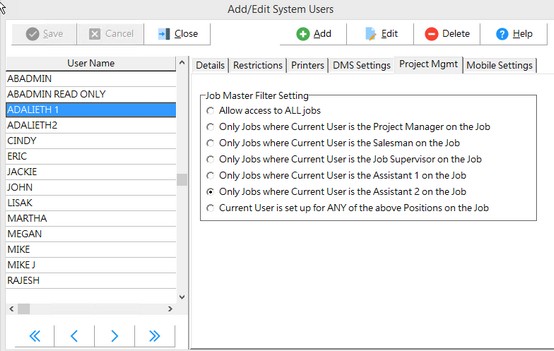
oClient Number - Link the user's client number/name to this field if you will be limiting access to job information based on the user's role on the job. (User Maintenance > Project Mgmt Tab)
▪Note: The client record must be created in the Clients system before it can be linked to the user record.
▪The Misc_Float1 field in the users.adt table will store the employee number and the Misc_Float2 field will store the client number.
•User E-Mail Settings Button - This button opens the Client E-Mail Settings screen which is used to configure the e-mail account settings for each user in AccuBuild. Refer to the documentation titled User Email Settings for complete information.
| 2. | Select the Restrictions Tab at the top of the screen. This tab allows you to click on the options that you do not want the user to access. All menu items including the module name, and all system reports are listed on this screen. To remove access from an entire module, simply click on the box next to the module name. It is highly recommended that all users, with the exception of the AccuBuild System Administrator, be denied access to the Browse Data, Restore Data, and System Administrator options. |
| If you restrict a user from a menu that has sub menus ("+Payroll", for example, indicates the whole Payroll menu), then the user will be denied access to the sub menus as well so there is no reason to check every sub menu option. This is true with some menus that are not quite as obvious that they have sub menus. For example, the File > System Administrator menu has sub menus named Configuration, User Maintenance, Menu Settings, etc. |
•Note: The +File and +Help Menus cannot be restricted as a whole. Select the sub-menus under those main options to restrict user access.
It is recommended that all NON administrator users be restricted from the System Administrator menu to prevent access to these sub menus. In some cases, restricting a specific sub menu (such as Configuration) will not allow the user to use certain features of the system. Conversely it may be important for you to restrict those options for a specific user or user group. The following two scenarios may apply to your situation:
•If the user is restricted from the System Administrator > Configuration option, then the system will gray out the 'Use Job Master for Phase Lookup' field on various data entry screens including the a/p invoice screen. If the user needs access to this field, simply restrict the user from the System Administrator option (not the Configuration sub menu).
•If the user is restricted from the System Administrator > User Maintenance option, then the system will not allow the user to assign tasks to other users on the Project Management > My Day Screen. If the user needs access to this feature, simply restrict the user from the System Administrator option (not the User Maintenance sub menu).
| Prior to the release of AccuBuild Version 8.2, the number of menu restrictions were limited to approximately 18 menu options per user. In this case, the restriction options should be used in conjunction with the Menu Settings option. As of Version 8.2, the menu restrictions per user are unlimited. Remember, if you have restricted a menu option in a group that the user belongs to, you do NOT have to restrict the menu for the user again. |
| 3. | The Printer Assignments Tab allows you to assign a specific local or network printer to each printing task for the user. |
•This task must be performed at each workstation otherwise the system will not use the proper printer driver(s).
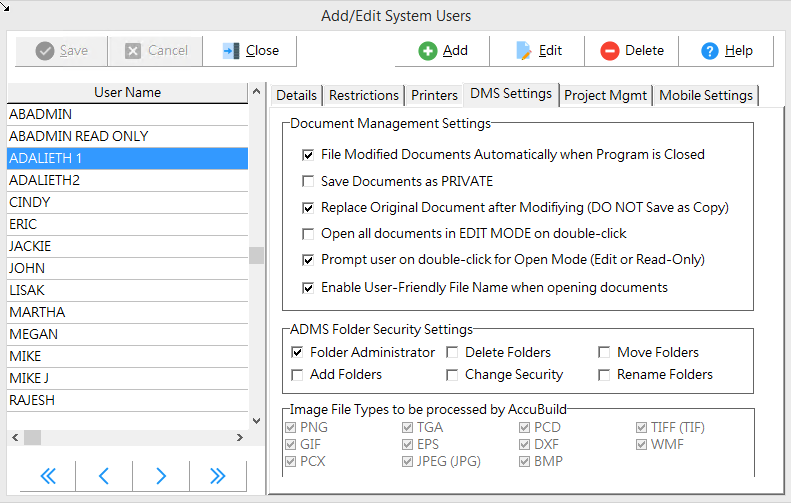
| 4. | The DMS Settings Tab is used to set up each user's default settings for the AccuBuild Document Management System (DMS). Refer to the documentation titled DMS Settings for complete information. |
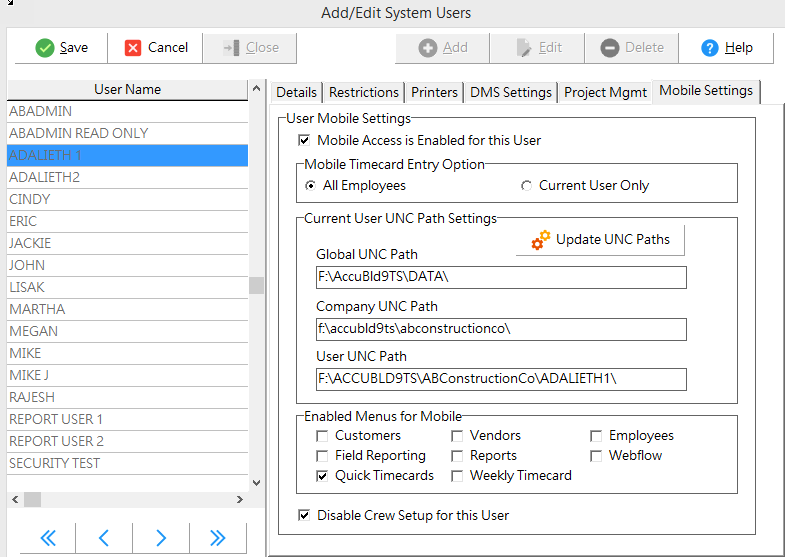
•Check the box 'Mobile Access is Enabled for This User' and click the 'Update UNC Paths' button so that the various data paths can be noted for the user.
•If the user is a supervisor that will be entering time for his crew or multiple employees, then be sure to check the option to allow time card entry to all employees. To prevent a user from entering time to other employees, you must check the 'Current User Only' box and un-check the 'Field Reporting' option. This will prevent the user from accessing the Daily Reports from the mobile app and will limit the time card entry to the Quick Time Card and Weekly Time Card screens. These time card screens will then gray out the 'employee name' field which will display the current user's name only.
•Note: The user must be set up as an employee in AB and linked to the user via the Employee Number field on the User Maintenance Screen > Details Tab before you can use the ''Current User Only' setting.
•The user can be restricted from viewing the various mobile menu options by un-checking the corresponding box in the 'Enabled Menus for Mobile'. For example, an employee can be restricted from accessing the vendor list from the mobile app by un-checking the Vendors box.
•Check the box "Disable Crew Se]Etup for this User" to prevent a mobile user from setting up crews for time card entry in the mobile app.
| 7. | Select Save to add the new user to the user list or select Cancel to ignore your entries. Note that the password is encrypted and is displayed as a series of asterisks. The password may be displayed again by selecting Edit. |
| 8. | To change or remove user information, select the user name and then select the Edit or Delete button. When a user is deleted, the user directory or file path is not automatically removed and must be deleted manually. |