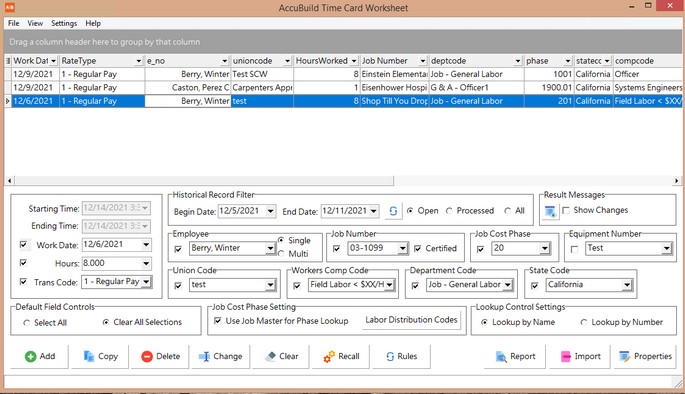
The Time Card Worksheet Screen is presented to you in a grid style and has several features that should make the data entry of time cards easier and faster.
•Multiple users can access this screen at the same time. The user's ID is stored with each entry for audit purposes.
•AB Mobile and AB Time Clock records are automatically displayed in the Time Card Worksheet Screen.
•Create new time card records directly in this screen. Enter or select the field values across the grid in each cell.
•Multiple records can be easily modified by group selecting the records, selecting the fields to be changed, and then entering the new values.
•Easily review the time card records by grouping, sorting or filtering the records on any of the fields.
•Once the records have been reviewed, import the records into the payroll batch file to complete the processing.
|
Current User Only Mode |
|
Navigating the Grid |
|
Time Card Worksheet Buttons |
|
Data Fields |
•The Time Card Worksheet is used by the Payroll Administrator to view and correct time entries that have been posted through the AccuBuild Mobile or AB Time Clock apps. The administrator can also manually enter in regular or overtime pay transactions on this screen. In addition, AB users who do not have access to AB Mobile or AB Time Clock, may optionally be set up to enter their own time into the Time Card Worksheet screen. The 'Current User Only Mode' prevents the user from entering time for other employees. Follow these steps to set up the 'Current User Only Mode'.
oGo to File > System Administrator > Configuration > Accounting Tab > Advanced Settings Button. On the right side of the screen, double click on the advanced setting entitled EnableMyTimeOnlyForTImeCardWorkSheet. If this Advanced Setting is NOT enabled, then the user settings will be ignored on the TimeCard Worksheet Screen.
oGo to File > System Administrator > User Maintenance.
•Select the user name and select the Edit button.
•On the Details Tab, be sure that the Employee Number field contains the employee name. The employee must be set up in the Payroll employee list before it can be added to this screen.
•On the Mobile Settings Tab, select 'Current User Only'. Note: This option controls whether an employee can enter time for themselves or for others on either the AB Mobile or Time Card Worksheet screen.
•Arrange Columns - Customize your view by moving columns in the order that you wish to view them. This customized view is unique for each user, however, unlike some of the other grid screens in AccuBuild, the configuration will not be saved. To move a column, simply hold down the left mouse button on the column header, and drag the column into position. Release the left mouse button when finished moving the column.
•Hide Columns - The visibility of these fields can be controlled through the Properties button (see below) by your System Administrator. Columns can be hidden from view by each user by clicking on the various fields on the Field List Menu which can be found to the left of the first column.
•Grouping Data - Summarize the hours by dragging a column(s) into the top part of the screen to create a group. Drill-down on each group to view the details.
•Filtering – Click on the column header to view the filters available for each field. Use the Custom option to set filters based on formulas such as a range of phase codes . The filters are displayed on the footer of the grid. Select the 'close' box next to the filter display to remove the filter. You may also uncheck the box next to the filter to temporarily turn off the filtering but this will leave the filter available in the footer area.
Hint: Since multiple users can enter transactions into this screen at the same time, set a filter on the Created By field to see the records that only you have created.
•Sorting – Click on any column header to sort the data. A small, gray arrow is displayed next to the column heading to indicate the ascending / descending order of the sort. Only one column can be sorted at a time.
•Select Multiple Records - To select multiple records, hold down the CONTROL key on your keyboard, click on the first record and then click on each of the other records. To select a group of records, click on the first record, hold down the SHIFT key on your keyboard, and then click on the last record within the group; all records between the first and last record will be selected.
•View Audit Trail of Record Changes - Right click on the grid to access this pop-up menu option.
•View Time Card Worksheet Activity - Right click on the grid to access this pop-up menu option.
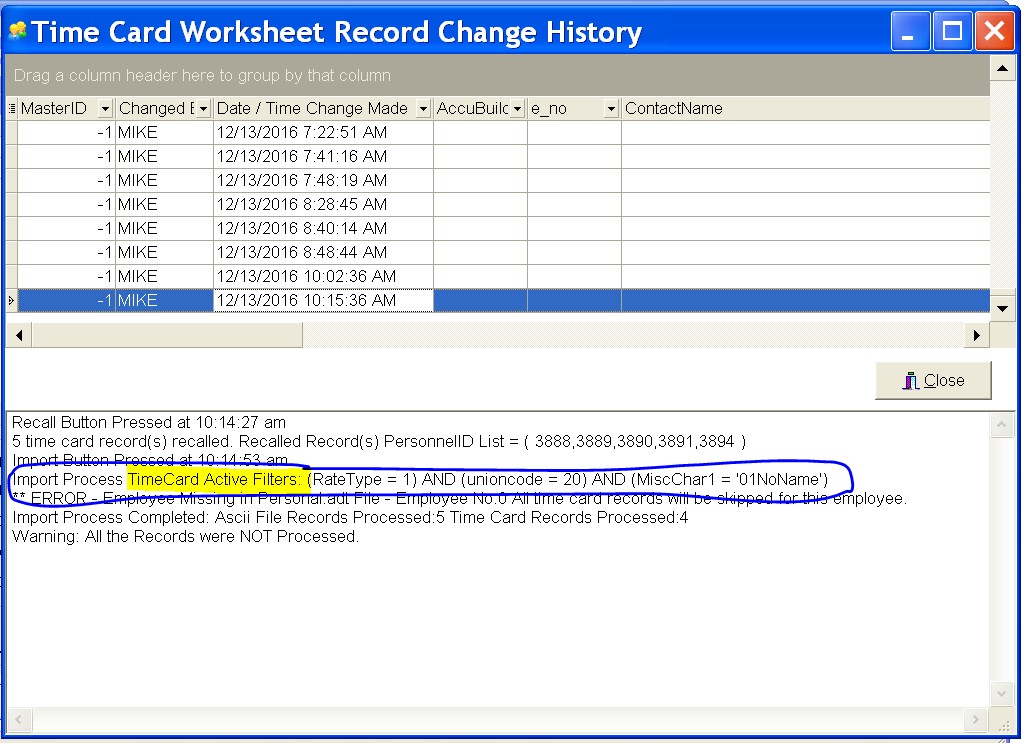
| The audit trail on the Timecard Worksheet Screen will log any filters that are active in the timecard worksheet grid when the Import Button is clicked. You must close the timecard worksheet screen and reopen it in order to update and refresh the log as this log is updated each time the screen is closed. This additional audit information will show ALL columns that had filters set during the time card import process. |
•Add – This option is used to create a new record. Tab across the row to each column and enter/select the value in each cell. Records created in this manner will NOT contain a Daily Report ID. This means that a Daily Report will not be automatically created in the Project Management System from the time card entry. If the Daily Report must reflect the time card information, then be sure to make your entries through the Daily Report or the AB Mobile system. Entries made through the Daily Report or the AB Mobile system will contain a Daily Report ID and will automatically create records on the Time Card Worksheet screen for you.
•Note: If the user's access is set to 'Current User Only ', then the employee number will be filled in automatically each time a record is added.
•Note: If the user's access is set to 'Current User Only ', and the time card record has been added, the Employee No column on the grid will only display records for the current user. The user will not be able to select any other employee number/name within the grid.
•Copy – This option will copy the highlighted record and create a new record with the same values which can then be modified as needed. The TCW business rules will dictate which fields on the new record can be changed. The default rule is to prevent the job number, work date and employee number from being changed if the new record contains a Daily Report ID (PMID) record but this behavior may be changed through the File > AccuBuild Mobile Settings screen as desired.
.
If you want a new time card entry to be linked to a Daily Report, you may select an existing TCW record (that already contains a Daily Report ID) for the same job and same day , and select the COPY button to make a duplicate of the existing record. You may then change any of the fields on this new record OTHER THAN the job or date. For example, if time was incorrectly entered for one employee with a work date of August 1st on Job 101 to phase 1.00, the record could be copied and the hours split between phase 1.00 and phase 2.00. The Daily Report would remain in sync with the time card worksheet records because the job and work date remained the same.
If the time card entry is NOT linked to a Daily Report ID, then any field, including the work date and the job number, may be changed.
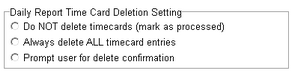
•Delete – The 'Daily Report Time Card Deletion Setting' on the AccuBuild Settings Tab of the AccuBuild Mobile Settings Screen, allows you to set the deletion behavior as follows:
•Do NOT delete Timecards (mark as processed) – This is the default behavior and will require that you also delete the timecard record from the Daily Report in order for the record to be completely removed from the system.
•Always delete ALL timecard entries – This option will automatically remove the timecard entries from the Daily Report.
•Prompt user for delete confirmation – This option will prompt the user for confirmation on the deletion process each time a timecard entry is deleted.
•Change - This option can be used to change one or more field values on multiple records at the same time. Select the records first, then check the box to the left of the field(s) that you wish to change and enter the new value(s). Click the Change button to update the record(s).
•Note: The box to the left of each field MUST be checked in order to use this option. You may wish to remove the check marks once you have completed your change to be sure you don't change a record accidentally.
•Note: The Change Button now enforces the daily report business rules for making sure the date and job number match the Daily Report for all selected records to be changed (Version 9.4.0.1 Green).
•Note: If the user's access is set to 'Current User Only', then the employee number will NEVER be cleared as this would cause the record to be hidden from view. If you do not want the record any longer, then use the Delete Button to remove it.
•Clear - This option can be used to clear one or more field values on multiple records at the same time. Select the records first, then check the box to the left of the field(s) that you wish to clear. Click the Clear button to update the record(s). The fields that can be cleared using this option include: union code, workers comp code, department code, state code, equipment number and phase number. The job number and employee number may be cleared if the entry is NOT linked to a Daily Report. This button is very useful when setting up and testing new Labor Distribution Codes.
•Note: The box to the left of each field MUST be checked in order to use this option. You may wish to remove the check marks once you have completed your change to be sure you don't change a record accidentally.
•Note: If the user's access is set to 'Current User Only', then the employee number will NEVER be cleared as this would cause the record to be hidden from view. If you do not want the record any longer, then use the Delete Button to remove it.
•Recall - This option is used to mark a 'processed' time card record as 'open' so it can be modified. Click on the 'Processed' option in the Historical Record Filter section of the screen and then click on the record that you wish to change, and then click the Recall button. The system will ask you to verify that you wish to recall the record. Once the record has been recalled, click on the 'Open' option in the record filter and make your changes to the record. You may than import the record into the payroll batch file. Note: Recalling a record does NOT remove the original record from the payroll batch file and the re-import of the item does NOT overwrite the original record with the changes, therefore, the original record must be removed manually from the payroll batch.
•Rules - This option is used to execute custom SQL script for company business rules. To be able to utilize this new feature, the new 'EnableTCWorksheetBusinessRulesBtn' option must be enabled in File > System Administrator > Configuration > Advanced Settings. This new framework allows for specific processes to be applied to the timecard entries for updating existing records and / or adding new timecard entries for such things as field changes, identifying overtime calculations etc. Refer to the documentation link above for complete information on this feature.
[Version 10.1.0.1] The backup process for the timecard worksheet company table (PMPERSONNEL) has been updated to use a new backup process which will now maintain the original values for the autoinc field (PERSONNELID) in the backup file. This backup process takes place each time the Rules Button is selected on the TimeCard Worksheet Screen. NOTE: The backup file will set the autoinc field to an integer field type in order to preserve the original values from the company table.
•Report - This option prints a report of all unprocessed time card entries for a selected date range. There are several format options available for printing the Payroll Time Card Listing. Options include 'Exception Error' reporting which will display possible errors such as coding time to a job cost phase that doesn't exist on a specific job or on the phase master (which can occur if you are importing time from a spreadsheet). Be sure to review your options with the AB Support Team.
•Import - This option is used to import all of the displayed records into the payroll batch table for processing. This option will simply add these new records to the payroll batch and will not overwrite existing batch information.
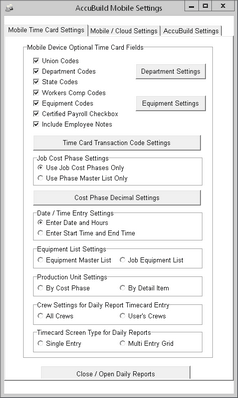
This option opens the AccuBuild Mobile Settings Screen which contains the controls for the Time card Worksheet and the AccuBuild Mobile App, as well as the Mobile / Cloud Settings (This screen can also be accessed through File > System Administrator).
•Mobile Time Card Settings Tab - The settings on this tab will control what the ABM User will see when they enter in time card records.
Note: It is highly recommended that you do not include any optional fields in the mobile view that rely on the employee defaults so that they may not be accidentally changed when the time card entries are created.
•AccuBuild Settings Tab - This tab controls the display fields for the payroll clerks that will be processing the time cards from the Time Card Worksheet Screen. If a field is not displayed, the system will follow the business rules for filling in the values during the import process.
Mobile Time Card Settings |
Department Settings Limit the employee list based on department code. If a department code is selected on this screen, then the employees that have this department code as a default in their employee file will be included in the employee list. Example: Exclude your office staff from the employee list by excluding the office department codes.
Equipment Settings Limit the equipment list by selecting the equipment categories that are visible in ABM. Example: Select the 'Heavy Equipment' category but exclude the 'Office Furniture' category.
Job Cost Phase Settings - Controls whether the user can choose from the master list of phases or from those phases that are set up on the job.
DISABLE Cost Phase Requirement on Job Entries - By default when this setting is UNCHECKED, you must enter a cost phase if the time entry is charged to a job to prevent any invalid job / phase entries from being made. If this box is checked, then this phase requirement will be DISABLED and the MOBILE user can save the time entry to a job without needed to select a cost phase on the job. The payroll administrator would be responsible for assigning the job cost phase in the Time Card Worksheet screen.
Data / Time Entry Settings - Choose the 'Start Time and End Time' option if you want to enter records with exact times such as '08:00 - 09:30' rather than as a lump sum of 1.5 hours.
Equipment List Settings - Choose the 'Job Equipment List' to allow the user to pick from a list of equipment that is located on the selected job. If the 'Equipment Master List' is chosen, then the mobile user will see a complete list of all equipment regardless of the job that the equipment is located. This option also works in conjunction with the Equipment Settings option that limits the equipment categories that can be viewed.
|
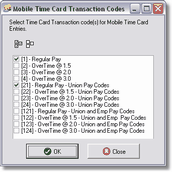
Time Card Transaction Code Settings - This option allows you to choose which transaction codes may be accessed from the worksheet or the mobile device. |
|
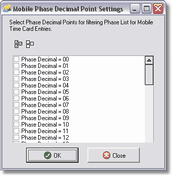
Cost Phase Decimal Settings - If your cost phases utilize the decimal position of the phase to represent labor, materials, etc, then you may select which phase decimals (0 through 99) can be viewed on the worksheet screen. This filter setting affects both the phase master list and the job cost phase list. If you clear (uncheck) all of the phases from this list then ALL phases will appear on the Mobile Screen.
|
|
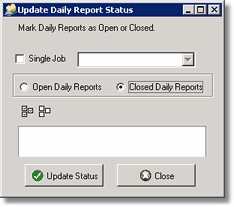
Close / Open Daily Reports - Use this button to change the open/closed status of one or more daily reports for selected jobs. The status of all time card records that are associated to the Daily Report will be updated as well. |
|
Production Unit Settings |
|
Crew Settings for Daily Report Time Card Entry |
|
Time Card Screen Type for Daily Reports |
The option controls the type of time card screen that is used for entering employee time cards from the Daily Reports.
Single Entry - This is the default option Multi Entry Grid - This option allows for multiple entries for multiple phases to be entered along with default start / stop times and lunch break times.
Technical Note: This setting is maintained in the Company CLOUDSETTINGS table under the INTEGER7 field: 0 = Single Entry 1=Multi Entry Grid. |
AccuBuild Settings Tab
|
Do NOT Delete Timecards (mark as processed)
Always Delete ALL Timecard Entries
Prompt User for Delete Confirmation |
AccuBuild Settings Tab
|
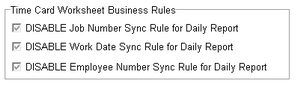
DISABLE Job Number Sync Rule for Daily Report If this option is checked, then the time card worksheet screen will NOT enforce the business rule to make sure that the job number on the time card record ALWAYS matches the job number for the Daily Report that the time card is linked to.
DISABLE Work Date Sync Rule for Daily Report If this option is checked, then the time card worksheet screen will NOT enforce the business rule to make sure that the work date on the time card record ALWAYS matches the date of the Daily Report that the time card is linked to.
DISABLE Employee Number Sync Rule for Daily Report - When this rule is disabled (checked), the employee number on the time card worksheet can be changed to a new employee number that does NOT match the original employee number on the Daily Report for that entry.
NOTE: It is strongly recommended that this rule is enforced for “best practices” in project management so that payroll clerks cannot change the employee number on a Daily Report time card entry That change should be approved and carried out by a Project Manager or Project Supervisor via the Daily Report Entry Screen.
If the employee sync rule is disabled, and an employee number is changed on the time card worksheet for a daily report time card, then the “contractID” field will now be changed to match the new employee number so that the new number is reflected on the Daily Report. In addition, the "contactname" field (Employee Name field on Daily Report Screen) will be changed to reflect the employee name. |
•AccuBuild Mobile / Cloud Settings - The settings on the Mobile / Cloud Settings Tab control the ABM Configuration as well as the stop and start of the ABM Service. The documentation for this screen can be found in the System Administrator > System Controls > AccuBuild Mobile section of the manual.
The following fields may be made visible on the Time Card Worksheet as determined by the Properties button (see above). If any field is not visible on this screen, then the system will follow the business rules to update the fields behind the scenes. Note: If you rely on employee file defaults for specific fields, then it is highly recommended that you exclude those fields from the worksheet so that the values are not changed erroneously.
•Date / Time - Depending on the Property Settings (see above), the time card entries can be entered with a date and lump sum hours per transaction or it can be entered with an exact starting and ending time such as 10:00 - 10:45.
•Trans Code - Select from the list of regular pay and overtime pay. Any other type of transaction code, such as for Vacation, Holiday or Sick pay, will require that you to enter those transactions through the Enter/Update Time Card Screen (the payroll batch file). You can control which regular pay and overtime pay transaction types are visible to the mobile user and on the TCW screen by changing the Property Settings (see above).
•Default Field Control - In order to enter a new time card record or update an existing record using the CHANGE button, the fields that you wish to populate must be checked otherwise the system will ignore the data that you enter into an unchecked field. Use the Select All option to check all fields. To omit one field, remove the check mark next to the field name. To omit all fields, use the Clear All option. BE CAREFUL: When using the CHANGE button to update more than one time card record at the same time, please note that ALL fields that are currently checked will be updated on ALL of the selected time card records.
•Historical Record Filter - Each time that you open the this screen, the system will display the unprocessed time card records for the current day. If you have entered records on the previous day and have not processed them, set the date range to include both days and then click the refresh button to display the records. Processed records may also be displayed for the selected date range by toggling the Processed or All option.
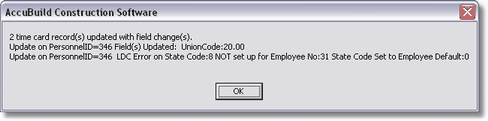
•Result Messages – The Show Changes box will be unchecked by default which will suppress all change messages in order to reduce mouse clicks. Check this box if you want a message to be displayed every time a change is made.
Note: It is recommended to leave this box unchecked as a complete audit log will be recorded for the entire session which you can refer to at any time by pressing the show changes button (located next to the checkbox) if you ever need to review the record change log. If you are going to be setting up LDC codes, you may want to check this Show Changes box to get confirmation messages each time fields changes are triggered in order to test the LDC Code setup.
| · | Audit Trail Features – Right click on the grid to display the pop-up menu options for displaying the audit trail in a grid format. |
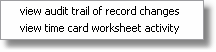
oView Audit Trail of Record Changes - Displays the historical changes made on the highlighted record. (Close/open the TCW to refresh the display or use the Result Messages Button to display the current results.)
oView time Card Worksheet Activity - Displays the historical audit trail on all users. This log is updated every time any user enters the Time Card Worksheet Screen and makes one or more changes. (Close/open the TCW to refresh the display or use the Result Messages Button to display the current results.)
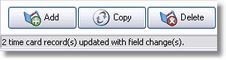
Status Bar - The status bar at the bottom of the TCW screen (below the Add Button) will display whether a field change was made using the Change Button. If a change was made to multiple records at the same time, then click the status bar to see the complete change information.
|
|
| An automatic audit trail will keep track of all time card record changes including a complete log of each Time Card Worksheet session. Each record changed will be identified by the "PersonnelID" field which represents the unique record ID code. The "PersonnelID" is an optional field that can be enabled in the grid as needed. |
Button Click Results – A log is now kept of any activity that is triggered by one of the buttons at the bottom of the screen including the button that was pressed, and information on the records that were processed as a result of the button being clicked.
Grid Record Changes – If a field change on the grid triggers fields to be updated based on a LDC code, the updated fields will be logged along with the record ID (PersonnelID).
•Job Cost Phase Setting - This setting is controlled through the Properties button and can be set so that the user can select phases from the master list or from phases that are specific to the job. If the user has been given access to the option, they may toggle between the two settings by checking or unchecking the 'Use Job Master for Phase Lookup' option on this screen.
•Labor Distribution Codes Button - This option will open the Labor Distribution Codes master list. Use this button to set up new LDC codes or update existing codes.
•Lookup Control Settings - Enter field values by name or by number.
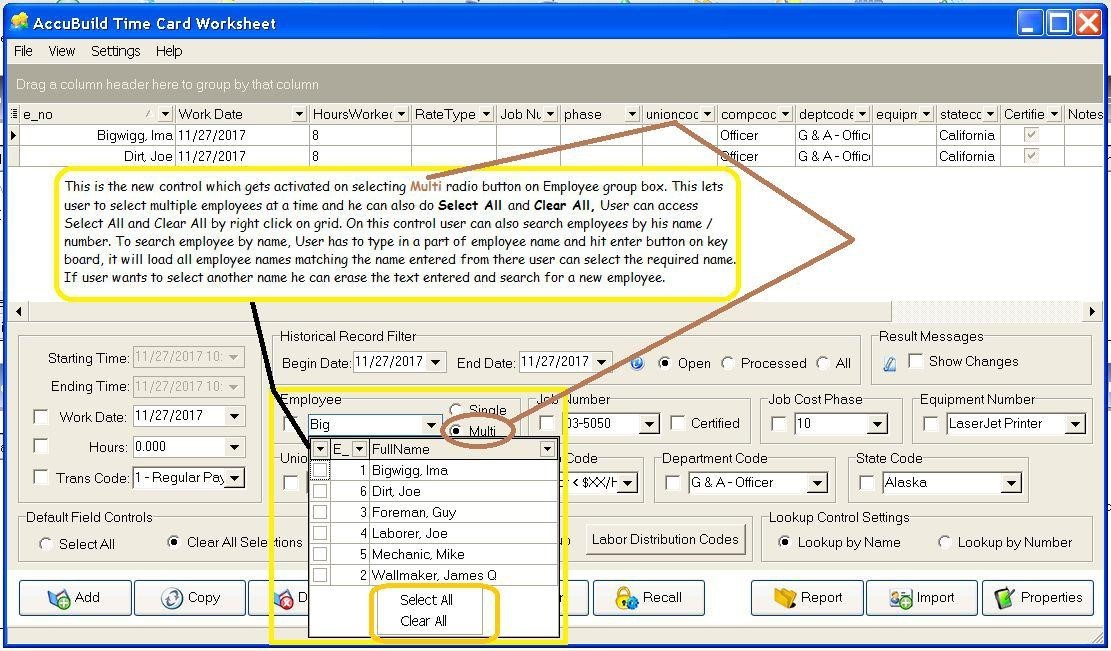
•Employee - This box controls the selection of employees when using the ADD Button when creating new timecard records.
▪Single - Allows you to select one employee from the list of current employees.
▪Multi - Allows you to select multiple employee from the list of current employees. This feature will be very useful when creating timecard entries for multiple employees with the same coding.
oNote: If the user's access is set to 'Current User Only', then none of the controls in this group box will be enabled. The user's employee number will be selected automatically and there will be no multiple (Multi) employee options allowed in this mode.
oThis control has a Select All / Clear All option which enables user to check and uncheck all employees in one click. Use the right-click of the mouse to pop up this menu option.
oThis control provides a search option also, where the user can search for an employee by name (first name or last name) or by employee number (depends on the Lookup Control Settings option for Lookup by Name or by Number ). To use the search option, make sure the drop down control is closed and then type the name or number to search in the control text and push the Enter key. A list of matching employees will be displayed in the drop down list and then the desired employee(s) can be selected (checked). To search for another employee, be sure to clear the text in search area and then type in a new selection and push the Enter key.
oClear the search text and press the Enter key to remove the search filters and return to the full employee list.
•Job Number - Select from the list of current jobs. The certified payroll flag will be automatically updated based on the job list setting whenever the job number is changed on a time card entry. Important Note: The Job Number data control at the bottom of the Timecard Worksheet screen has been updated to immediately change the Certified checkbox next to the control to reflect the certified payroll setting in the Job List for the selected job.
•Job Cost Phase - The Properties button (see above) will determine if you will pick from the phase master list or the list of phases that are specific to the job.
If you select a phase number that has been set up with a Labor Distribution Code, then the non-blank LDC fields will be automatically updated. For example, if you enter time to a phase code that has a workers comp code and union code set up on the LDC phase list, the record will be updated with those values from the LDC record.
•Equipment - If you own the Equipment system, then you will be able to link a piece of equipment to the time card record. The Properties button (see above) can control which equipment categories, therefore the list of equipment, that can be displayed in this screen.
•Equipment Operator - If the employee is an equipment operator, choose the piece of equipment that the employee has worked on that day. When the payroll is processed, the system will add an in-house rental expense to the job, and the meter hours on the piece of equipment will be updated based on the time card hours. Note: The proper department code for an equipment operator MUST be used in the time card transaction for the rental rate to be applied to the transaction. Review the Equipment system documentation for more information on creating in-house rental rates.
•Mechanic - If you have an in-house mechanic, then the mechanic's time can be linked to a piece of equipment which will create a historical transaction of maintenance expense on the piece of equipment. Note: The proper department code for a mechanic MUST be used in the time card transaction for the maintenance expense to be applied to the transaction.
•Union Code - Select from the list of current union codes to pull in hourly pay rates from the union table. When the union code is changed, the department code will be updated with the default department code found in the union table if a default code exists. In addition, if a department code change occurs based on the new union code, the comp code will be changed if the new department code has a default comp code. Note: Exclude the union field on the worksheet if you are relying on the default union code in the employee's file as you do not want this erroneously changed on the time card screen. In most cases, only union companies have default union codes in the employee file.
•Workers Comp Code - Select from the list of workers comp codes. If the time card entry does not contain a union code, then the workers comp code field will update automatically based on the default in the employee's file. If the time card entry is linked to a union code, and the union code is linked to a department code, then the workers comp code will be updated based on the union code's worker comp code. If the department code on the time card entry is changed, and the new department code is linked to a workers comp code, then the entry will be automatically updated with the department's workers comp code.
•Department Code - Select from the list of department codes.
•State Code - This field is only necessary for companies that own the multi-state payroll feature. In most cases, companies that do business in multiple states will set the payroll state code on each job. In this case, do NOT include the state code field on the time card worksheet screen; let the system do the work for you. If you have not set up the payroll state codes on each job (again, this is only necessary if you work in multiple states), then you will need to include the state code field on the worksheet so that the user can identify the proper state; the transaction should reflect the state in which the job is located.
•Daily Report ID - The Daily Report ID field is read only and is visible in the TCW grid. If the field is not blank, then it indicates that the time card entry is linked to a Daily Report. Time cards that are entered through AB Mobile or from the Project Management Daily Reports > Personnel Tab will be contain a Daily Report ID. If these time card records are edited in the Time Card Worksheet screen, then the records in AB Mobile and the Daily Reports will also be updated. However, if new entries are created with the ADD function, then they will NOT contain a Daily Report ID and therefore the record will not appear in the AB Mobile or Daily Report screens.
•Closed Daily Report - This field indicates if the Daily Report that the time card entry is linked to has been closed. This is a read only field in the grid. This field is automatically updated each time the related Daily Report is updated in the PM Log or whenever Daily Reports are closed from the AccuBuild Mobile Configuration Screen. NOTE: Use the Integrity Test option on the Project Management menu to set ALL time card records on ALL daily reports (both closed and opened) to have the same open/closed status.