The Time and Material (T&M) Billing Feature allows for job cost transactions (payroll, accounts payable, etc) to be billed. Each cost phase on a project must be set up with a single markup billing code which indicates how the costs under that cost phase will be marked up and billed on the customer invoice.
In addition to job cost transactions and vendor purchases, the system is fully integrated with the AccuBuild Mobile and AccuBuild Time Clock modules for including individual time card transactions and related notes providing a complete solution for time based billing and consulting services.
The billing process is accomplished by running a query of all cost transactions that have not been billed previously and marking those cost items up based on the phase code of the cost and the markup formula set up for that phase code.
This is an extremely robust process which does not rely on transition cutoff dates but rather the record ID of each cost transaction to make sure that ALL transactions are including in the billing preparation.
Once the billing transactions have been created, the user can edit the billing markup amounts and decide which transactions to include on the T&M billing. Any transactions that are not included in the current invoice will show up the next time the job is invoiced. In addition, if a T&M Invoice is voided in the system, all of the cost transactions for that invoice will be marked as billable costs for the next invoice.
This T&M billing feature can also be used on a job that is set up for traditional contract billings (schedule of values progress billings). For example, you could set up “extras” that need to be billed outside of the original contract, by using specific T&M cost phases on a job to track the extra costs so that they are picked up on the T&M invoice.
The T&M invoices are generated through the Receivables > Misc A/R Invoices option. The T&M invoices will automatically be included in contract totals, job billing totals, and job receipt totals (once paid) on the various Contract Status Reports.
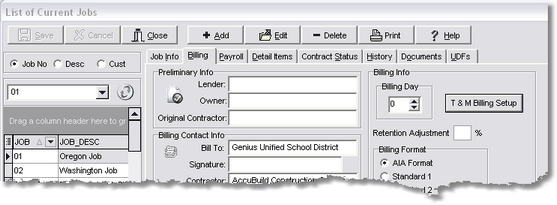
Before creating the T&M invoice, use the T&M Billing Setup Button located on the Job Cost > Update Jobs > Billing Tab to set up the markup types on each cost phase that you want to include on the T&M billing:

Refer to the topics listed below in the Job Cost Activities section of the manual for more information on setting up T&M markups and creating T&M billings.
Navigating the Time & Material Setup Screen |
|
Time & Material Setup Process |
|
Create a Time & Material Billing |
Navigating the T&M Billing Setup Screen
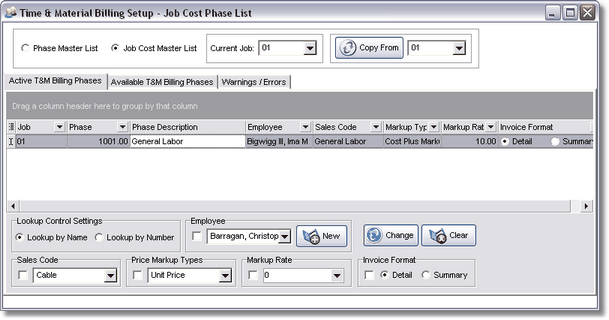
The Time & Material Billing Setup Screen is used to set up the markup codes and rates for the cost phases on a specific job or on the phase master list.

Use the options at the top of the screen to select the list of phases that you want to use for T&M Billing.
| • | Phase Master List – When this option is selected, you will be able to set up T&M Markups for one or more phases on the Phase Master List. |
| • | Job Cost Master List – When this option is selected, you will be able to set up T&M Markups for specific job cost phases that exist on the job. Use the Current Job drop down list to switch between jobs. |
| • | Current Job – This field is only available with when the Job Cost Master List has been selected. |
| • | Copy From Button – Use this button to copy T&M Markups from an existing job to the current job. This option may only be used with the Job Cost Master List option. The markups will only be copied to those phases that exist on both jobs. |
Example: If you want to copy the T&M Markups from job 1 to job 2, then select job 2 in the Current Job field and select job 1 in the Copy From field and then click the Copy From Button. If phase 1001 and 1002 exist on job 1, but only phase 1002 exists on job 2, then the only markup that will be copied to job 2 is phase 1001.
Data is displayed on the screen on the following tabs:
•Active T&M Billing Phases - This tab displays the phases that are linked to T&M Markups. If you want to remove one or more phases from this list, highlight one or more rows (shift-click for multiple rows), right click to display the pop up menu, and then select "remove selected phase(s) . . .". This action will remove the phase(s) from the "active" list and add them back to the "available" list.
•Available T&M Billing Phases - This tab displays the phases that are not linked to T&M Markups. If you want to add one or more phases to the active list, highlight one or more rows (shift-click for multiple rows), right click to display the pop up menu, and then select "add selected phase(s) . . .". This action will remove the phase(s) from the "available" list and add them to the "active" list.
•Warnings / Errors - This tab will display any warning or error messages associated with the T&M Markups Master List. For example, if a cost phase is removed from the phase master list or from a job, and that cost phase exists on the Active T&M Billings Phases Tab, it will be noted on this tab until it is removed from the "active" list.
The grid display on this screen supports grouping, filtering, and sorting on any column to allow you to locate and organize your information as desired. Please note that once you close this screen, your customized view of the grid will be replaced with the default view settings.
•Grouping – Column grouping is accomplished by dragging the desired column heading up to the top of the screen in the grouping area. You can group multiple fields, and as these fields are dragged into the group area, a tree structure is dynamically built on the grid to represent the grouping order. To remove a field grouping, simply drag the field back to the column heading area on the grid.
•Filtering – To filter the data, click on the down arrow next to the column heading and pick your filter option. A unique list of each field value will be available to select fields that contain a single specific value. You may also use the Custom Option to create filters based on formulas such as a value 'equal to' or 'greater than'. Filters are displayed in the footer of the grid. You may toggle the check box next to the filter to turn off/on the filter. Click the 'X' next to the filter to completely remove the filter.
•Sorting – Columns may be sorted by clicking on the column heading of any column. A small arrow is displayed next to the column heading to indicate the ascending / descending order of the sort. Only one column can be sorted at a time.
•Rapid Entry Columns – Phase Group and Phase Category columns can be used for quick filtering of cost phase codes. These fields are not part of the default view but you may display them by clicking on the column header on the far left of the grid to display the fields.
| o | Phase Group – This is the integer portion of the phase code (all the digits to the left of the decimal point on the phase code). Use the filter option on this column to quickly filter the grid for a group of related phase codes so that you can change all the markup fields at one time. |
| o | Phase Category – This is the decimal portion of the phase code (all the digits to the right of the decimal point on the phase code). Use the filter option on this column to quickly filter the grid for a group of related phase category codes so that you can change all the fields at one time. For example, if you use ".01" for all your labor phases, you can select this filter to quickly set up your markup codes as a group at one time, using the filter in combination with the group selection feature. |
The field setting controls are located at the bottom of the screen and are used to set and clear the fields for selected phases.
| • | Lookup Control Settings – This setting is used to set the display of the Markup Types by either the description (Lookup By Name) or the type number (1-7 and 99) (Lookup By Number). |
| • | T&M Billing Field Controls – These are a series of drop down controls for each field including Employee (job phases only), Sales Code, Price Markup Types, and Price Markup Rate. Each drop down control has a check box next to it for enabling the markup field for use with either the Change Button or the Clear Button (see below). |
oChange Button – This option is used for changing markup values on selected phase record(s). All control fields that are checked at the bottom of the screen will be changed to the current value in the control field.
oClear Button – This option is used for clearing the markup values on selected phase record(s). All control fields that are checked will be cleared.
oEmployee Markup Control – The employee markup control works just like the other markup controls when the Change or Clear function is used. It also has a New Button next to the control which is used to copy a selected phase(s) and create a new record(s) where the employee number is linked to the new phase(s). Use this button when you need to add phases for specific employees in order to override the default markup controls for a cost phase.
Time & Material Billing Setup Process
1.Select the cost phases that will be included for T&M billings on the Active T&M Billing Phases Tab.
1.You may select from either the Phase Master List (phases that can be used on any job) or the Job Cost Master List (phases that have already been set up on a job). If you choose the Job Cost Master List, you will then be prompted to select a specific job.
2.Click on the Available T&M Billing Phases Tab to access the list of available phases.
3.Select one or more phases (shift-click for multiple phases) and then right click and select the pop-up menu option titled “add selected phase(s) to the active billing phase list. The selected phases will be added to the billing phase list and removed from the available tab. Only the phases that are listed on the active phase list will be used for the T&M billing process.
4.If you need to remove one or more phases from the active phase list, use the same select process and right click to see the pop-up menu for removing the phases and adding them back to the available phase list.
2.Phase Markup Settings: To change the value of a field on one record, select the value from the drop down list on the column in the grid. If you need to change the field value for more than one record at a time, then use the control fields at the bottom of the screen. Check the box to the left of the field, select the value from the drop down list and then click the Change Button. Duplicate phases are not allowed on the list with the exception of employee specific phases (see below).
| For each phase on the Active Phase Tab, you can set up a single Markup Type which will define how the costs on that phase will be marked up on the T&M invoice. Markup calculations can be based on units (payroll hours / payable purchase units / journal entry units) times a unit price, markup percentage on a cost amount, or production units (refer to Job Cost > Enter Production Units for more information on this type of entry). |
•Markup Types (This list is embedded within the program and may not be changed by the user).
1.Unit Price
2.Cost Plus Markup %
3.Production Unit Price
4.Payroll Cost with Burden Plus Markup %
5.Payroll Cost with Department Burden Plus Markup %
6.Payroll Cost with All Burden Plus Markup %
7.Payroll Cost Excluding Burden Plus Markup %
99.Non Billable Cost
The Markup Rate field is used to hold the rate which will either be a unit price or a percentage depending on the markup type field. If using a percentage markup, enter the percentage as a whole number: 10% would be entered as 10.00
If you need to have specific markup rates for individual employees in your firm, you can add the same phase more than once by assigning a different Employee using the New Button. This will handle the situations where certain employees have higher markup profit margins. The employee option is not available if you have selected the Phase Master List in Step 1. You may not have an employee assigned to the same phase on the same job more than once.
Select a Sales Code from the Receivables > Sales Master List to be assigned to each phase. The sales code will control the revenue account that will be used when the T&M Invoice is created and will also indicate if the sales on this phase are taxable for sales tax purposes.
The Invoice Format field indicates if the individual cost transactions should be included on the T&M invoice (Detail) or if the costs are to be summarized on the invoice by cost phase (Summary). If summarized, the description of the cost phase will be used as the item description on the invoice.
3.Another option is to utilize the Tailored Solution framework that allows for individual company business rules to be implemented for the markup computations on the cost transactions. A new tailored script can be designed for companies which can override the default markup business rules in AccuBuild. The requirements for implementing this new feature are outlined below:
○A custom script must be designed and set up by an authorized AccuBuild Support representative using the SQL Script Utility built into the AccuBuild Program.
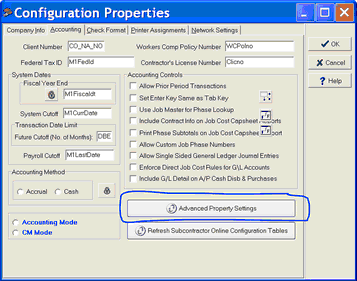
○The new Advanced Settings Feature titled TimeAndMaterialInvoiceCustomPricingRules must be enabled using the Advanced Property Settings Button on the Company Configuration Properties screen.

Create a Time & Material Billing
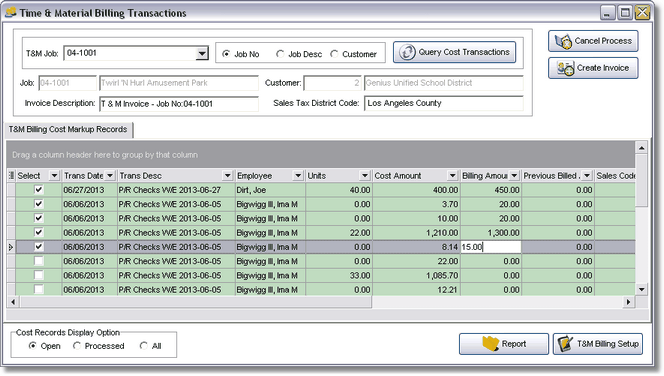
Time & Material Invoices are created through the Receivables > Generate Misc Invoices Screen. Use the T&M Button at the top of the screen to open the Time & Material Billing Transactions Screen. This screen is used to automatically pull items items for a T&M Invoice from the cost transactions in the system. The invoice creation process consists of three main steps: select the job, query the cost transactions, and create the invoice.

1.Select the Job - Choose a job from the T&M Job field drop down list. Use the options to the right to toggle between Job Number and Job Description to select a job. Once the job is selected, the job description and customer name will be updated on the screen. In addition, the Sales Tax District Code will be updated if it exists on the job and a default invoice description will be created.
•Invoice Description – Review the description and edit as necessary.
•Sales Tax District – If a sales tax district code exists on the job, then this field will default to that code. You may also select the sales tax district from the drop down list. The tax district will define the sales tax rate for any items on the invoice that are taxable.
2.Query Cost Transactions – Click this button to create the list of cost transactions that need to be billed on the project. The system will then automatically build a list of all transactions that have not been billed previously and list them in the grid.
•Cost Records Display Option (located at the bottom of the screen) – By default, the cost transaction grid only displays the cost transactions that have not been billed yet, however there are three options for displaying the transactions:
1.Open – This is the default option and displays only the cost transactions that have not yet been billed. These items are displayed with a green background color.
2.Processed – This option is used to display the cost transactions that have already been billed in a prior T&M Invoice. These items are displayed with a white background color.
3.All – This option is used to display both Open and Processed items.
•Navigating the Grid - When reviewing the cost transactions, you can tailor the grid on the screen to display or hide any of the related fields that are associated with the cost transactions by clicking the icon located at the top left of the grid column headings. You can also group the cost transactions by any field by dragging the field up to the dark gray area at the top of the grid.
•Data Entry - Most of the fields on the grid are 'read only' and cannot be changed. However you can change the Select, Billing Amount, Billing Description and Notes fields.
oSelect – By default, the system will mark each item as 'selected' so that the transaction is included in the invoice. Uncheck the box to exclude the transaction on the current invoice. Any items that are not selected will be listed again on future invoices for the job.
| Note: If you do not want the item to be billed on a future invoice, leave the item selected and then change the Billing Amount to zero. |
oBilling Amount – The billing amount field is automatically calculated based on the markup type and markup rate that was set up on the associated cost phase. This amount may be changed as needed to override the calculated amount.
| Note: Once a cost transaction has been billed on an invoice, it cannot be billed again. In other words, there are no partial billings for an individual cost transaction. Once the item has been billed, no matter what the billing amount was, it will never be included on another invoice, unless the invoice that it was billed on is voided. |
oBilling Desc – This field holds the description that will be used on the invoice. The billing description field may contain up to 255 characters.
oNotes – This field holds any notes for the employee time card entries made via the AccuBuild Mobile or the AccuBuild Time Clock products. This is typically used for descriptions of tasks that were carried out for each set of employee time card hours but you may edit this field in this grid as needed.
•Report Button - Use this button to print the Time & Material Supporting Transactions report (arinvtm1.122) which is a list of the cost transactions that will be included on the invoice. This report can be found in the Reports > All Forms > Customer A/R Invoice Forms section of the program. Make a copy of the form and modify it in order to tailor it specifically to your company's needs. Then use the Reports > Custom Form Assignments option to replace our default format with your custom form.
•T&M Billing Setup Button – Use this button to review and edit the phase markup codes.
![]() Note: If any changes were made to the billing setup on this job, they will not be reflected in the current set of billing transactions. You will need to re-create the billing transactions (Query Cost Transactions Button) in order to incorporate any new billing setup changes.
Note: If any changes were made to the billing setup on this job, they will not be reflected in the current set of billing transactions. You will need to re-create the billing transactions (Query Cost Transactions Button) in order to incorporate any new billing setup changes.
•Cancel Process Button – Use this button to cancel the creation of the T&M Invoice.
3.Create the Invoice – This button is used to create the actual invoice from the selected cost transactions. The invoice is created and the user is then returned to the A/R Miscellaneous Invoice Screen. The new invoice will be displayed on the screen and can then be further edited and processed through the accounting system. The billing amount on any item can be changed on the Misc A/R Invoice screen and the actual billed amount will be stored in the 'Previous Billed Amount' field on the T&M Billing Transactions Screen. (Select 'All' on the cost display selection in order to view items that have been previously billed.)
| During the invoice posting process, all of the cost transactions that were used to compute the invoice will be marked as billed so that they do not show up on any future invoice. However, if a T&M Invoice is voided in the system, then all cost transactions on that voided invoice will be marked as not billed and they will be included on the next T&M Invoice for that job. These business rules ensure that every cost transaction will be tracked in detail and never missed by mistake. |
T&M Invoices will be automatically marked as 'include in contract' which means that they will be included in the Total Billed amount, as well as the Total Contract Receipts once paid, on the Contract Status Reports. Each invoice amount will also increase the total contract amount on the job.
•T&M Invoice Form - The T&M invoice (arinv3.121) can be found in the Reports > All Forms > Customer A/R Invoice Forms section of the program. Make a copy of the form and modify it in order to tailor it specifically to your company's needs. Then use the Reports > Custom Form Assignments option to replace our default format with your custom form.