| 1. | To create a new miscellaneous invoice, select the Receivables > Generate Misc Invoices option and then select Add at the top of the Accounts Receivable Invoices screen. This type of billing is entered into a temporary batch file, armibat.adt, that is located in the user's personal directory. |
| Use the Auto Create Button to access the following options: |
|
| 2. | Enter the general invoice information. |

•Client - Enter the customer name or select the customer from the drop down list. If the customer does not already exist in the system, then select the client icon to add a customer to the client master file (clients.adt). AccuBuild will return to the Accounts Receivable Invoices screen once the new client information has been added.
oNew Invoices - when new invoices are entered into the batch, only the active customers will be available for selection.
oExisting Invoices - If an invoice exists in the batch for a customer that has subsequently been marked as inactive, the screen will still show the inactive customer name and allow the invoice to be processed.
•Invoice No. - AccuBuild will display the next available invoice number. Duplicate invoice numbers may not be used.
•Hold Retention - Enable this option to withhold retention from the total invoice. Select a percentage between 1 and 10.
•Description - Enter a summary description of the invoice.
•Date - Enter the date of the invoice. The transactions for this invoice will be posted through the system with this invoice date.
•Tax Dist - If the invoice will include taxable items, then you must select a sales tax district. Sales tax district codes are set up in the Clients module and a code may be linked to each customer as a default but the code may be changed as needed on each invoice. If you need to change or delete the default sales tax code as it appears on this screen, then click on the 'Erase' icon next to the Tax Dist field.
•Overhead & Profit % - An overhead and profit amount based on a percentage of the invoice total (including sales tax, if any) may be included on the invoice by enabling the Overhead & Profit option and selecting the applicable percentage.
•Job and Include in Contract - Enter the job number, if applicable. If a job is entered, the invoice may be optionally included with the contract status totals. In other words, the contract amount and the billing totals on the job will be increased by this miscellaneous billing.
•An Advanced Setting is available to automatically check the 'Include in Contract' box whenever a job number is included on the invoice. To enable this setting, go to File > System Administrator > Configuration > Accounting Tab > Advanced Settings and select the option titled IncludeInContractOnMiscARInvoiceAutoCheck
•Ch Order - If the Include in Contract is enabled, then the invoice can be designated as a change order.
•Hold - Check the HOLD box to prevent selected invoices from being posted with a batch. Any invoice in a batch that is marked as hold will remain in the batch until the hold is removed. This feature, in conjunction with customized invoice formats through MAR, allow for customer quotes to be created from the A/R invoice screen and then held in the batch until accepted by the customer. A copy of the existing invoice layout can be copied and modified to create a customer quote. When the invoice is printed, the user can choose whether to print the invoice as a quote or as an actual invoice. Once a quote has been accepted, the hold can be removed and the invoice can be printed and posted from the existing entry.
| 3. | To enter an item on the invoice, select the New button on the right side of the screen. |
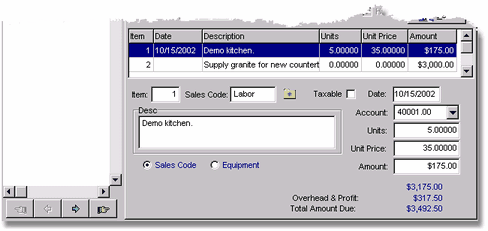 |
•Item - If the Include Line Numbers on Misc Invoices option in the Receivables > Properties option has been enabled, then each item entered on the invoice will be prefaced with a line number. Item numbers may not be changed but a new item may be entered between two existing items by selecting the Insert button.
•Sales Code or Equipment Code - The item may be linked to a Sales Code or Equipment code.
| The Sales Code defines the unit price, whether an item is taxable, and to which revenue account that the item will be charged. If a sales code is not selected, then the item will be charged to the default revenue account as set up in the Accounts Receivable Properties screen. The item description will automatically be pulled in from the code but additional description may be added on the invoice screen. When the description is complete, press Tab to skip to the next field. |
| Note: If the sales code has been set up as taxable, then AccuBuild will automatically create the last item on the billing as the sales tax amount. This tax amount represents the total tax on all taxable items. |
| The Equipment Code is only available if you have purchased the Equipment module. If the billing item is linked to an equipment code, then a transaction (type 35) will be posted in the Equipment module representing rental income for the equipment. The rental rates will be pulled form the equipment list using outside rental rates with an operator. The general ledger accounts will be pulled from the associated equipment category fields for Outside (third party) Rental Income. Equipment rental line items will be taxed if the equipment category has been set up as taxable. The Hours Meter is not updated with this transaction type. |
•Date - Enter the date that will be associated with this item. This date field is optional and this field may be left blank. An example of when the date field would be used is when creating a time and material billing and you wish to list the different dates on which the work was performed.
•Account - If a sales code or equipment code has been selected, then the account field will be updated with the revenue account set up with the code. If the item is not associated with a sales code or an equipment code, then the default revenue account, as set up in the Accounts Receivables Properties screen, will be used. The revenue account may be changed on this screen as necessary.
•Units - Enter the number of units that are being billed. Note that unit descriptions are only defined with a sales code or an equipment code, therefore, you may need to include the unit description in the item description if the item is not linked to a code.
•Unit Price - If the sales code has been set up with a unit price, then the price will be automatically displayed but it may be changed as needed. If the sales code that has been entered contains secondary unit pricing , and the 'Include in Price Calculations' checkbox is enabled for that code, then the displayed unit price will be the calculation of the primary unit price * the secondary unit price. If a lump sum is being billed, then skip the unit price field and enter the billing amount in the Amount field.
•Amount - The amount is calculated for you by multiplying the total units by the unit price.
| 4. | To enter another item on the same invoice, select the New button. Note that invoice totals are displayed at the bottom of the screen as each new item is saved. To add a new item between two existing items, select the Insert button. Use the Delete button to remove an item from the invoice. When all items have been entered, select Done and then Save. |
| 5. | Repeat the above steps for any additional invoices that you would like to enter into the current batch. |
| 6. | Highlight an invoice in the browse screen and then select Edit in order to change an invoice in the batch. Change or skip the client field and then select the Edit button on the right side of the screen. Change any item on the invoice and then select Done and Save. |
| Select the Print button to print all of the invoices in the batch or to print a selected invoice. Select 'Yes' to print all of the invoices at one time or select 'No' to print the single invoice that is currently highlighted in the browse screen. All entries should be verified for correct invoice totals and descriptions before posting. You will be given a choice to print the 'Traditional' or 'MAR' invoice format. The traditional version is the default form layout while the MAR version can be customized by the user through the Reports module. Note: The MAR report library also contains a sample invoice design called Misc A/R Invoice - Secondary Unit Pricing if needed. |
| At this point, any invoice in the batch may be removed from the batch by highlighting the invoice in the browse screen and then by selecting Delete. Invoices that have already been posted through the system may not be deleted through this option. Please refer to the Void Misc Invoices option for more information on this function. Once all of the entries have been verified, select the Post button at the top of the screen to spread the invoice information to the historical miscellaneous invoice file (armihist.adt), the sales journal (sales.adt), the open receivable invoice file (openar.adt) and the general ledger detail file (gldetail.adt). |