The Project section of the screen displays a list of project schedules. Each schedule is listed in a grid with several columns and the list can be sorted in any order by clicking on the column heading. The row of buttons at the top of the project list can be used to create and maintain the project schedule information. A pop-up menu is also available by right-clicking on the project list.
![]()
|
Open Project Gantt Chart |
|
Properties (Edit Project) |
|
Project Calendar |
|
Add Project Schedule |
|
Delete Project Schedule |
|
Open Resource Gantt Chart |
|
Copy to Baseline Schedule |
|
Make Copy of Schedule |
|
Reports |
Other Topics: |
|
|
Clear In-Use Flag on Project Schedule |
|
Security |
| 1. | Click on an existing project schedule and then click the Open Project button (or simply double click on the project schedule) to display the Project Schedule (Gantt Chart) screen. Use this screen to design the initial layout of the project schedule and update the schedule throughout the course of the project. Refer to the documentation on the Gantt Chart Screen for more information |
| Note: You can use this option to open a Baseline Schedule, but you will be limited to viewing and/or printing the schedule. |
| 2. | Click on the Project Properties button to change the settings. Refer to the Add Project Schedule documentation for more information on the Project Properties screen. |
| 3. | Only one project can be opened at a time but this screen may remain open while you access other AccuBuild modules. |
| 4. | The project schedule must be closed before another use can open the same schedule. |
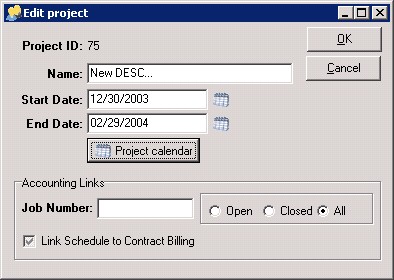
Project Properties and Project Calendar
The Project Properties button is used to edit the properties for each schedule which include the Project Calendar and the link to the accounting system.
| 1. | Add or Open a project schedule then click the Project Properties button. |
•Project ID – This number is automatically assigned when a new schedule is added and identifies the unique schedule ID number.
•Name – The description entered in this field will be displayed as the Project Description on the project list.
•Start Date – Enter the starting date of the project.
•End Date – Enter the ending date of the project.
•Project Calendar Button – This button will open up the Calendar Rules for the project. Refer to the Project Calendar documentation for more information.
•Job Number – This field is optional and will allow you to link the schedule to a job number in the Job Cost module. You may link an unlimited number of schedules to the same job number. Note: If one or more tasks on the project schedule have been linked to job detail items, then you will not be allowed to change the Job Number field as this would break the links between the schedule and the job detail items. As long as no items are linked, you can change the job number at any time.
•Link Schedule to Contract Billing – If the schedule is linked to a job number, then this option will allow the schedule to link to the contract billing items for that project. The percentage of completion on each task in the project schedule can then be used in generating the contract billing.
| 1. | Click the Add Project button to add a new project schedule. |
| 2. | Enter the project information on the Project Properties screen. Refer to the Project Properties documentation for complete information. |
| 3. | Click Save. The project will be assigned a new Project ID and added to the project list. |
| 4. | After adding a new project, click on one of the project list column headings to refresh the screen and see the new project. |
| 5. | Hint: Consider setting up a 'template' project schedule with no tasks but which contain a 'typical' set of calendar rules for your company. This project schedule can be copied to new jobs and will prevent the need to set up calendar rules for each project manually. Refer to the documentation on Calendar Rules and Working Hours for more information. |
| 1. | Click the Delete Project button to remove an existing project schedule and all associated tasks. Use caution when deleting projects from the list. |
| 2. | If you delete a project by mistake, the project can be restored by setting the DeletedProject field to False in the Projects table. Please call AccuBuild Software Support for help in recovering a deleted project. |
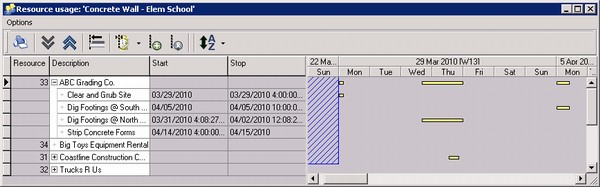
| 1. | Click the Open Resource Schedule button . |
| 2. | The resource schedule is a read-only view of the resources that are used on the project and cannot be changed from this screen. All resources are listed on the resouce schedule, whether or not they are used on this project. If a resource is used on the project, then the tasks where the resources are used will be displayed on the schedule. The tasks are grouped by Resource name. |
| 3. | Please refer to the Schedule Button Bar topic within the Project Gantt Chart Screen documentation for information on the button functions. |
| 4. | The project schedule must be closed before another use can open the same schedule. |
| 1. | Select a job schedule and click the Copy to Baseline Schedule button to create a read-only copy of the schedule. The new baseline schedule will be named 'Copy of . . . ' with the project description. This option can be used to take 'snapshot' copies of the schedule at different points (milestones) during the progress of the project. For example, once the original job schedule is created, you may wish to take a snapshot of the original schedule for a reference starting point. |
| 2. | Baseline Schedules can be opened for viewing and printing purposes. If you are going to be reviewing the job schedule with several parties at a jobsite meeting, make a baseline copy of the project schedule for the meeting so that you can reference that schedule, or print addtional copies of that baseline schedule as needed. |
| 3. | You can also edit the Name field under the Project Properties. For example, you may want to change the description on the schedule to include the date the baseline schedule was created. |
| 4. | If you make a copy of a baseline schedule, the new copy will NOT be flagged as a read-only baseline schedule and changes can be made to the new schedule. |
| 1. | Click on an existing project schedule and then click Make Copy of Schedule. |
| 2. | Make changes to the new project schedule as desired. |
| 3. | If a Baseline Schedule is copied, the new copy will NOT be flagged as a read-only Baseline Schedule and changes can be made to the new schedule. |
Clear In-Use Flag on Project Schedule
This option is only available on the pop-up menu (right-click on the screen) and can be used to clear a lock on the project schedule when a problem arises and the schedule cannot be accessed. AccuBuild uses the flag to prevent multiple users from changing the same schedule at the same time. The flag is cleared automatically whenever a schedule is closed, however, if the AccuBuild Program is terminated due to a power failure or workstation lock up, this flag may remain set.