The Project Schedule (Gantt Chart) is displayed when the Open Project Schedule button is selected. Use this screen to design the initial layout of the project schedule and update the schedule throughout the course of the project. Note: You can use this option to open a Baseline Schedule, but you will be limited to viewing and/or printing the schedule.
|
Tasks - Bar Display |
|
Tasks - Data Tabs |
|
Task Button Bar |
|
Schedule Button Bar |

•Blue Bar – The blue bar represents the parent task of all tasks that are grouped under this task. The length of this bar cannot be changed and will always represent the total duration of all child tasks within the group. If the group bar is moved, then all tasks within the group will be moved as well.
•Yellow Bar – The yellow bar represents the scheduled starting and stopping time for the task. You can move this bar or stretch this bar to change the dates. You can also change the scheduled start date and scheduled stop date on the Dates tab to move the yellow bar as well.
•Black Bar – The black bar inside the yellow bar represents the percentage complete (progress) on the task. You can drag this bar to increase or decrease the percentage or you can update the percentage from in the Progress field on the General tab. The black bar percentage is always based on the Scheduled Start and Scheduled Stop dates.
•Gray Bar - The gray bar represents the Actual Start date and Actual Stop dates of the task. When these dates are updated, the gray bar is displayed over the yellow bar which makes it easy to compare the scheduled dates to the actual dates.
•Green Bar – The green bar represents a task that is marked as running in the Status field of the General tab.
•Resource Names – If resources have been assigned to a task, then the resource names are displayed in black text on the right side of the yellow bar.
Fields for each task are contained on two tabs that are located on the bottom half of the screen.
|
Task Tab |
|
Resource Allocation Tab |
![]()
| · | Apply Changes – Use this button to save any changes to the task information. This button will be enabled automatically whenever a change is made to a task. |
| · | Cancel Changes – Use this button to cancel the task changes |
| · | Add Task – Add a new task to the schedule. |
| · | Add Child – Add a new task under the selected task. |
| · | Delete Task – Delete the selected task. |
| · | Start Task – This will set the Status field of the selected task to "Running". |
| · | Stop Task - This will set the Status field of the selected task to "Completed". |
| · | Cancel Task - This will set the Status field of the selected task to "Terminated". |
Located at the top of the screen, these buttons are used to update the schedule.
![]()
| · | Apply Changes – Save any changes to the schedule. This button will be enabled automatically whenever changes are made to the schedule. Note: Some buttons on the Schedule Button Bar cannot be used until the Apply Changes button has been clicked. |
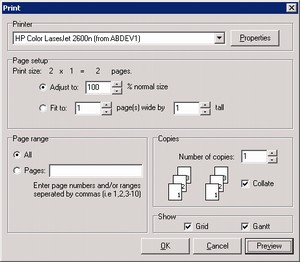
| · | Print – The print dialog contains settings specific to the Schedule. Please note that the printing of the Gantt Chart itself is controlled solely by the Scheduling component and the only formatting options that you have are displayed on the print dialog screen (see below). This report is not part of the MAR reports library and therefore cannot be accessed through the Reports module. |
| · | Expand – Expand a group task to show all child tasks. |
| · | Collapse – Collapse a group task and hide all child tasks. |
| · | Scroll – Scroll to the selected task when it is not in view. This button is only enabled when the Auto Scroll menu option is NOT checked. The Auto Scroll feature is located in the Options menu at the top left side of the screen. |
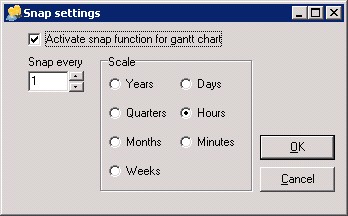
| · | Snap – Use this button to setup and enable the Snap settings. The snap settings are used when dragging bars on the schedule with the mouse to automatically stop at pre-determined time intervals on the schedule. Check the Activate snap function for gantt chart checkbox option to enable the snap settings. |
Note: You can also enable the snap setting option from the Options menu located at the top left side of the screen.
| o | Snap when dragging – This menu option is checked when the snap settings are enabled. |
| o | Snap setup - Displays the Snap Settings screen. |
| · | Show Details – Displays the detail information on a group task that is NOT expanded. Normally, a non-expanded or collapsed group task simply shows a single blue bar representing all child tasks within the group. Clicking this button changes the display to show all the details on the group task line. |
| · | Resource Graph – Toggles on and off the resource graph option. When this option is enabled, a red line is added to the schedule on each task that has one or more resources assigned and the Progress percentage setting is greater than zero. |
| · | Minimize – Minimizes the schedule display on the right side of the screen. |
| · | Maximize – Maximizes the schedule display on the right side of the screen. |
| · | Scroll to Current Timeline – Scroll sto the default starting timeline of the schedule. If you have added schedule markers, use the drop down arrow next to this button to scroll to a user defined marker. |
| · | Add Marker – Creates a temporary user defined schedule marker. Markers are used like bookmarks on the schedule and can be accessed quickly using the Scroll to Timeline options. Note: Markers are temporary and will NOT be saved when the schedule is closed. |
| 1. | Click Add. |
| 2. | Enter the marker description. |
| 3. | Enter the date of the marker. |
| 4. | Click OK. A vertical line will be drawn on the schedule at the date represented by the marker. |
| 5. | Once a marker is added to the schedule, you can highlight the marker and move it to left or right to change the marker's date field. |
| · | Delete Markers – Deletes a user defined schedule marker |
| 1. | Select a marker. |
| 2. | Click the Delete Markers button. This button will not be available unless you have selected the marker. |
| · | Reschedule – Apply all the latest schedule change and run the automatic scheduling calculations. The schedule is updated and if any problems arise during the update process, they will be identified at the bottom of the screen on the Reconcile Messages tab and/or the Schedule Messages tab. |
| · | Sort – Click on the drop down arrow to the right of the Sort button to select the sort option. Note: If you select Key as the sort option, and you are using resources in your schedule, you can then filter the schedule for an individual resource using the Resource Drop Down option located to the right of the Sort button. This can be very useful displaying a schedule for an individual resource such as a subcontractor. |
| · | Indent – Makes the selected task a child task of the task directly above it. |
| · | Outdent – Removes the child setting on the current task and removes the parent task setting. |