The Task tab represents a group of tab controls that contain all the fields for the task.
|
General Tab |
|
Constraint Tab |
|
Dates Tab |
|
Resources Tab |
|
Predecessors Tab |
|
Memo Tab |
|
Job Accounting Tab |
|
Job Detail Items Tab |
The General Tab contains the basic task status and progress fields.
•Work – Enter the time allotted for the task in hours. You can enter the number of days for the event by entering the letter "d" after the entry such as "5d" for 5 days which will then be converted to 40 hours when the entry is saved (based on an 8 hour working day). Note: If the Status field is set to None, then the scheduled start and stop dates will be adjusted when the Work field is changed.
•Priority – Set to High, Normal, or Low and can be used to sort the tasks based on priority.
•Status – Options include None, Running, Completed, or Terminated.
If status is 'running', then the task number appears with a green arrow in the grid.
If status is 'completed', then the task number appears with a red check mark in the grid.
If status is 'terminated', then the task number appears with a red X in the grid.
Note: If the Status field is set to None, then the scheduled start and stop dates will adjust when the Work field is updated.
•Progress – Enter the percentage of completion (0% to 100%) on the task. You can also drag the blank line on the schedule to adjust this field.
Note for Contract Billings: If the schedule is linked to the contract billings in AccuBuild, and this task is linked to a billing item on the schedule of values, then the percentage of completion for this line can be used to create the contract billing. Refer to the Job Cost > Contract Billing documentation for more information.
•Locked – This field is reserved for future use.
•Parent Task – If the task is a child task within a group of tasks, then the parent task ID will be displayed in this field. This is a read only field for reference purposes.
•Order – This field is assigned automatically and is used for sorting orders on tasks. This is a read only field for reference purposes.
•JC Item No – If the task is linked to the job detail items in the Job Cost module, then the item number will be displayed here. You must use the Link Task button next to this field if you want to link a task, change a task link, or clear a link.
•Link Task Button
| This button is used to edit the JC Item No field which allows you to link the current task to a job detail item in the Job Cost module. Only items that have not been linked to other tasks will be displayed. Note: If you want to unlink a task from a detail item, select the "0 – No Link" option. |
•JC Import Code – This field is assigned automatically when detail items have been imported into the job schedule using the Import Items button. This is a read only field for reference purposes. The codes for imported tasks are outlined below:
0 = No Import – The task was created manually in the scheduling module.
1 = cost estimate import - NO GROUPING
2 = contract billing import - NO GROUPING
3 = sub payment import - NO GROUPING
4 = bill of material import - NO GROUPING
5 = all items - NO GROUPING
101 = cost estimate import - GROUPING
102 = contract billing import - GROUPING
103 = sub payment import - GROUPING
104 = bill of material import - GROUPING
105 = all items – GROUPING
Note: A NEGATIVE value in this field represents a task that was copied from another job schedule and represents the task ID from the job that the task was copied from.
The Constraint tab is used for setting up parameters on the task. For example, you can indicate that a task must start on a specific date. The Constraint Date field is used in conjunction with the Constraint rule.
•Constraint – Select from the following options:
oDo not level – no constraint is set up for this task.
▪When creating a new task using the 'Do not level' option, you will not see the task denoted with a yellow bar unless you mark the task as running. Marking the task as running will start the task on the first day of the project. You can drag the yellow bar to different starting day on the schedule but the task will move back to the original starting day location when the refresh button is selected. In order to save the task with a new starting date, change the Constraint field to 'Must start on' and fill in the date.
▪The 'Do not level' constraint does not respect the working rules of the project or the resources assigned to the task.
oMust start on – task must start on the Constraint Date.
oMust finish on – task must finish on the Constraint Date.
oStart no earlier than – task cannot start before the Constraint Date.
oFinish at or before – task must finish on or before the Constraint Date.
oStart no later than – task must start no later than the Constraint Date.
oFinish no later than – task must finish no later than the Constraint Date.
oAs soon as possible – This is the default setting when adding a new task. Click the Refresh button to display the yellow bar denoting the task in the schedule. The task will be set to start the first day of the project unless a predecessor task is assigned.
oAt end of project – task must be performed at the end of the project.
oIgnore task – ignore this task for scheduling constraints.
•Constraint Date – Enter the date associated with the Constraint rule when applicable.
The Dates tab is used to track both the scheduled and actual dates for the task.
•Scheduled Start – Enter the scheduled starting date for the task. This field will be automatically updated based on the constraint type and the predecessor settings.
•Scheduled Stop – Enter the scheduled finish date for the task. This field will be automatically updated based on the constraint type and the predecessor settings.
•Actual Start – Enter the actual starting date for the task. If you select the 'Running' option on the Status field on the General Tab, then the actual start date will be updated with the current date/time.
•Actual Stop – Enter the actual finish date for the task. If you select the 'Completed' option on the Status field on the General Tab, then the actual stop date will be updated with the current date/time.
Use the Resources tab to assign resources to the task. Use the Add button (+) to add a new resource and use the Delete button (-) to remove a resource from the task. Resource names will be displayed on the task bar of the schedule.
Use the Predecessors tab to establish task dependency. Use the Add button (+) to add a predecessor task and use the Delete button (-) to remove a predecessor task.
•# – This column contains the task number of the predecessor task. You can enter the task number directly into this field or simply select the task from the Predecessor column.
•Predecessor – This column contains the predecessor task description and a drop down lookup control to select the desired predecessor task.
•Relation – This column contains the relationship rule between the predecessor task and this task.
| o | Finish – Start – The current task's start date is based on the predecessor task's finish date plus the lag time. |
| o | Start – Finish – The current task's finish date is based on the predecessor task's start date plus the lag time. |
| o | Start – Start – The current task's start date is based on the predecessor task's start date plus the lag time. |
| o | Finish – Finish – The current task's finish date is based on the predecessor task's finish date plus the lag time. |
Enter notes about each task on the Memo tab for documentation purposes.
This tab contains the detail item information and associated accounting information when the task is linked to a job detail item in the Job Cost module. Note: If the task is not linked to a job detail item, this tab will be blank.
•Refresh Detail Items Button - If changes have been made to the task's percentage of completion (Progress field) or to the job detail items in the accounting system, then use this button to re-compute and update the fields on the Job Accounting tab.
•Job No – Contains the job number of the linked detail item.
•Item No – Contains the item number of the linked detail item.
•Item Desc – Contains the item description of the linked detail item.
•Schedule – The fields on the Schedule line are used to compute the amount completed for billing purposes based on the task's percentage of completion when the task is linked to a contract billing detail item (job detail item that is included on the contract billing schedule of values).
| o | % Compl – This is the task's percentage of completion. Refer to the Progress field on the General tab for more information. |
| o | Amount Completed – This field calculates the completed amount of the contract line item based on the task's percentage of completion. (Contract Amount on Detail Item x % Compl) |
•Contract Amount – The fields on the Contract Amount line are used to display the amount that has been actually billed on this task from the contract billing (accounting data).
| o | Contract Amount – Total contract amount for this task. |
| o | % Compl – Actual job-to-date billing percentage for this task. |
| o | Amount Complete – Actual job-to-date billed amount for this task. |
| o | Over/Under Amount – This field compares the actual billing amount from the contract billing to the earned amount as displayed in the Amount Completed field on the Schedule line. A positive number represents an Over Billed situation (billed more than earned) and a negative number represents an Under Billed situation (earned more than billed). |
•Subcontractor – If the job detail item is linked to a subcontractor payment sheet in accounting then the subcontractor fields will be updated with the related data.
| o | Subcontractor – Subcontract Name. |
| o | Subcontract Amount – This is the actual subcontract amount (committed cost amount) for this task. |
| o | % Compl – Actual percentage completed to date on the subcontract based on payments processed to the subcontractor. |
| o | Amount Complete – Actual amount completed to date on the subcontract based on payments processed to the subcontractor. |
| o | Over/Under Amount – This field compares the actual amount complete on the subcontract to the computed amount as based on the task's percentage of completion as shown on the Schedule line. A positive number represents an Over Paid situation (subcontractor payment amount is more than what has been completed) and a negative number represents an Under Paid situation (subcontractor payment amount is less than what has been completed). |
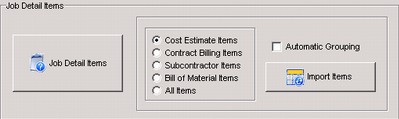
•Job Detail Items Button – Opens a read-only list of all detail items for the job. (Refer to the Project Properties for more information).
•Import Items Button – Use this button to import items into the schedule from the job detail item list.
| o | Filtering Options – Filter options can be used to select only certain types of detail items for importing. For example, the contract billing items option will only display the job detail items that are associated with the contract billing (schedule of values). Note: Choose the All Items option to disable the filtering feature. |
| o | Automatic Grouping – Check this box if you would like to group similar tasks together based on the Filter Option selected. For example, if the filter is based on contract billing items, then the tasks with the same billing phase will be grouped together just like they are on the contract billing. When grouping is enabled, an additional task is created for each group and the imported tasks are then set up as child tasks of the group task. Leave this box unchecked to disable automatic grouping. Note: You can also group items manually after importing by dragging a task under another task. |
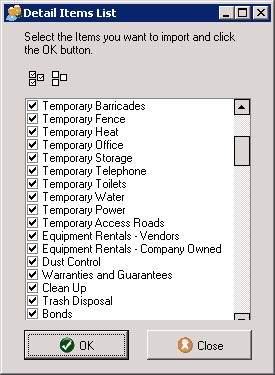
Once the import options have been selected, click the Import Items button to display the list of items that can be marked for import. By default, all items are marked (checked) for importing. Select all of the desired options and then click the OK button to import the items as new tasks on the schedule. Use the Select All or Select None buttons at the top of the import screen for faster selections or simply click on each item one at a time. Use the Close button to cancel the import operation.