|
The Residential Templates option is used to import the residential master lists into the job estimate detail file (estdetl.adt). The estimate detail file is the file that is used when creating contract billings and for computing the job cost reports.
| 1. | Begin by selecting the template type and the job number from which the data will be imported: |
| Lot/Plan Master - Master list of all lot / plan / elevation combinations. If this option is selected, then click on the Select Lots Button to choose the lots that you want to import into the target job. This list may include change orders on each lot if the change orders were previously set up in the lot/plan master file. |
| Option Master - Master list of all plan options. If this option is selected, then you must enter the lot number that the option will be linked to. The plan and elevation of the lot number will be displayed and a purchase order or reference number for the option can be entered in the P.O. Number field. Click on the Select Lots Button to choose the options that you want to link to the lot. Options are set up based on each plan, therefore, the screen will only display the options that have been set up with the same plan as the lot. If a change order has been setup through the options master list, and the change order affects multiple lots with the same plan, then this procedure of entering the lot number and choosing the change order must be completed for each lot that the change order pertains to. |
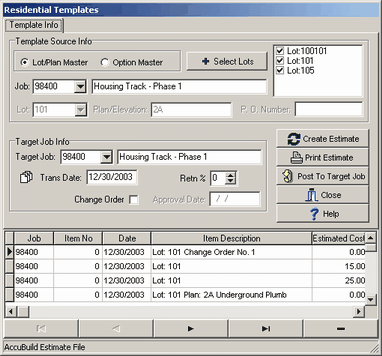
| 2. | Enter the following data into the Target Job Info section of the screen: |
| Target Job - Select the job into which the data will be copied. |
| Trans Date - Enter the date with which the data will be posted. Remember that this date determines the period in which this data will appear on your job cost reports. |
| Retn % - Enter the percentage of retention that should be withheld on each billing item. If your billing items already consist of a separate item for total retention on each lot, then do not enter a percentage in this field. |
| Change Order - If the item selected in Step 1 is a change order, then you MUST click on this option to properly flag the item as a change order for reporting purposes. The change order is considered an unapproved change order unless an approval date is entered. |
| Important! - Flagging an item as a change order also enables the program to properly assign the billing phase for the item. Billing phases consist of a maximum of six digits plus two decimals. The lot number becomes the integer value of the phase and the billing type becomes the decimal value. Original contract billing items have a decimal range of .01 and .10. Change order items have a decimal range of .25 to .49. Options have decimal range of .50 and .99. |
| Approval Date - Enter a date to flag the change order as approved. The approval date of a change order may be entered at a later date through the Job Cost > Update Jobs > Detail Items option. |
| 3. | Select the Create Estimate Button to copy the items from the select master lists into the working file. Note: More than one list or option can be added to the working file by repeating steps 1 and 2. The items in the working file can be modified as desired. You may delete a single row of data by clicking on a cell within the row and pressing the Ctrl Key and Delete Key on your keyboard at the same time. More than one row may be deleted at the same time by clicking on the first row, holding down the Shift Key and using the Down Arrow Button on the keyboard to highlight the multiple rows. Press Ctrl+Delete to remove the selected rows. |
| Individual items should only be imported into a job one time. If you try to import an item into a job that already has the item, then a warning will be displayed. If you ignore the warning and do not delete the items from the batch, and then post the batch, the job estimate detail file will contain multiple items with the same billing phase which will overstate the contract amount on each lot. |
| 4. | Once all items have been added to the working file, select the Print Estimate Button to print a report to review the items before posting the items to the target job. |
| 5. | If all of the items are correct, select the Post to Target Job Button to import the data from the working file into the job estimate detail file. Once the items have been posted, they may be viewed, edited and deleted through the Job Cost > Update Jobs > Detail Items option. |
|