Once you have an account set up with Corpay, you will need to set up the account information on the Corpay Settings Tab of the Payable > Properties screen before you can process any payments.
Version 10.0.0.5 - The settings for Corpay have been updated for future Account Code and FTP Site Address changes. AccuBuild now supports both the current legacy settings as well as the future settings. These settings will only need to be changed when Corpay notifies the customer that they need to be set up for a new account code. Until you are contacted by Corpay, you will continue to use your current settings.
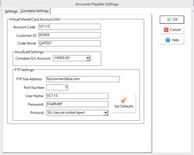
•Account Code - Supplied by Corpay.
The new account codes that use the new FTP Server will contain a dash '-' in the second potion of the code (ie '1-ACC'). If the new account code format is used then and the Set Defaults button is clicked, the new FTP Site Address and Port will be updated automatically. See below for the FTP Settings info.
•Customer ID - Supplied by Corpay.
•Code Word - Supplied by Corpay.
•Corpay G/L Account - You will need to set up a new liability account in your Chart of Accounts named Corpay Virtual MasterCard. Enter this new account number into the Corpay G/L Account field. This Account will be credited whenever vendor payments are processed with the Corpay Virtual Master Card and will be debited whenever you process a payment (check) to Corpay. You will also use this account number for all payments made to Corpay. Use the AccuBuild Bank Reconciliation Process with this account for reconciling your Corpay Account Statements.
•FTP Settings - This set of fields is needed for connecting to the Corpay Server over the internet to upload payment files and download confirmation files after the vendor payments have been processed by Corpay. These fields are supplied by Corpay and you may use the Set Defaults button to set the current Corpay default settings:
Current (Legacy) Settings |
New Settings |
|
FTP Site Address |
ftp.iconnectdata.com |
|
Port Number |
10021 |
50023 |
User Name |
Supplied by Corpay and is usually the same as the Account Code field |
|
Password |
Supplied by Corpay |
|
Protocol |
This field is set automatically by AccuBuild to define the type of protocol being used to connect to the Corpay FTP Server |
|
 |