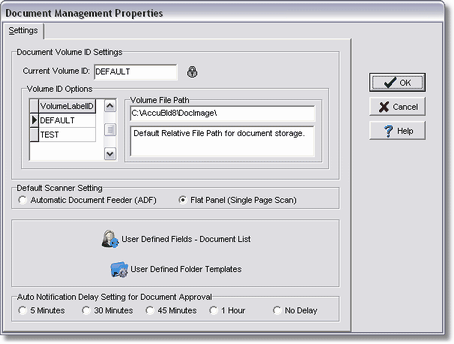
The Documents > Properties option is used to define the following:
•define the storage location of the ADMS documents
•define the default scanner settings
•creating user defined fields for the master document list
•creating user defined Document Folder Templates for organizing documents
•determine the timing (frequency) of the notifications to the user that there are a/p documents pending their approval
Document Volume ID Settings |
|
Default Scanner Settings |
|
User Defined Fields - Document List |
|
User Defined Folder Templates |
|
Auto Notification Delay Setting for Document Approval |

This section of the screen is used to select the Current Volume ID for all documents that are processed in the ADMS. Due to the space requirements for storing documents, it may be necessary to store your documents on a separate drive so please read the documentation on creating volume IDs before attempting to scan or import documents into ADMS. Use CAUTION when changing the Volume Label ID because if it is changed to an invalid path, then the underlying documents associated with the volume ID cannot be located by the ADMS. The Current Volume ID setting can be changed as follows:
•Click on the Lock/Unlock Button to allow access to the Volume ID settings.
•Select the desired Volume Label ID from the list provided in the Volume ID Options Box. The volume label's file path will be displayed along with any associated notes.
•Click the Lock/Unlock Button to save the Volume ID changes.
This option is used to define whether you can scan multiple pages at one time on your scanner.
User Defined Fields - Document List
This button displays a grid of user defined fields for the master document list. Once defined, data can be entered on the UDFs Tab on the Document Index Options Screen. The UDF fields can then be accessed on the master document list screen or with a custom report to help you track, sort and filter your information. Keep in mind that these codes are strictly optional and do not have to be defined before scanning or attaching documents into the system. Please refer to the documentation 'How to Set Up UDFs' in the Clients Module for more information.
To help you organize the documents that you will be storing within AccuBuild, this option is used to set up folder templates (series of one or more folders with folder security) that will be created on each new master record (ie. employee, job, client, etc) that is added in the system. Please refer to the 'Creating Folder Templates' document in the Document Activities section of this manual for step-by-step directions.
Auto Notification Delay Setting for Document Approval
This option is used to alert the user that there are documents waiting for their approval. By default, there is no delay in this notification which is useful when configuring and testing the document approval procedure for the first time. However, this 'no delay' setting will cause performance issues for all users in AccuBuild due to the constant polling that has to be done in order to check for new documents to be approved. Once the testing is complete, be sure to change the setting to 5 minutes or longer for the delay.