This feature is used to scan batches of documents into the AccuBuild System and index (link) the documents with the appropriate database field(s). Each batch of documents is scanned into multi-page TIF files and assigned a batch description by the user. These batches may then be indexed immediately or saved in the system for future indexing. The batches of documents may be of the same type (accounts payable invoices) or totally unrelated documents. It does not matter how the documents are organized when they are scanned into the system because the indexing process will take care of organizing the documents. However, organizing your documents before scanning them will make the indexing process much easier if you are working with a large number of documents.
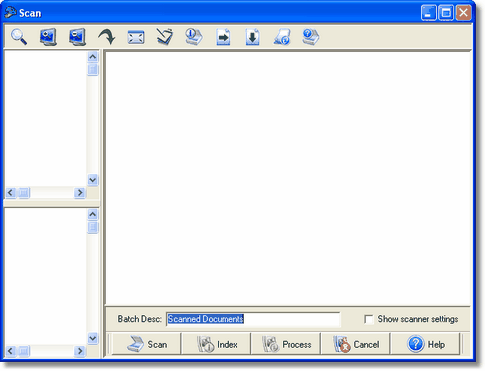
Show Scanner Settings Check Box – If you would like to view the scanner interface or change the scanner settings before scanning your documents, then be sure to check this option.
Follow these steps to scan a document:
•Type the name of the batch of documents to be scanned in the Batch Desc: field.
•Scan the documents using the Scan Button at the bottom of the screen. Once the documents have been scanned, they will be displayed in the thumbnail viewer on the upper-left side of the screen.
•The documents may be indexed immediately by using the Index button or the documents can be saved for future processing by simply closing the screen or pressing the Cancel button.
Scan Documents – AccuBuild uses the same screen for both scanning documents and importing images, however, certain buttons on the top button bar are disabled when importing an image.
•Toggle Magnifier Button – Clicking on this button will allow you to use your mouse as a magnifying glass to enlarge areas of the document that may be hard to read.
•Zoom In Button – Allows you to zoom in on the document making the image larger with each click of the mouse.
•Zoom Out Button – Allows you to zoom out of the document making the image smaller with each click of the mouse.
•Reset Zoom Button – Returns the document to its original size making the document much clearer on the display but will require use of the window scroll bars to view different areas of the document.
•Best Fit Image Button – This button will resize the document image to fit the entire document in the viewing window where no scroll bars are required.
•Copy To Clipboard Button – This button is used to copy the current selected document image to the Windows Clipboard which can then be accessed through any Windows Program that supports graphic images such as Paint or Word for pasting into another program.
•Select Scanner Button - This button is used to change the default scanner.
•Rotate 90 Button – This button will rotate the image 90 degrees to the right.
•Rotate 180 Button – This button will rotate the image 180 degrees which can be very useful for documents that were scanned upside down.
•De skew Button – This button will attempt to straighten a document that was scanned crooked and is tilted to one side or the other.
•Scanner Resolution Button - This button is used to change the default settings for scanning a document which is set to low resolution, black and white at 200 pixels per inch. Color scanning will result in a much bigger file size which will slow down the access of the image in the system.