This option on the Payables menu allows you to process ACH payment and pre-notification records using the Create ACH File option. In addition, you may use this menu to view or reset (rollback) a vendor ACH payment batch that was previously processed for ACH. The Reset option will reset a previously processed ACH vendor payment batch so that the ACH File can be created again.
During the Create ACH File process, an ACH File will be created that can be transmitted by you to your bank for automatic processing of ACH payments. Vendor ACH remittance statements may also be generated after the ACH file has been created that provides a copy of each vendor's payment information. This statement can then be e-mailed (optional) to the vendor and a copy will be stored on the Documents Tab of the vendor's file.
Processing ACH and Pre-notification Records
The following outlines the procedures for creating ACH Files for vendor ACH payment batches as well as pre-notification records:
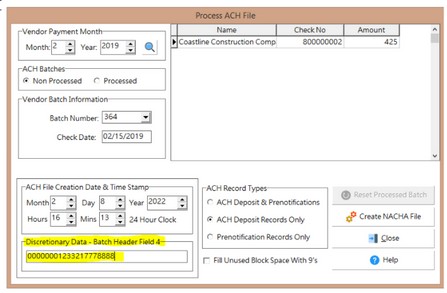
oVendor Payment Month – Select the desired month based on the payment date of the Vendor Payment to be processed and click on the Refresh Button to list all batches that have not been processed for ACH Payment. Note : Make sure the ACH Batches option is set for Non Processed batches.
oVendor Batch Information – Select the desired batch from the list of unprocessed batches. The vendor check information for each selected batch is included in the grid on the right-hand side of the screen.
oACH File Creation Date & Time Stamp – Review the date stamp information for accuracy and adjust if necessary. This information is pulled from the workstation's time and date setting and will be used for the file creation date fields in the ACH File.
oDiscretionary Data – Batch Header Field 4 – This is an optional field and may be left blank. If your bank requires this field, then the values must be set up in the Payables > Properties > ACH Settings screen. The values will then be displayed on the Process ACH File screen.
oACH Record Types – Select the type of records to be included in the ACH File. The ACH Specification allows you to transfer ACH Payments as well as pre-notification records in the same batch. If you want to process ACH Payments and pre-notification records in separate batches then you may change this selection as desired. Note : Your bank may be charging you a fee for each ACH File that is processed so if you combine these two record types into a single file,you could save on bank charges.
oFill Unused Block Space With 9's – The ACH Specification states that the blocking factor for the file is 10 records per block and if the last block in the file does not contain 10 records, then all unused record space needs to be filled with the value '9'. This is NOT required by all banks. This setting can be found on the Payable> Properties>Setting tab>ACH Settings screen.
Create the ACH File
Click the Create ACH File Button to create the ACH File and preview the records in the file for accuracy.The file will be created and the Vendor ACH File Screen will be displayed along with all of the ACH File Records in the selected batch.
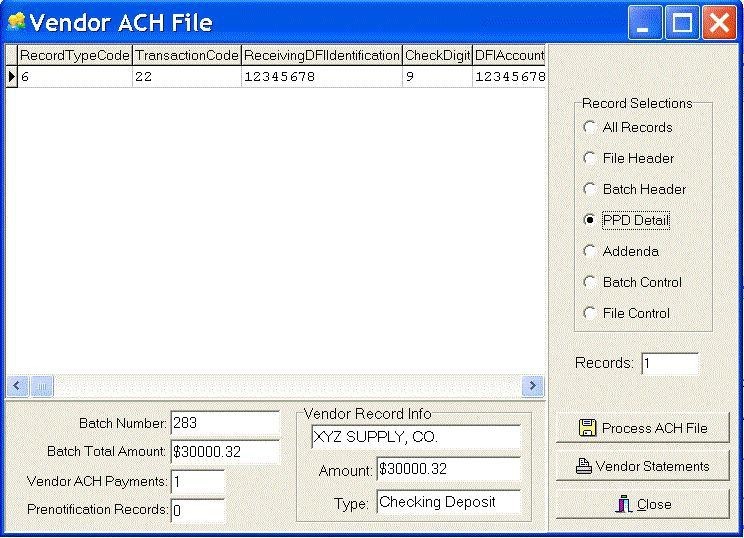
Review the file information for accuracy. The bottom of the screen will show the batch information including the Vendor Payment batch number, the total amount of all ACH Payments, the number of ACH Payments, and the number of pre-notification records. If you want to preview each record type in the ACH File, simply select a record type from the Record Selections list and the selected record(s) will be displayed along with the field headings for each field in the record. If the PPD Detail selection is selected, then the vendor information for the selected record will be displayed at the bottom of the screen.
•Note : The ACH File is a Fixed Format Ascii Text File as viewed under the "All Records" option. When you choose a specific record type, the system will display the record(s) with the Field Names as indicated in the ACH File Specification. This allows you to view each field of each record type for accuracy before transmitting the file to the bank.
Click the Process ACH File Button to save the ACH File and process the ACH information. You will be prompted for a file name and location which you will need to locate when you are ready to transfer the ACH File to your bank. Your bank will provide you with more information on how to transfer the file to them.
•Note : AccuBuild automatically keeps a copy of all processed files so you do NOT need to name each file with a separate file name, you can simply replace the previous file each time you process a new ACH batch. Use the View Processed ACH Files menu option to view previously processed ACH files.
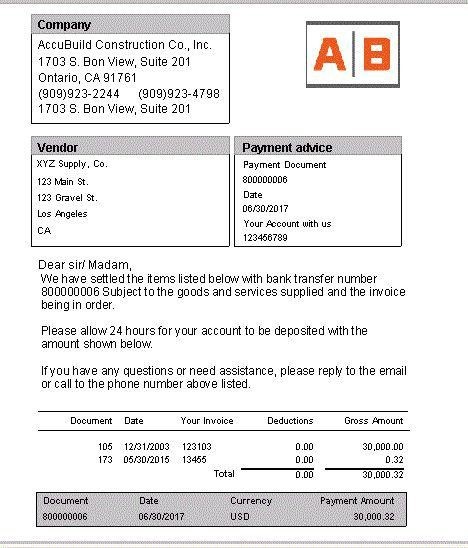
Use the Vendor Statements button to generate a single page report for each vendor that includes the current payment information for each vendor ACH record.
•This form is an automated e-mail / merge form so once the statements are previewed, the statements may be automatically emailed to the vendor and a copy saved under the vendor’ s Document Tab . Be sure to set up an email address for each vendor on the Payables > Vendors >Addr Tab . If you do not wish to email the statements, then you may ignore and cancel the email pop up screen, and then print the statements instead.
•In order to utilize this feature, be sure to go to Reports > All Reports > Properties Button to grant access to users that will need to create this form. The Vendor ACH Statement is located in the Accounts Payable Forms group and it may be copied and modified for individual tailoring for your specific company needs.
•To view the Vendor ACH Statements , you will need to either process a new ACH file OR view a previously processed ACH File. Simply click the new Vendor Statements button on the ACH File preview screen and the statements will be generated.
An entry will be made in the company batch log for each ACH batch process. Refer to the Batch Selection control in the batch log for more information.
If you DO NOT want to process the ACH file at this time, simple click the Close Button to cancel the process. Remember : If you process a file by mistake, simply use the Reset Processed Batch option on the Process ACH File Screen to roll back the process.
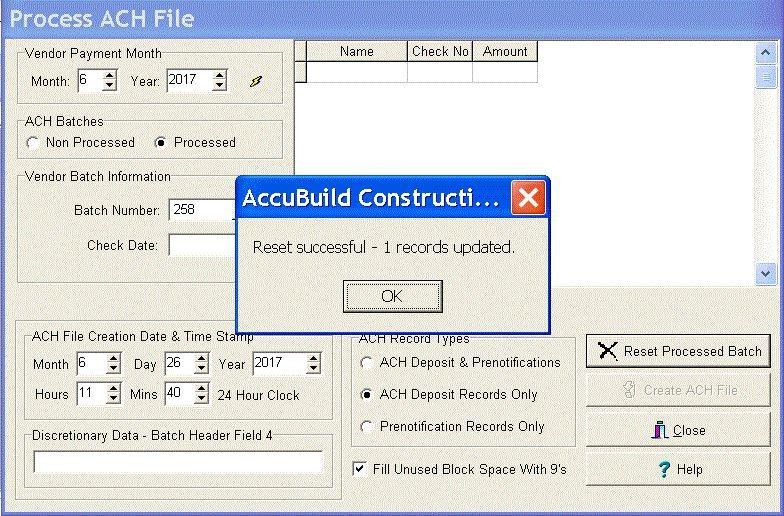
Reset Processed ACH Batch
The following steps outline the procedures for resetting or rolling back a processed batch of ACH Payments. This step is used to cancel a ACH file for a specific batch so that it can be recreated. Once the reset option has been performed on a batch, the batch will be listed on the Non Processed list of batches again. There is NO LIMIT as to how many times the same batch can be reset which can be very helpful in the early testing stages when the ACH system is first being set up. Reset a processed batch as follows:
1.Vendor Payment Month – Select the desired month based on the payment date of the Vendor Payment to be reset and click on the Refresh Button to list all batches that have been processed for ACH. Note : Make sure the ACH Batches option is set for Processed batches .
2.Vendor Batch Information – Select the desired Batch Number from the list of processed batches. The vendor ACH Payment information for each selected batch is included in the grid on the right-hand side of the screen.
3.Reset Processed Batch Button – Click this button to reset the selected batch. The batch will be reset and a message will be displayed indicating that the reset process was successful. The reset batch will now appear on the Non Processed list of batches for further processing.