The Pay Invoice Via ACH option is used to schedule unpaid invoices for ACH payment. This screen is the same screen that is used for selecting vendor invoices for payment with paper checks and works identical with the exception of text labels on the screen. The only real difference on the ACH Invoice Screen is that the payable invoices are only displayed for those vendors that are set up for ACH Payment in the Vendor List. Please refer to the documentation on the Schedule Payments screen for more detailed information, or press the Help Button located at the top of the screen.
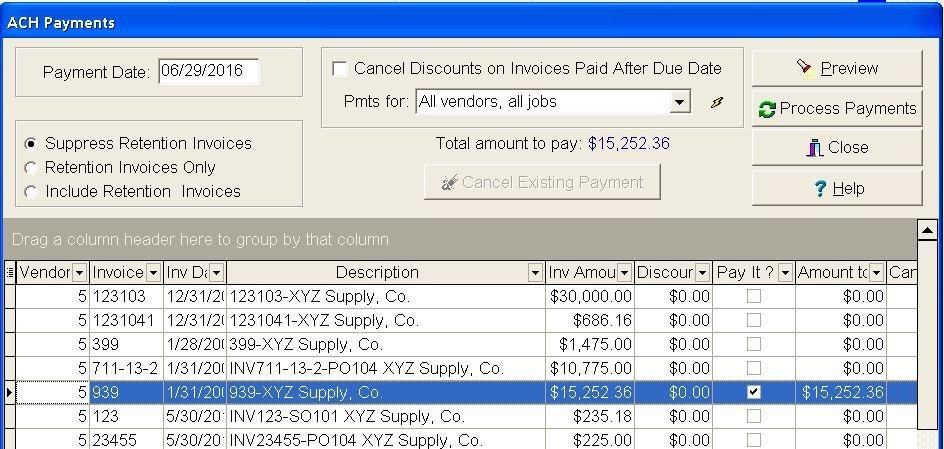
1.On the ACH Payments screen, enter the Payment Date and press the Enter Key.
2.Select (filter) the invoices for payment using the selection controls:
a.Retention Settings - Choose the desired retention option for subcontractor retention payments. By default, retention invoices are hidden from view on this screen. (Refer to Schedule Payments option for more details).
b.Cancel Discounts on Invoices Paid After Due Date - If you have set up invoices with discounts, and have not paid those invoices in time to take the discount, then you may click on this option so that the discount amounts will be ignored when the invoices are selected for payment. (Refer to Schedule Payments option for more details).
c.Pmts for - Choose from a variety of options to filter the invoices on the screen. Same as the ‘ Checks for ’ option on the Schedule Payments screen. (Refer to Schedule Payments option for more details).
d.Using advanced grid features for invoice filtering - The advanced grid is now the default option for invoice selection which allows further filtering and grouping. You can click on any column to sort the invoice information on that column. You can also group the data by moving any column into the gray area above the columns. Once filtered, use the Pay or Pay All options to select invoices for payment. When using this option to mark invoices for payment, the Total Amount to Pay field will show the totals for the current invoice filter. Hint: You can click the lightning bolt button at the top of the screen to refresh the total for all marked invoices.
3.Use the Pay and Clear Buttons to mark displayed invoices for payment. The Pay All Button will mark all invoices for payment, The None Button will clear the payment setting on all invoices,and the Pay Button allows for individual invoices to be marked for payment. (Refer to Schedule Payments option for more details)
4.After all of the desired invoices have been marked for payment, select the Preview button to display the Proposed Payment Journal for ACH Payments . Review the report to make sure that all of the invoices have been properly selected. If an invoice was missed, simply follow the same steps to add the invoice to the ACH Payment run. If an invoice was inadvertently added to the ACH Payment run, select the invoice and click the Hold button at the bottom of the screen to change the 'Pay It' status of the invoice back to 'False'.
5.Process the ACH Payments - click the Process Payments Button to process the selected ACH Payments which is similar to printing checks except no checks are printed and the invoices are assigned an ACH Reference (check) numbers. A Dialog screen will be displayed for entering the payment information:
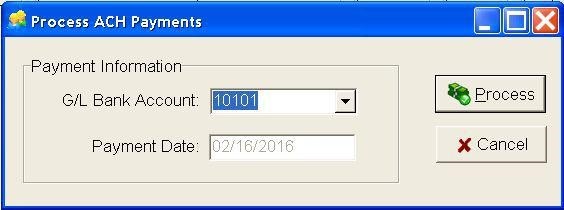
oG/L Bank Account: Select the Bank Account for the ACH Payments. Only the bank accounts that have been set up for ACH Processing will be available for selection on this screen.
oPayment Date: The payment date is copied from the schedule payments screen and cannot be changed at this point.
oProcess Button - Click the Process Button to create the ACH Check numbers and process the payments. Each ACH invoice will be assigned a check number based on the ACH check numbering system and a message will be displayed indicating if the process was successful or not.
oCancel Button - Click the Cancel Button to cancel the operation.
6.If the ACH Payments are processed successfully, you will be prompted to Post the ACH Payments through the accounting system. The posting process is the same as posting printed A/P checks. If you do NOT wish to post the payments at this time, you can do it from the Accounts Payable menu using the Post to Master for ACH menu option. IMPORTANT - You must post the ACH Payment through the system before you will be able to generate the ACH File for your bank and generate the vendor ACH remittance statements .
7.NOTE: During the posting process for ACH Payments, the APDIRDEP table is updated with the ACH Vendor Payments so that the ACH (NACHA) file can be generated and sent to the bank once the posting is completed. If the posting process is successful, you are now ready to Process the ACH file for your bank and generate the vendor ACH remittance statements.