The Misc Non-Invoiced option is used to enter any receipts that are not related to any open receivable invoice. This type of receipt is used to record miscellaneous refunds, interest payments, cash transfers, or anything that your company does not normally invoice for. These receipt entries can then be spread to the Ledger system and the Job Cost system as desired. This option is very similar to the general journal entry in the Ledger system in that the user can post the credit side of the miscellaneous receipt to any number of general ledger accounts, and optionally to any number of jobs and phases.
The non-invoiced cash receipts are entered into a temporary batch file (arcrbat.adt) that is located in the user's personal directory. This batch file is also used for the direct payment cash receipts. This enables the user to post both types of receipts into the same batch so that the total transactions for the day will match the total of the actual deposit. The user's batch may also consist of more than one deposit date; AccuBuild will post each transaction into the proper period based on the deposit date entered.
Hint: To enter a cash transfer, enter the 'transferred to' information in the top portion of the screen and enter the 'transferred from' information in the bottom portion of the screen.
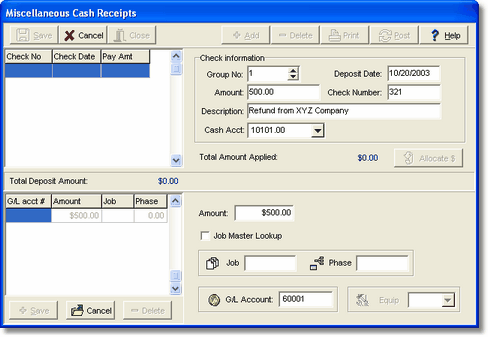
| 1. | To enter a new receipt, select Add at the top of the Miscellaneous Cash Receipts screen and then enter the basic check information. |
| Group No - AccuBuild will automatically assign a group number to each cash receipt. |
| Deposit Date - The transactions for this deposit will be posted through the system with this date. |
| Amount - Enter the total amount of the check received. |
| Check Number - A check number may be optionally entered as a reference with the transactions. |
| Description - In the description field, you may want to enter a brief description of the receipt along with the payer's name since the transaction does not include a client name field. |
| Cash Acct - This field represents the default cash-in-bank account as set up in the Receivables > Properties option. This account represents the bank account that the receipt will be deposited into. The account may be changed as necessary by selecting a new account from the drop down list. |
oAn Advanced Setting is available to remove the default bank account on the Cash Receipt screens and force the user to pick a bank account from the list. To enable this setting, go to File > System Administrator > Configuration > Accounting Tab > Advanced Settings and select the option titled DisableDefaultCashAccountsonARReceipts.
| 2. | Select the Allocate Button (middle of the screen) to enter the appropriate general ledger account(s) and/or job/phase combinations that the receipt amount will be credited. |
| 3. | The bottom half of the screen is used to enter the receipt distribution information. One receipt may be split into any number of accounts and/or jobs. Select Add at the bottom left corner of the screen and enter the first distribution amount of the current receipt. This amount is entered as a positive amount; do not enter a minus (-) sign with the dollar amount. AccuBuild will handle the debits and credits for you. |
| Job Master Lookup - If the receipt is to be applied to a job, then you may wish to enable the Job Master Lookup option. This option will list only the job cost phases that have a budget amount or actual costs charged to them on the select job. This option can be defaulted in the System Administrator > Configuration > Accounting option. |
| Job and Phase - Enter the job and phase numbers or select them from the appropriate drop down list. If the numbers do not already exist, then select the appropriate icon to add a new job to the job master file (joblist.adt) or add a new phase to the phase master file (phase.adt). AccuBuild will return to the Miscellaneous Cash Receipts screen once the new information has been added. If the receipt is not to be applied to a job, then simply skip the job field. |
| G/L Account - Enter the general ledger account, or select the account from the drop down list that the receipt should be credited to. If the account does not already exist, then select the chart of accounts icon to add the account to the general ledger master file (glmaster.adt). AccuBuild will return to the Miscellaneous Cash Receipts screen once the new information has been added. |
| Equip - This field is reserved for future use. |
| 4. | Select Save at the bottom of the screen to record the entry. As each distribution is saved, AccuBuild will display a running total of the amount applied (distributed) in the middle of the screen. This amount must be equal to the total check amount before the Save button at the top of the screen will be enabled. Select Add to enter another transaction for the same receipt, or select on Delete to remove the highlighted transaction from the current invoice. Select Edit to change the information on the current distribution amount. If the current receipt has been completed, be sure to select Save at the top of the screen to commit the invoice into the batch. If Cancel is selected at this point, then all transactions entered for the current receipt will be erased. |
| 5. | Select the Print option to generate an edit list of all entries in the batch. All entries should be verified for correct account and/or job cost coding. At this point, if an entry is incorrect, it may not be edited. Instead, the entry must be removed from the batch by highlighting the receipt in the browse screen and then by selecting Delete. The receipt may then be re-entered correctly. Once all of the entries have been verified, select the Post button at the top of the screen to spread the receipt information to the historical cash receipts file (receipts.adt), the open receivable invoice file (openar.adt) and the general ledger detail file (gldetail.adt). If direct payment cash receipts have been included in the batch, then the receipt information may also be posted using the Receipts > Direct Payments option on the Receivables menu. |