| 1. | On the Import Job Estimate Screen, select Excel as the Import File Type. |
| 2. | Open the desired spreadsheet file using the Import File icon. The file name should now appear in the Import File field. Note: There are several samples of spreadsheets located in the \AccuBld8\Samples directory. |
| 3. | Select the Open Import File button to view the spreadsheet date in the Import File Grid. |
| 4. | Next, set up the Import Table Settings. AccuBuild will automatically display the starting and ending columns (up to 200) and rows based on the data found in the spreadsheet, however, this data will probably contain column headers that should not be included in the import. Therefore, the starting and ending columns and rows can be adjusted to read just the actual data. |
| 5. | Select the Import Structure button to link the spreadsheet columns to the fields in AccuBuild's estimate detail file. |
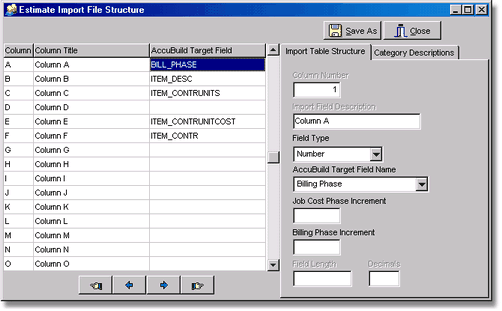
| Field Type & AccuBuild Target Field Name |
| The field type is based on the type of data to be imported into each field. Map the spreadsheet fields to any field in the estimate detail file (estdetl.adt). Notice that once a field is mapped, it will appear in the column heading in the Import File grid (Import Job Estimate screen). |
Target Field Name |
Field Type |
Notes |
Assembly Seq No |
Number |
** Reserved for Future Use |
Billing Description |
Character |
|
Billing Phase |
Number |
|
Contract Amount |
Number |
|
Contract Unit Cost |
Number |
|
Contract Units |
Number |
|
COR Category Number |
Number |
|
Equipment Number |
Number |
This field will be used in a future release for including AB equipment numbers.
|
Estimated Cost |
Number |
|
Estimated Units |
Number |
|
Expense Account |
Number |
Optional but may be used to insure that all Buyout Items are linked to the correct account on the PO.
|
Import Item Type |
Number |
Used to flag the record as a Buyout Item for the Orders module 0 = Estimate or Billing Item 1 = Buyout Item 2 = Production Unit Master Bid Item / Task |
Inventory Manufacturers Code |
Character |
Used for Buyout Items for the Orders module. |
Inventory Part No. |
Character |
Used for Buyout Items for the Orders module. |
Invoice No |
Character |
|
Item Description |
Character |
|
Job Cost Phase |
Number |
|
Job Number |
Character |
** This is only used if you want to import items for multiple jobs at the same time from a single spreadsheet ** |
Labor Assembly ID |
Number |
** Reserved for Future Use |
Misc Character Field 1 |
Character |
|
Misc Logical Field 1 |
Boolean |
|
Misc Number Field 1 |
Number |
|
Prod Unit Bid Item No |
Number |
Actual Field Name: SCHEDULEIDTASK3A |
Prod Unit Bid Item Notes |
Character |
Used for Prod Units by Detail Item |
Prod Unit Bid Item Type |
Number |
Actual Field Name: SCHEDULEIDTASK3B |
Prod Unit Parent Detail Item Number |
Number |
Actual Field Name: SCHEDULEIDTASK3C |
Prod Unit Task Number |
Number |
|
Project2 - TaskID A |
Number |
** Reserved for Future Use |
Project2 - TaskID B |
Number |
** Reserved for Future Use |
Project2 - TaskID C |
Number |
** Reserved for Future Use |
Purchase Order Number |
Character |
Used for Buyout Items for the Orders module. |
Resource ID |
Number |
|
Retention % |
Number |
|
Revenue Account |
Number |
|
Schedule Duration (Days) |
Number |
* For use with the Scheduling module |
Schedule Parent Task ID (Indent) |
Number |
* For use with the Scheduling module |
Schedule Predecessor Task ID |
Number |
* For use with the Scheduling module |
Schedule Task End Date |
Date |
* For use with the Scheduling module |
Schedule Task ID |
Number |
* For use with the Scheduling module |
Schedule Task Start Date |
Date |
* For use with the Scheduling module |
Schedule ID - Project 1 |
Number |
** Reserved for Future Use |
Schedule ID - Project 2 |
Number |
** Reserved for Future Use |
Schedule ID - Project 3 |
Number |
** Reserved for Future Use |
Subcontractor Client No |
Number |
* For use with the Scheduling module |
Unit of Measure Abbr |
Character |
|
Unit Price |
Number |
Used for Buyout Items for the Orders module.
|
User Defined Fields - Any detail item UDF that is set up and marked as Visible will be available for import from a spreadsheet.
|
||
Number
|
UDFNumber1 thru UDFNumber10 |
|
Character
|
Character |
|
Boolean
|
UDFLogical1 - UDFLogical10 - must contain the word TRUE or FALSE in the spreadsheet. Default is FALSE.
|
|
Date
|
UDFTimeStamp1 - UDFTimeStamp10 - must be in the format MM/DD/YYYY |
|
Memo |
UDFMemo1 - UDFMemo3 - Up to three memo fields which can contain large blocks of text. |
|
* For use with the Scheduling module. Scheduling tasks may be imported first into the job detail items from an Excel Spreadsheet. Then within the Scheduling module, the tasks can be imported from the Job Cost module into the Schedule.
Job Cost Phase Settings
This part of the screen is dynamic and will change depending on which option you choose.
•Use G/L Accounts - This may be used by companies that have set up their phase master list without using the decimal place of the phase to denote the sub-categories of labor, material, etc. Instead, you will utilize a g/l account to denote these categories. If you select the 'Use G/L Accounts' option, then you will be allowed to enter the general ledger account that should be associated with that column.
| For example, in your spreadsheet, the master phase number 3300.00 would represent Concrete and have its own column (such as Column A) and would be mapped to the job cost phase field. The labor and material costs would all have their own columns (such as C and D) and these two columns would be mapped to the estimated cost field. But each one of these cost columns would also be linked to a specific g/l account, therefore the system would create two items during the import process: |
•3300.00 - Concrete with the labor amount and g/l account for labor
•3300.00 - Concrete with the material amount and g/l account for material
• Job Cost Accounts - If you selected 'Use G/L Accounts' as noted above, then you can filter the list for only those accounts that have been set as direct cost accounts in the Chart of Accounts. Click the box 'Job Cost Accounts' to enable this filter.
•Job Cost Phase Increment - If the 'Use G/L Accounts' box is not checked as noted above, then this field will be visible. This may be used by companies that have set up their phase master list to utilize the decimal position of the phase to denote labor, materials, equipment, etc.
For example, any phase ending in .00 would represent the master phase (ie. 3300.00 - Concrete). Any phase ending in .10 represents labor, any phase ending in .20 represent material, etc. The 'Job Cost Phase Increment' option lets you assign the decimal increment number to be used for that specific column on the spreadsheet. In this scenario, the increment number would be 10. In your spreadsheet, the master phase number would have its own column (such as Column A) and would be mapped to the job cost phase field. The labor and material costs columns would be mapped to the estimated cost field. In this scenario, the increment on the cost columns would all be set to 10. The system would then create two items during the import process:
•3300.10 - Concrete with the labor amount
•3300.20 - Concrete with the material amount
| Billing Phase Increment - This option creates a unique billing phase number in the same manner as the Job Cost Phase Increment option when there are multiple contract amounts on one line item. (This option is used when the first five digits preceding the decimal are set up in the phase master with standard descriptions that are used on every job. For example, phase 100.00 is always used as Demolition on every job and .10 is always used as labor.) |
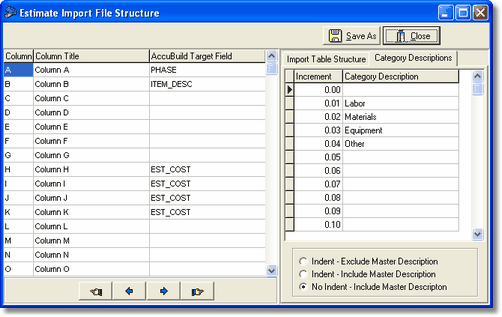
| Category Descriptions - This option can be used in lieu of the Job Cost Phase Increment and Billing Phase Increment features especially if the line item descriptions will be different from job to job. Up to 100 unique categories (.01 through .99) can be created for each line item. The description for each line item can be created with a combination of the section and the category. The '.00' items can be considered the master description and the non '.00' items can be considered the sub description. The sub descriptions can be optionally indented and/or the master description excluded as part of the sub description. See below for an example of the formatting: |
100.00 |
Building A |
100.00 |
Building A |
100.01 |
Building A - Labor |
100.01 |
Labor |
|
100.02 |
Building A - Material |
100.02 |
Material |
| Click the Save As Button to save the file structure. By default, AccuBuild will create the file name of the file structure to match the name of the spreadsheet but it will be preceded by the characters JCIMPT2S_. |
| Note: You may also use an existing file structure with any spreadsheet. However, it must have the same name as the worksheet so be sure to create a copy of the existing file structure and then rename it. (Use Windows Explorer to copy and rename the file). For example, if your spreadsheet is named JobType1.xls then the structure file must be named JCIMPT2S_JobType1.adt. There are samples of structure files located in the \accubld8\samples directory. |
| 6. | Job Information Section. |
•Job - Single Job - Select the job number that the data will be imported into. The job number does not have to be in the spreadsheet in order to import into a single job.
•Job - Multiple Jobs -
●If the Job field is one of the field mappings in the estimate import template layout, then the job number from the JOB column of the spreadsheet will be used as the target job number for each detail item that is created. If there is no job field in the field mappings list, then the target job will be pulled from the Job setting in the Job Info Group Box at the top left of the screen.
●All the Jobs in the job import file MUST already exist on the Job List. You will NOT be able to import estimate items on jobs that have not been set up in AccuBuild. If any jobs do not exist, then the posting process will display a list of missing jobs and then the posting will be canceled until the jobs are added. NOTE: You can use the Job List button in the Job Info Group Box to add new jobs if needed.
●When multiple jobs are involved in the import, the item numbers will be automatically numbered for the next sequential item number for each specific job.
•Trans Date - Typically this would be the date of the contract or the change order. All items imported will be updated with this date.
•Change Order Work - If the spreadsheet data represents a change order, then be sure to select the Change Order Work field and enter the change order approval date. The change order status will then be updated in AccuBuild automatically.
•Contr Ret % - If the imported estimate data includes amounts for contract billings, then you should set up the retention percentage on the contract using the Contr Ret % field.
•Sub Ret % - If the estimate involves subcontractor payment amounts then the default retention percent for subcontractors should be set up using the Sub Ret % field.
| 7. | Once the job information and import table settings are defined, select the import options. These settings will be saved and restored on a user by user basis. |
•Round Amounts to Nearest Dollar - Use this option to round up all estimate amounts.
•Synchronize Job Cost & Billing Phases - Use this option to make the job cost phase and the billing phase the same on an item.
•Synchronize Item Desc & Billing Desc - Use this option to make the item descriptions and the billiing descriptions the same.
| Note: If the item description is not included in the import file, the system will insert a default description from the phase master file for any items where the job cost phase or billing phase exists in the phase master. |
•Summarize Phase Totals - Use this option to summarize any records that contain the same job cost phase or billing phase.
•Ignore Zero Amount Items - If this option is checked, then the system will not post any item to the job detail file that does not have a billing amount or estimate amount or a unit amount. This will prevent the need to delete unnecessary lines from the work file. Note: If your file includes line items that are basically used for titles of section (ie. item 16000.00 Electrical is the section followed by sub-section 16000.01 Electrical - Labor, etc) then be sure to enter an amount in the unit field of the section title so that the line item will not be ignored during the posting routine.
•Keep ALL Master Phases - This option is used in conjunction with the Ignore Zero Amount Items checkbox. When this new checkbox is checked, then master phases (ending in .00) will NOT be removed even when the Ignore Zero Amount Items option is selected. This will allow you to import estimates with multiple amounts per cost code using the phase category feature without bringing in the zero amount phases within a group. The following example shows how the import estimate will work based on whether this option is checked:
Spreadsheet:
Phase Phase Description Labor (01) Materials (02) Rentals (03) Other (04)
10.00 Mechanical 500.00 700.00 0.00 75.00
Import Results based on checkbox settings:
NO Checkboxes checked
10.00 Mechanical 0.00
10.01 Labor 500.00
10.02 Materials 700.00
10.03 Rentals 0.00
10.04 Other 75.00
Ignore Zero Amount Items checked
10.01 Labor 500.00
10.02 Materials 700.00
10.04 Other 75.00
Ignore Zero Amount Items checked AND Keep All Master Phases checked
10.00 Mechanical 0.00
10.01 Labor 500.00
10.02 Materials 700.00
10.04 Other 75.00
•Mark All Items for Buyout - 'Buyout Items' refer to any type of goods or services on a job that you will be purchasing using an AccuBuild Purchase Order or Subcontract Order. These items are stored in the Job Cost > Update Jobs > Detail Items screen and be manually entered or imported into the job through the Import Job Estimate File option. As orders are created, you can simply pick the items to be purchased from a list of items that have been created for that specific job.
oIf importing the buyout items into the system along with regular budget items, then the spreadsheet should contain a separate column for the item type. The value of the item type should equal 1 in the spreadsheet whenever the row contains a buyout item. (The item description and item quantity columns on the spreadsheet can be used for either a budget or buyout item). If the items that you are importing are all buyout items then you can leave out this extra column and simply check the box labeled Mark all items for Buyout. An example of a spreadsheet containing only buyout items is located within the \AccuBld9\Samples folder. Be sure to also read the documentation in the Orders module for complete instructions and recommendations on importing buyout items.
| 8. | Select the Create Estimate button to view the data in the AccuBuild Estimate File grid (bottom portion of the screen). The information in this grid shows the data as it will be imported into AccuBuild. |
| Important Note: The data in either grid on the screen can be changed prior to posting the estimate to the target job. Use the Ctrl-Delete Key combination for deleting any records in the AccuBuild Estimate File prior to posting the records. |
| 9. | Select the Print Button to print a breakdown of the import records to review BEFORE posting the records. Adjustments may be made to the Import File Structure as necessary; be sure to follow the above outline in the same order. |
| 10. | Once the records have been verified for accuracy, select the Post Button to create the records for the selected job in the estimate detail file. |
Note: Business Rules were added to the estimate import process when importing Production Units by Detail Item to make sure duplicate Bid Item Numbers are not imported at the same time. Posting of the import records will be rejected if duplicate Bid Item Numbers are encountered.
Print the Job Detail Items - Item List Report from the Job Cost Reports Menu to view the imported records.