The Handwritten Checks option in the Payables system is used to record a check that has been written outside the accounting system. This option also allows you to print a check for an invoice that has not yet been entered into the system. This option may also be used to post debit transactions from the checking account for such items as ATM withdrawls, bank fees or and cash transfers.
Note: A check number is required for the handwritten check entries and, therefore, it is recommend that a unique check number series be designated for miscellaneous bank debit entries. You may use the same check number more than once.
| 1. | Select the Handwritten Checks option on the Payables menu. |
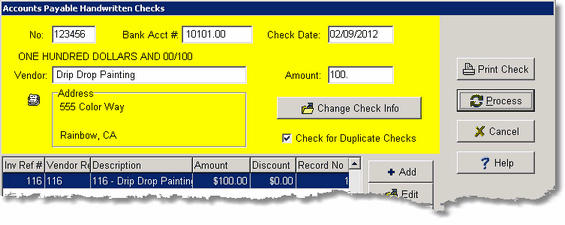
No. - Enter the check number. This field is numeric only and may contain up to ten digits. AccuBuild will automatically check for duplicate check numbers in the system. This option may be disabled by clicking on the Check for Duplicate Checks option on this screen.
Bank Acct # - Select the appropriate checking account. This field will default to the account listed in the Payable > Properties screen.
Check Date - Enter the check date. If paying an invoice that has already been entered into accounts payable, then the check date may not be earlier than the invoice date. The check date will also be used as the expense date of any transaction that is NOT associated to an invoice that is already in accounts payable.
Vendor - Select the vendor name.
Amount - Enter the net amount of the check (gross amount less discounts).
Change Check Info - Use this button if you need to change the check number, checking account or check date after you have already entered the invoice information at the bottom of the screen.
| 2. | Once the vendor's name is entered, AccuBuild will search the open accounts payable file (openap.adt) for any unpaid invoices for the vendor. The Payable Link box will automatically be enabled and AccuBuild will display a list of the invoices found in the Payables system for this vendor. The Inv Ref No field does not represent the vendor's invoice number but rather it represents the internal reference number that AccuBuild assigns to all a/p invoices. Select an invoice and press Enter. |
| Once an invoice is selected, the screen will display the invoice information in the bottom half of the screen. Simply enter through the Amount, Units, Disc % and Disc Amount fields and select Save to attach the invoice to the check. Select Cancel to disregard your entry. As you enter through the above fields, please note that these amounts may be changed as necessary. For example, to pay a partial amount on an invoice, change the Amount field. Discounts may be added or deleted by entering in the discount percentage or flat discount amount. |
| Please also note that the vendor's invoice number, invoice description, job, phase, general ledger account, and equipment code may not be changed. |
•When an unpaid invoice (OPENAP) is linked to a handwritten check, a test will be made to verify that the job number, phase number, gl expense account number, and the equipment number all match the original invoice entry (PURCHJNL) before allowing the Handwritten Check to be posted. If a coding mismatch is encountered, the invoice reference number field (inv_ref_no) will be included in the error message so that the entry can be corrected. Version 10.2.0.3 BLUE

| 3. | Once Save has been selected, AccuBuild will verify that the check amount is equal to the net amount of the attached invoice. AccuBuild keeps running totals on the right side of the screen for the gross amount, discount and net amount of the invoices entered. The program will not enable the Process button if the check amount is not in balance with the running net total of the invoices. |
| 4. | Additional invoices may be added to the check by pressing Enter on the Add button and selecting the next invoice number. |
| 5. | If an invoice paid by the check was not originally entered in accounting system, then the invoice amount may be expensed 'on the fly'. To do this, disable the Payable Link field. |
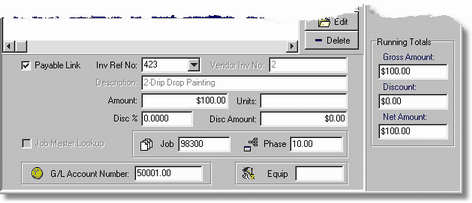
Inv Ref No - This field should display a zero if the Payable Link option is disabled.
Vendor Inv No - Enter the vendor's invoice number in this field.
Description - The invoice description will automatically update with the vendor's invoice number followed by the vendor's name. Please be aware that the vendor number is not stored with these postings and the only reference to the vendor name will be within the invoice description. Therefore, it is recommended that at least a partial reference to the vendor name be left in the description field.
Amount and Units - Enter the gross amount of the invoice and the corresponding units, as applicable.
Disc % and Disc Amount - A discount percentage or flat amount may also be entered. For example, to enter a 10% discount, enter 10.0000 in the Disc % field. To enter a discount of $10.00, enter a zero in the Disc % field and enter 10.00 in the Disc Amount field.
Job Master Lookup - If the expense will be coded to a job, then this option will display only the phases for a specific job that have either a budget amount or actual costs coded to them. This option can be defaulted in the System Administrator > Configuration > Accounting option.
Job and Phase - Select the job and phase number for the transaction, as applicable.
G/L Account Number - Select the expense account. Note: DO NOT select Accounts Payable or Accounts Receivable in this field.
Equip - If the invoice is to be charged to a piece of company owned equipment, then enter the equipment code that the invoice should be expensed to. This will create a direct cost entry (transaction type 10) in the Equipment module on the piece of equipment. Note: This field is only enabled if you have purchased the Equipment module.
| 6. | Again, additional invoices may be included on the check by selecting the Add button. In addition, any of the invoice entries may be edited or removed from the check by selecting the Edit or Delete button. |
| 7. | Once all of the invoices have been entered for the check, select the Print Check button to display the Print Instant Vendor Check screen. The vendor information can be changed on this screen in order to print a joint check without setting up a separate vendor and invoice with the joint vendor name. Click on the Override Vendor Check Information button and then adjust the vendor name and address as desired. Remember that there are only 35 characters in the vendor name field so you may want to utilize the address field for part of the name. |
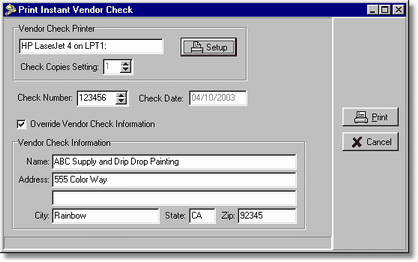
For example: A joint check for Drip Drop Painting and their supplier can be issued as:
Name: ABC Supply AND Drip Drop Painting
or
Name: ABC Supply AND
Address: Drip Drop Painting
Note that the supplier's name has been entered first as the system will use the Name field for the transaction description when the check is posted. This will make it very clear who the check was actually issued to. The check has already been linked to the primary vendor (Drip Drop Painting) so the 1099 information will not be affected by the placement of the names on the check. There is no audit trail when creating joint checks in this manner so be sure to read the documentation on creating joint checks with another method.
Note: If a user does not have access to the Print Check option for automatic accounts payable checks, then they will not be able to print a check under the Handwritten Checks option. Also, a user's access to the Override Vendor Check Information option may be blocked on the Restrictions Tab of the System Administrator > User Maintenance option.
| 8. | Please notice that there is not a Close button on this screen, and therefore, if you wish to exit the screen before you post your entries, you must select Cancel which will erase all of your entries. Select the Post button to post the transactions through the system. Be sure to review all of the invoice transactions on the screen before posting them as there is no edit report to print on this screen. The invoice information will be posted to the historical transaction files in the Ledger (gldetail.adt) and the Job Cost (jobdetl.adt) systems (as applicable). The invoice will be removed from the open (unpaid) invoice file (openap.adt) as applicable and the payment information will then be merged into the historical cash disbursement (apchecks.adt) file. |
| Note: The check does not have to be printed in order to post the transaction. |