|
The Generate Payment Sheets option creates documents that will be used to replace the accounts payable invoices that are received from your subcontractors. The details of each subcontract is based on the items entered on the Estimate Detail Tab on the Job List Screen. Subcontractor Payment Sheets may consist of one or more detail items (Refer to Item 7 below) on a single job that are linked to one or more cost phases and are linked to the same subcontractor and group. Please refer to the Job Cost documentation for more information on setting up the subcontractor detail items.
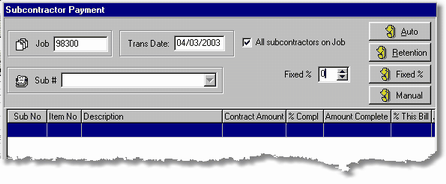
| 1. | To create payment sheets, select the Generate Payment Sheets option from the Payables > Subcontractor Payments menu, enter the job number and then press Enter. This type of transaction is entered into a temporary batch file, apspbat.db, that is located in the user's personal directory. Note: Only one job may be selected for each batch of payment sheets. |

| Enter the date with which the invoices will be posted through the system. |
| All subcontractors on Job |
| AccuBuild will default to generate payment sheets for all subcontractors found on the job. To select an individual subcontractor, disable this option and then select the subcontractor from the Sub field and then press Enter. |
| 2. | Select the payment sheet type: |
| This option assigns a percentage based on the associated percentages of completion that were used in generating the contract billings. Contract billings are created in the Job Cost system, and each contract item may be billed based on a percentage of completion (1% through 100%). The automatic payment sheet option looks for any billing items linked to a subcontractor client number and automatically produces a payment sheet using the subcontract amounts for each item, and the current percentage of completion for the contract billing item. If the calculated amount of the payment sheet is zero, then the payment sheet will not be generated. |
| This option creates an invoice for all retention amounts previously withheld on each subcontract. The payment sheet will show that no retention is being withheld and the current amount due will be the amount of the retention. Note: Be sure to mark all items as 100% complete before running the retention option. |
| Note #1: Each progress billing created through the subpayment sheets process will post two separate invoices to the aging schedule: one for the net amount (gross amount less retention withheld) and one for the retention withheld. The retention withheld invoice will be 'hidden' from view when you pay your progress billings so that you do not accidentally pay retention before it is due. When you are ready to pay the retention, you should create another subpayment sheet using the Retention button. This will create a separate subpayment sheet for the full amount of the retention held to date on the subcontract that you can print and give to your subcontractor along with the check. This invoice will show zero retention withheld and the current amount due will equal the total of the retention amounts that were previously withheld. Behind the scenes, the system is moving the retention amount from the Retention column to the Current column on both the a/p aging schedule and the Subcontractor Payment Sheet Summary report. When you pay the retention, be sure to select the 'Include Retention Invoices' option so that you can see all of the retention entries for your sub. This will include the invoices where the retention was originally withheld as well as the in/out retention invoice that you created with the Retention button above. The net amount of all of the entries should be the amount of retention you need to pay your subcontractor. Be sure to select all of the invoices for payment and not just the 'current' portion of the retention invoice, otherwise the other retention invoices will stay on your aging schedule indefinitely. |
| Note #2: It is important to follow the steps in Note #1 if you are planning to give your subcontractor a copy of the payment sheet that reflects that retention is being paid. Again, the primary purposes of this step is to print an invoice for the subcontractor to explain what is being paid, and to move the retention amount from the Retention column to the Current column on the A/P Aging Report and Subcontractor Payment Sheet Summary report. Due to the fact that the system has already created retention invoices with each subpayment sheet, it is not required that you do create the separate Retention invoice in order to pay the sub. The retention amounts will remain in the retention column on the A/P Aging Report until paid. The Subcontractor Payment Sheet Summary report will continue to show the retention amount in the Retention column along with the payment status. When you pay the retention, be sure to select the 'Include Retention Invoices' option so that you can see all of the retention entries for your subcontractor. This will include the invoices where the retention was originally withheld but there will not be an in/out entry as described in Note #1 above. The net amount of all of the entries should be the amount of retention you need to pay your subcontractor. |
| Note #3: If you followed the steps in Note #1 to create an retention invoice for your sub, and failed to select all of the retention invoice entries for that subcontractor when you paid the retention, then invoice entries netting to zero will remain on the A/P Aging Schedule indefinitely. The best way to remove these 'extra' entries is to create a handwritten A/P check to the sub with the net amount of the check as zero. You can then use the 'Payable Link' option on the handwritten check screen to attach to each individual retention invoice. Once all the applicable retention entries have been selected and your entries net to zero, you may post the check. The invoices will be marked as paid and removed from the A/P Aging Schedule. Be sure to date the handwritten check the same or after the last invoice date that you are trying to clear. It is best to work with the printed aging schedule (full detail) in front of you when trying to make the check entry to ensure that you selecting the correct invoices. |
| This option is used to quickly assign a single percentage of completion to all items for all subcontracts. This is especially handy for marking all items as 100% complete before using the automatic retention option. |
| This option allows the user to enter any percentage of completion or amount completed for each subcontract item regardless of the percentage used on the related contract billing item. |
Note: If the manual option is used when the All subcontractors on Job option is enabled, then a payment sheet for each subcontract on the job will be created even if the current amount of the invoice is zero. Such invoices should be deleted from the batch or else they will be printed along with the other payment sheets. Although they may be printed, these invoices will not post through the accounting system but keep in mind that the payment sheet references numbers will be lost.
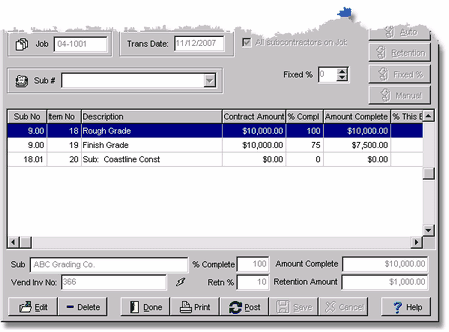
| 3. | After the payment type has been selected, AccuBuild will begin the payment sheet calculations and build the payment sheet transaction file. All items for each subcontract selected will be displayed on the screen. |

| | If the manual payment type is selected, each subcontract item must be edited and a percentage of completion or completed amount must be entered. |
| Enter the job-to-date percentage of completion or enter a zero in this field in order to enter the job-to-date amount in the Amount Complete field. |
| When the percentage is entered, the Amount Complete field will be automatically updated. Alternatively, an amount may be entered when the percentage is unknown, or if the amount must be an exact amount. If a zero has been entered in the % Complete field, then enter the job-to-date amount in the Amount Complete field. Once the amount is entered, the percentage field will be updated with the nearest percentage. |
| The percentage will default to the retention percentage as set up per the subcontractor but it may be changed as needed. This feature is especially helpful if the retention must be adjusted in each period or if the retention amount is not a straight percentage. |
| When the retention percentage is entered, the Retention Amount field will be automatically updated. If the retention amount is zero, then a flat retention amount may be entered. |
| 4. | If you want to reference the sub's actual invoice number instead of the reference number that the system automatically assigns, then select one item on the payment sheet, click the lightning bolt icon found at the bottom of the screen and then enter the invoice number. This will assign the same invoice number to ALL items on a single payment sheet. |
| 5. | After all the adjustments to the subcontract items have been made, be sure to Print the payment sheets. AccuBuild will create a physical invoice for the current amount due. The system will make an accrual for the current retention due but it will not print a physical invoice for the retention withheld. |
| With the 8.3.0.1 software release, the sub payment sheet forms are now printed using My AccuBuild Report (MAR) forms. The user must have access rights to the form before they can be printed. If you have system administrator rights, right-click on the form to grant access to the form. With the form design now in MAR, the form can now be customized by the user as well. |
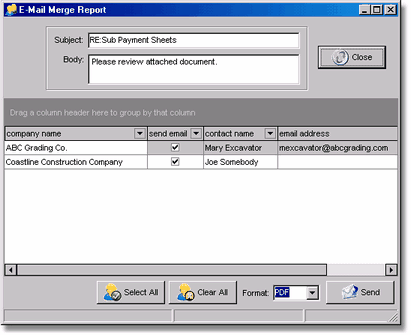
| There are two options to choose from when printing the payment sheets. You can simply print the payment sheets or you can print with the e-mail merge option. If the e-mail merge option is chosen, you will be able to preview the payment sheets, print while previewing, and then close the screen to display the E-Mail Merge Screen. AccuBuild will select the default contact name and email address found in the Client List for each sub but you can choose a different contact name from the drop down list on the E-Mail Merge Screen (this information is pulled from the Email Contact List in the Clients Module). You can also manually type in an e-mail address on this screen. Once all of the contacts have been selected, click the Send button to send a PDF version of the individual payment sheet to the appropriate recipient. |

| If you own the Document Management Module, then a PDF version of the sub pay sheets will be automatically filed with links to the subcontractor and the vendor invoice number. The payment sheets can be also be reprinted at any time. |
Note: If you use Microsoft Outlook for your e-mail, it will be necessary to install the Outlook Security Manager when utilizing the e-mail merge feature. Installing this DLL file will prevent Outlook from displaying warning messages with each e-mail that it tries to send. This option should be performed at each workstation and is found on the Help Menu of the main screen. **Version 8.3.0.1
Note: If you experience problems when exporting to PDF, then try installing the PDF DLL files on the workstation. The install process is found on the Help Menu of the main screen. **Version 8.3.0.1
| 6. | If corrections are needed, select Edit to enter the revisions, and then select Save to record your changes, or select Cancel to ignore your entries. Select Delete to remove an entire payment sheet from the batch. Select Done and Cancel if you wish to delete ALL payment sheets from the batch. To exit the screen without posting the batch, select Done and Save. Once all of the entries have been verified, select the Post button to spread the invoice information to the purchase journal (purchjnl), the open payable invoice file (openap), the historical subcontractor payment sheets file (subpmts) and the general ledger detail file (gldetail). The payment sheet batch may also be posted using the Subcontractor Payments > Post Payment Sheets option on the Payables menu. Once posted, the payment sheets may be reprinted or voided as necessary. |
| 7. | Business Rules for Posting Subcontractor Payment Sheets: |
| The Subcontractor Invoices field on the Payables > Properties Screen represents the single liability account where the net amount of the payment sheets will be accrued. The Retention Payable Invoices field represents the liability account where the retention withheld on the payment sheets will be accrued. |
| The Subcontractor Expenses field on the Payables > Properties Screen represents the default expense account where the gross amount for all Subcontractor Payment Sheets will be posted. The system will use this single expense account when posting the payment sheets if the 'Use A/.P Properties Setting' option is chosen at the bottom of the Properties Screen. Select 'Use Phase Master Account' if the payment sheets should be posted to multiple expense accounts as linked to the job cost phases in the Phase Master. |
| Prior to Version 8.3.0.1 - Prior to this software release, the Subcontractor Payment Sheets were limited to a single subcontractor/phase combination. In other words, a single subpayment sheet could not contain items for both HVAC and Plumbing if those categories of work were coded to two separate job cost phases. In addition, only a single expense account could be used for all subpayment sheets as defined by the Subcontractor Expenses field on the Payables > Properties Screen. This notation is being made simply for customers troubleshooting issues with the older software versions. |
|


