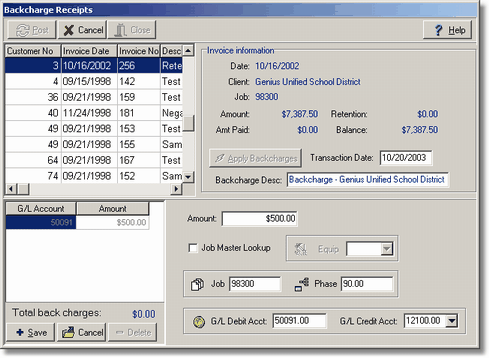
The Backcharges option is used to reduce the amount due on any open receivable invoice. This type of receipt is used in circumstances where the total amount due has been reduced for miscellaneous items and a change order has not been issued. This option is very similar to the general journal entry in the Ledger system in that the user can post the debit side of the backcharge receipt to any number of general ledger accounts, and optionally to any number of jobs and phases. If a backcharge is applied to a contract billing, then it will show up as a receipt on the contract.
Hint: Use the backcharge receipt option after a final payment has been posted to an invoice and there is a payment discrepancy of a few pennies. If the invoice has been underpaid, then enter the balance due on the invoice as a positive backcharge amount. If the invoice has been overpaid (the balance on the invoice will be a credit amount), then enter the overpaid amount as a credit backcharge amount. This will adjust the balance due to zero and the invoice will be removed from the accounts receivable aging schedule. If the invoice was a contract billing, then the job receipt totals will show the job as paid in full.

A backcharge receipt is entered into a temporary batch file (arbkbat.adt) that is located in the user's personal directory. Only one transaction can be entered and posted at a time.
| 1. | Highlight the appropriate invoice on the browse screen. Invoices are listed in order by customer number and invoice date. The right side of the screen will display a recap of the invoice information. |
| 2. | Click on the Apply Backcharges button. |
| Transaction Date - The transactions for the backcharge will be posted through the system with this date. |
| Backcharge Desc - AccuBuild will default the backcharge description with the word 'Backcharge' preceding the customer's name. This description may be changed as desired. |
| 3. | The bottom portion of the screen is used to enter the backcharge distribution information. One backcharge may be split into any number of accounts and/or jobs. Select Add at the bottom left corner of the screen and enter the first distribution amount of the backcharge. This amount is entered as a positive amount; do not enter a minus (-) sign with the dollar amount except as noted in the above HINT. AccuBuild will handle the debits and credits for you. |
| Job Master Lookup - If the receipt is to be applied to a job, then you may wish to enable the Job Master Lookup option. This option will list only the job cost phases that have a budget amount or actual costs charged to them on the select job. This option can be defaulted in the System Administrator > Configuration > Accounting option. |
| Equip - If the backcharge is to be applied to a piece of company owned equipment, then enter the equipment code, or select the code from the drop down list. If the equipment code does not already exist, then select the equipment icon to add the code to the equipment master file (equiplst.adt). AccuBuild will return to the Backcharge Against Invoices screen once the new code information has been added. |
| Job and Phase - Enter the appropriate job if the backcharge amount should be expensed to a job. The 'Phase' field will display the default backcharge phase as set up in the Receivables > Properties option but this may be changed. If the receipt is not to be applied to a job, then simply skip the job field. |
| G/L Debit Acct - AccuBuild will display the default general ledger account that the backcharge should be expensed to in the G/L Debit Acct field but this account may be changed as desired. |
| G/L Credit Acct - The G/L Credit Acct field will display the same accounts receivable account that the invoice was originally posted to. This account should not be changed otherwise the General Ledger Trial Balance will not tie to the Accounts Receivable Aging Schedule. |
| 4. | Select Save at the bottom of the screen to record the entry. As each distribution is saved, AccuBuild will display a running total of the applied amounts at the bottom of the screen. This amount must be equal to the total backcharge amount before the Post button at the top of the screen will be enabled. Select the Add button to enter another transaction for the same backcharge, or click on Delete to remove the highlighted transaction from the current invoice. Select Edit to change the information on the current distribution amount. |
| 5. | When the backcharge is completed, be sure to select Post at the top of the screen to spread the backcharge information through the accounting system. If Cancel is selected at this point, then all transactions entered for the current backcharge will be erased. The spread routine will post the backcharge information to the historical cash receipts file (receipts.adt), the open receivable invoice file (openar.adt), the general ledger detail file (gldetail.adt) and the historical job cost transaction file (jobdetl.adt). |