Online Support Link Updates / New Website
●The Help and Support Menus in AccuBuild have been updated for the latest links that work in conjunction with our new AccuBuild Website. These menu options enable you to find answers to support questions, view online training videos, and check for the latest Accubuild Software Updates.
○Help Menu - The Help Menu can be used to check for the latest AccuBuild Software Updates as well as the update release notes. From the Help Menu, click on the menu option entitled “Check AccuBuild Website for Updates…”
○Support Menu - the Support Menu can be used to access training videos and find answers to support questions. To review training videos, select the “AccuBuild University” menu option. This option requires login credentials which you can obtain by contacting Terry Middleton ( terry@accubuild.com ). To search for answers to support questions and view additional support documentation, select the “Knowledge Base / Support Documentation” menu option.
NOTE: All of these support resources are free and are included with your software update fee renewals.
Company Inquires - Enhancement
●The Company Inquiries screen has been updated with new settings to remember the grid filters for each table so that these filters are reestablished when the table is reopened.
Accounts Payable Invoice Approval - Bug Fix
●The 9.6.0.0 update was causing an error message to pop up when the Vendor Invoice Number was entered during the process of approving scanned documents (Tiff Files). This problem has been corrected.
Accounts Payable Invoice Approval - Enhancement
●The Invoice Approval Screen now checks for duplicate vendor invoice numbers so that they can be discovered and corrected on this screen ahead of the invoice entry process.
Accounts Payable Invoice Approval - Enhancement
●The Approval Settings Screen has been updated to disable the invoice field settings for vendor invoices and purchase order invoices when the invoice entries already exist. A new status bar has been added at the bottom of the screen to indicate the invoice entry count. If there are invoice entries, then the status bar will be colored in yellow to alert the user and a message in the status bar will indicate the reason for disabling the fields. NOTE: If you need to make changes to the invoice entry fields, then you will need to delete the associated invoice entries so that these fields can be modified.
IMPORTANT: The invoice entry fields will also be disabled when the Approval screen is opened for Subcontractor Online Invoices since these field settings are created automatically and should NOT be changed.
Client List - Security Enhancement
●A new security option has been added for the User and Group Security Settings in order to be able to secure the new ACH Tab of the Client List that was introduced in the 9.6.0.0 Release of AccuBuild. Since these settings involve vendor bank accounts and routing numbers, we need to block this tab from non-authorized users. The ACH Tab settings option can be found in the Restriction Tab of the User and User Group Screens in the Clients Menu Group (+) as shown below. Check the Client ACH Tab setting to block a user from accessing that tab. NOTE: If the user is in the AccuBuild System when the setting is enabled, the new setting will be established for the user once they have closed and reopened the AccuBuild Program:
Accounts Payable - New Hold Payment Feature
●A new HOLD feature has been implemented for the Accounts Payable process whereby payable invoices can be placed on hold in order to prevent invoices from being paid until the hold is released. The hold option can be updated from several screens including the document approval settings, invoice entry for both regular payable invoices and purchase order invoices, and all of the screens for scheduling payment (paper checks, ACH payments, and Comdata payments).
●Setup: No setup requirements.
●Process: The process for using the HOLD feature is to simply set a hold on the vendor invoice at any point in the payment process. Once a vendor invoice hold is in place, it can then be cleared on any of the scheduling payment screens. The following instructions explain how to use the new HOLD Feature:
Setting up a Vendor Invoice Hold: The hold setting can be done during the approval routing process, the invoice entry process, or the schedule payment process. IMPORTANT NOTE: It is important to note that the hold settings are placed at the Vendor Invoice Number level and NOT at the individual invoice distribution level. In other words, if an invoice has been split up into different cost codes for accounting purposes, the hold option applies to all of the distributed items related to the Invoice Number.
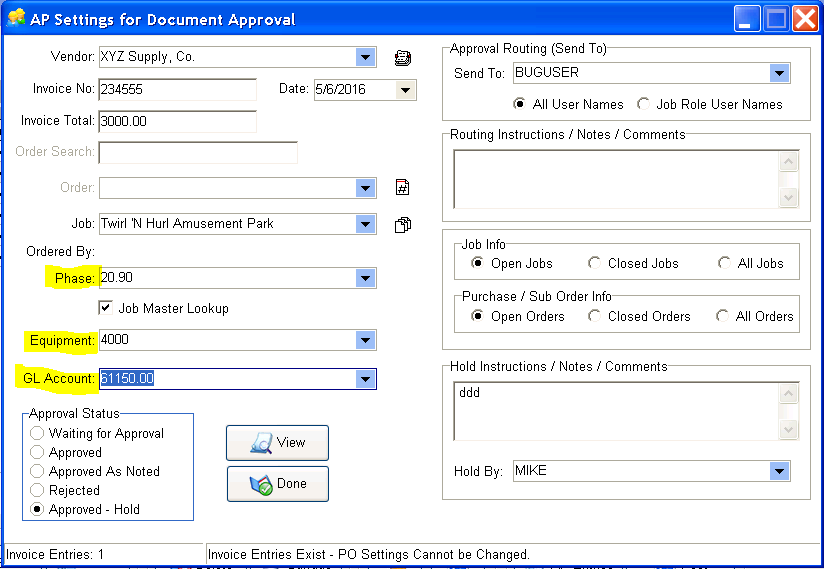
●Invoice Routing Approval - You can place an invoice on hold during the routing process using the option on the Approval Settings Screen called “Approved - Hold” in the Approval Status group box. This new setting is required so that the invoice can still be marked as approved for payment, but set for the HOLD option during the posting process. When this new Hold status is set on the invoice, a new set of Holding Information fields will be displayed so that Instructions and Comments can be entered to document the reason for the hold:
○Holding Instructions / Notes / Comments: Enter any hold instructions in this field which will be saved with the invoice during the posting process so that it can be reviewed from the any of the schedule payments screens. NOTE: The hold instructions are REQUIRED in order to use the HOLD option.
○Hold By: Enter the AccuBuild User name of the person that is requesting the hold, such as a project manager or the company controller. The current user is set up as the default user name for this field.
●Invoice Entry Process - The HOLD setting can also be set during the invoice entry process for both the regular payable invoice screen and the purchase order invoice screen. Both of these screens have a Hold Payment Checkbox which can be used to set up or clear the invoice hold. If the invoice screens are opened from the Invoice Approval Routing process, then the HOLD settings from the approval screen will be updated on these screens:
●Regular Payable Invoice Screen:

●Purchase Order Invoice Screen:
When the Hold Payment Checkbox is clicked, the Hold Dialog screen is displayed and you can set or clear the Hold option. If you are setting up a payment for hold, then you will need to include the payment hold instructions before closing the screen. The Hold By username will be set to the current user by default, however you can change the name to any user in the drop down list.
When the hold settings are updated from the invoice entry screen or the purchase order screen and the invoices are entering from the routing process, then any changes to the Hold Information will be updated in the Approval Settings Screen as well. In other words, any Hold Option changes in the invoice entry screens will be synchronized back the the Approval Settings screen. If the hold is cleared, the invoice will be set to Approved Status in the Approval Settings screen, and if the hold is set, then the invoice will be will set to Approved - Hold in the Approval Settings screen.
When the payable invoices are posted through the accounting system, any invoices placed on hold during the entry process will be updated in the OPENAPHOLD table in order to maintain the hold setting information. Once invoices are posted, the hold information can be accessed via any of the three Schedule Payments screens including Paper Check payments, ACH payments, or Comdata payments.
●Schedule Payments Process - The HOLD setting can also be set and cleared from any of the Schedule Payments Screens for Paper Checks, ACH Payments, and Comdata Credit Card Payments. Use the Hold / Clear Hold Button on the lower left side of the screen for updating the payment hold status. If the selected invoice is already on hold, then the button caption will be changed from Hold to Clear Hold.
A new column on the Schedule Payments grid has been added which shows the Payment Hold Setting and this field will be checked on any invoice where the invoice record is set for Hold.
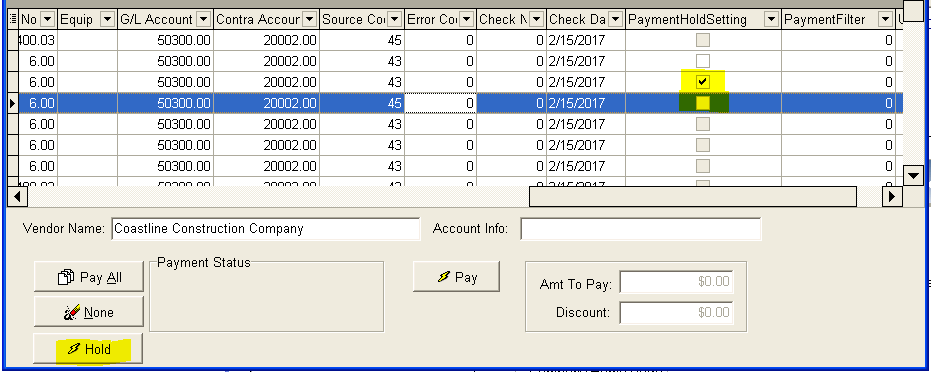
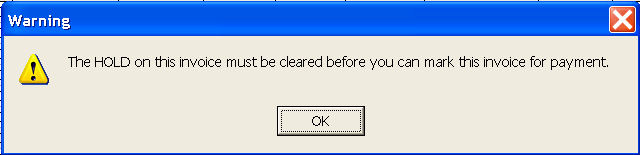
If you attempt to pay an invoice that is marked for hold, a warning screen will be displayed and you will need to remove the hold before you can mark the invoice for payment.
IMPORTANT NOTE: The Hold feature is applied at the Vendor Invoice Number level, so if there are multiple distribution entries on a Vendor Invoice, then ALL related entries are processed as a group for the Hold and Clear Hold options.
Accounts Payable - New Invoice Total Feature for A/P Invoices
●A new Invoice Total field has been introduced for the A/P Approval Screen which can is used during the invoice entry process for regular payable invoices. This Invoice Total field is used for computing running totals on the invoice entry screen to calculate and display the balance of the invoice amount to be entered. This is the same running total process that is currently used in the purchase order invoice screen. The regular payable invoice screen has been updated with a total invoice amount field which will be populated from the approval screen when available. In addition, the invoice entry screen can also be populated manually for this new field as well.
●Setup: There is no setup required to use this feature.
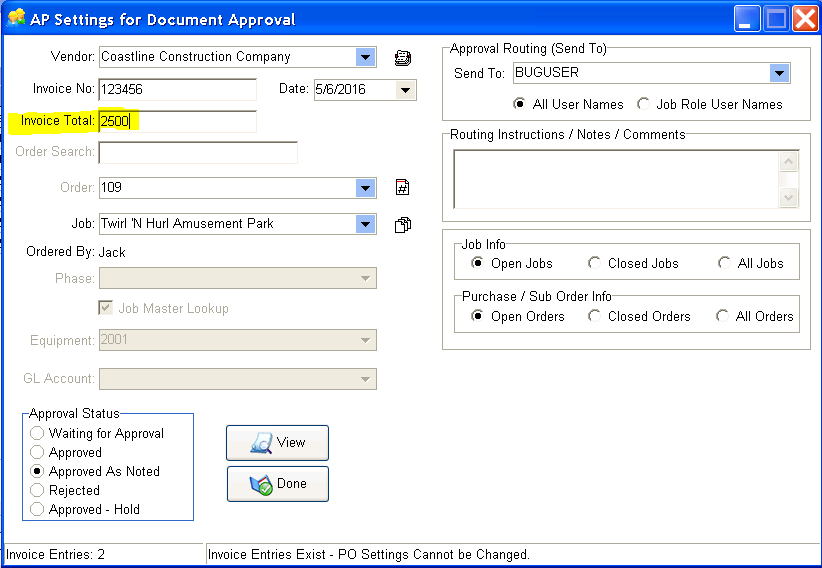
●Process: If you are using the invoice approval process, then you have the option of setting up this total invoice amount field inside the approval settings screen in the Invoice Total field. This is an optional field, but if an amount exists in this field, it will be copied into the payable invoice screen or the purchase order invoice screen during the invoice entry process:
Approval Settings Screen:
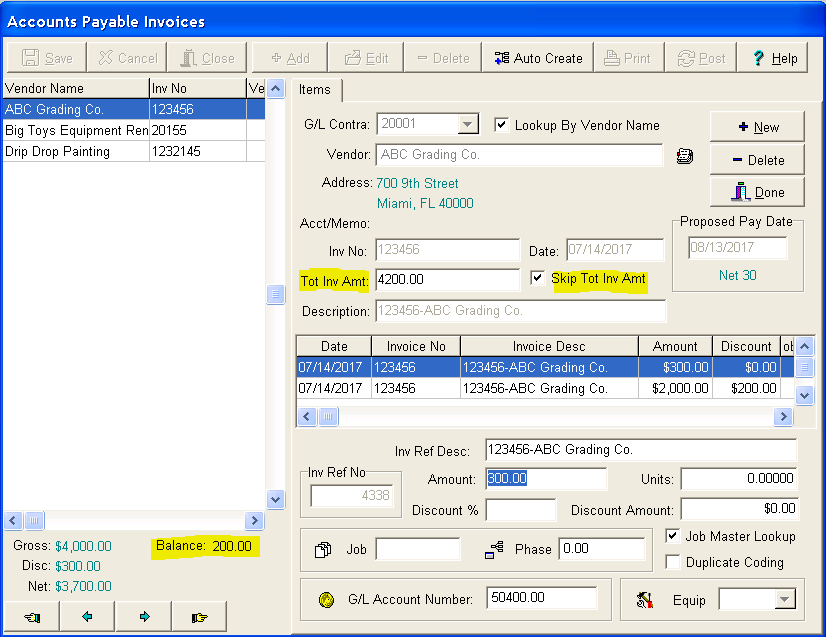
Invoice Entry Screen: On the Invoice Entry Screen, the Total Inv Amt field can be used to track the running balance of the total amount as each invoice distribution amount is entered. This field is optional and will be updated from the Approval Screen settings when an invoice is being entered from the invoice approval process. As the breakdown invoice items are entered in the bottom of the screen, the remaining balance of the Invoice Total will be displayed on the lower left side of the screen. When the running balance feature is being used, the Save Button will NOT be enabled until the remaining balance is zero. You can override this balance checking feature by setting the Tot Inv Amt field to zero.
A Skip Tot Inv Amt checkbox can be used to include the Tot Inv Amt field in the tab order during entry. The default setting for this checkbox is in the “checked” state which indicates that the field is skipped during invoice entry. The “checked” state allows the screen to work without stopping on the Tot Inv Amt field so that you do NOT have to implement the total checking feature. However, if you would like to use the total checking feature, you can uncheck this box so that it will become a tab stopping point during invoice entry to speed up the input process. NOTE: Even with the tab stop process enabled, you can still leave this field set to zero if you do not want to check totals on the entry.
When the invoice total checking feature is enabled and you try to save the entries before the distributed amounts are in balance with the invoice total, you will receive an out of balance message when the Done Button is clicked. At this point, you can finish the remaining entries to balance out the totals, or can set the Tot Inv Amt field to zero and ignore the balance checking feature.

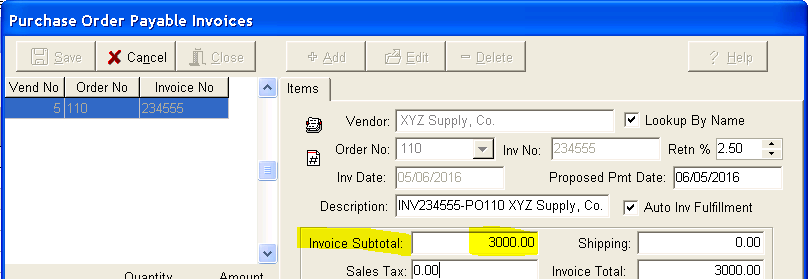
Purchase Order Invoice Screen: The invoice entry screen for purchase order invoices contains an Invoice Subtotal field at the top of the screen which is used to compare to the running balance for each invoice entry and indicate when the entries are in balance with the Invoice Subtotal. When new purchase order invoice entries are entered from the Approval Process Screen, the Invoice Total amount from the Approval Settings Screen will be copied to the Invoice Subtotal field. NOTE: This only occurs for NEW invoice entries. If you are editing an invoice, then the previous saved total is displayed in the Invoice Subtotal field and the Invoice Total from the Approval Settings Screen is ignored.
Approval Settings / Document Routing - New Default Fields
●The Approval Settings Screen for the payable invoice routing process has been updated with new fields for default values when entering regular payable invoices. These fields include the cost phase, the expense g/l account, and the equipment number.
●Setup: Currently there is no setup required. If the AccuBuild user has access to the approval tag form, then they will have access to the new option phase and GL Account number.
●Process: When any of the default fields are set up on the settings screen, they will become the default entry for the payable invoice screen. These are optional fields and are only required for regular payable invoices. If the AP Invoice is relate to a purchase order or subcontract order, then these fields will be disabled.
NOTE: The Payable Invoice entry screen will still enforce the accounting business rules and will issue warnings as needed for any invalid combination of fields. The invoice settings screen does NOT enforce any business rules for accounting.
Approval Settings / Document Routing - New Invoice Entry Settings
●A new setting is available on the Document Routing Screen for opening up additional screens during the invoice entry process in order to view the invoice document and/or the approval settings.
●Setup: Currently there is no setup required.
●Process: When entering payable invoices from the Approval Screen, you can now set the radio button group control for one of the four options:

○Settings - This option will open the Approval Settings Screen each time the AP Entries Button is clicked. The Approval Settings screen will be positioned on the left side of the screen and the invoice entry screen will be positioned to the right of the approval screen so that both screens are visible during the invoice entry process. This allows you to view and update the routing approval information while entering the payable invoice.
○Document - This option will open the actual invoice document each time the AP Entries Button is clicked. If the document you are viewing is not being viewed from the AccuBuild Document Viewer, then you will need to close the document screen when you are finished viewing.
○Both - This option will open both the Settings Screen and the actual invoice document each time the AP Entries Button is clicked.
○None - This is the default setting each time the routing screen is opened and indicates that no additional screens are opened during the invoice entry process.
Document Routing - New Posting Update for Equipment Documents
●The invoice routing feature for both payable invoices and purchase order invoices has been updated to link the invoice documents to each piece of equipment when the invoice involves multiple pieces of equipment. Previously, the invoice document was only linked to the default equipment that was set up on the invoice routing screen.
●Setup: Currently there is no setup required.
●Process: The process of linking an invoice document to multiple pieces of equipment will occur during the payable invoice posting process. Any time there are distribution entries for the invoice that are charged to more than one piece of equipment, additional copies of the invoice document will be made and attached to the document folders of each additional piece of equipment.
MAR Report - Report Viewer Enhancements
●The MAR Report View has been updated with new controls to make it easier to navigate through multiple pages of long reports. A better scrolling mechanism for the reports has been added along with a new edit field where the user can enter a page number and navigate to the specified page in the report. In addition, the mouse wheel can now be used to scroll through the report pages.
●Setup: None.
●Process: The new page controls are located at the top of the screen and include and edit field for the “Go To” page number, a refresh button for refreshing the report page count, and a label indicating the total pages for the report.
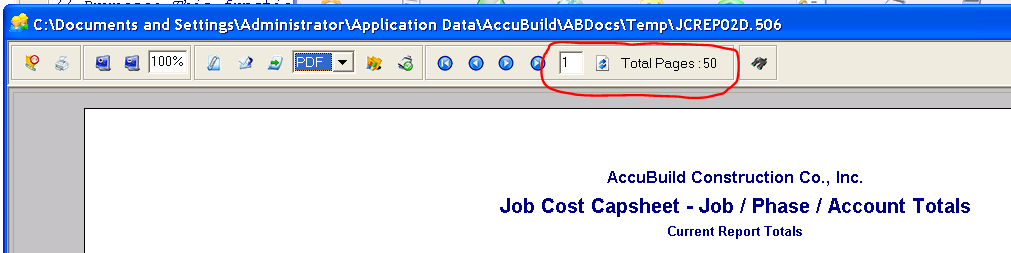
Go To Page Option: To use the Go To Page Number field, type in the desired page number that you would like to navigate to and press Enter/Return key or Tab key. This will navigate the report viewer to the entered page number.
Mouse Wheel Scrolling: Use the mouse wheel to scroll through the pages of the report. As the scrollbar reaches the beginning or ending of a page, the viewer will jump to the next / previous page.
Page Cout Refresh Button: When performing drill downs on reports, the total number of pages may increase due to the expansion for the drill down area. Use the refresh button to update the report page count in order to get the proper number of pages when the report has expanded.