Database Structure Update - This update requires database structure changes to your company database files. You will be prompted to update the database when the program is first opened after installing the 9.6 Release. There are at least three databases that will be updated with this update and possible more if you have multiple companies and / or multiple users within each company. Database restructure processing is outlined below:
●BASEGLOB - AccuBuild Global Database - Updated when the AccuBuild Program is opened for the first time by any user. This process is only done ONE time per AccuBuild Program Installation.
●BASECOMP - AccuBuild Company Database - Updated the first time a company is opened by any user. This process is done ONE time per Company.
●BASEUSER - AccuBuild User Database - Updated the first time a user logs into a company. This process is done ONE time per User per Company.
Example 1: User Joe is the first user to log into the AccuBuild Program for Company “A” after the update is installed:
●BASEGLOB is updated for new structure changes (one time for global database)
●BASECOMP is updated for new structure changes (one time for Company “A” database)
●BASEUSER is updated for Joe (one time for User Joe in Company “A”)
Example 2: User Sally is the second user to log into the AccuBuild Program for Company “A”:
●BASEUSER is updated for Sally (one time for User Sally in Company “A”)
Note: At this point, Joe and Sally will never be prompted for restructure going forward when they log into Company “A”. However, if Joe or Sally are have user access to another company in AccuBuild, they will be prompted again for that company.
IMPORTANT - Before any database restructures are done, a backup of the company databases are made to a zip file in the company folder.
TimeCard Worksheet Screen - New Feature
●Overview: A new feature has been added to allow support for Other Pay Transactions on the Timecard Worksheet Screen using department code settings. You can now set up specific department codes that will change any time card entry that is entered for Regular or Overtime Pay Hours to any of the Other Pay Transaction Types. For example, if an employee’s vacation pay is processed as normal pay, but coded to a department code that is set up for a transaction type override, the transaction type will be changed during the time card worksheet import process so that the pay type is classified correctly according to the department code setting.
●Setup: To Implement this feature you will need to do the following:
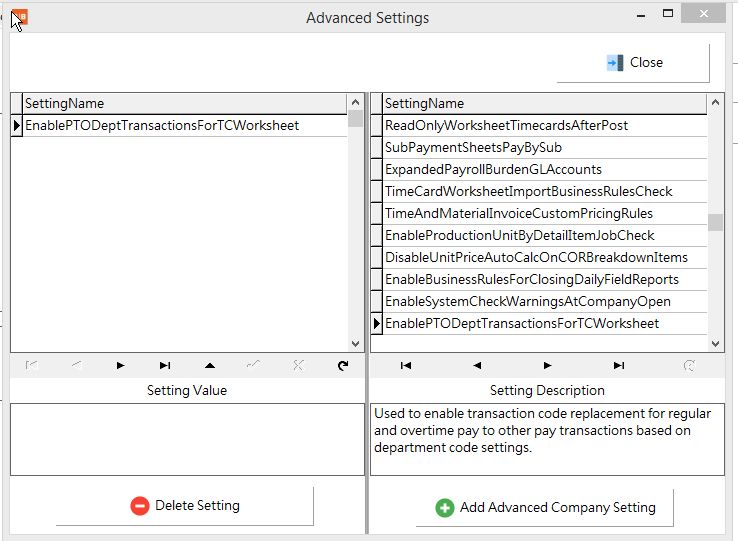
○Set up the Advanced Setting Feature in the system configuration screen entitled EnablePTODeptTransactionsForTCWorksheet. Use the Add Advanced Company Setting Button to enable this setting which will then list the setting on the left side of the screen.
oUpdate the Department Codes List with new department code entries that will be used to control the Other Pay transaction types. These department codes are set up as normal but will include an additional set of fields on the Advanced Settings Tab as outlined below:
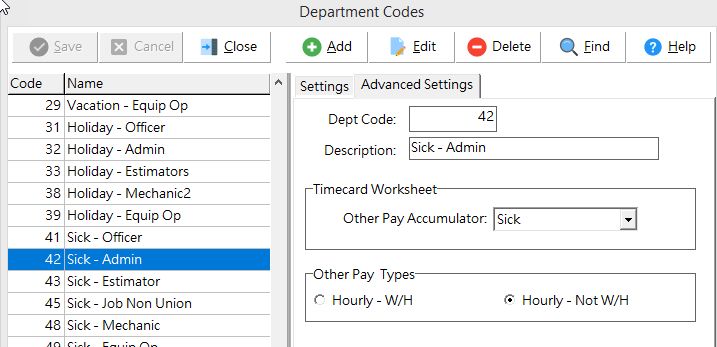
Dept Code & Description: These are read only fields that are used to show which department code is currently selected.
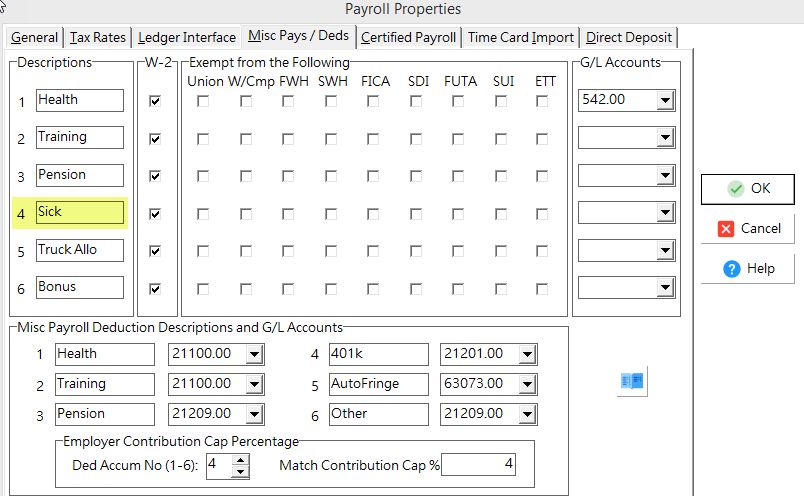
Other Pay Accumulator: This field is used to assign the other pay accumulator that will be used for the pay transaction. The Other Pay transactions are defined on the Misc Pays / Deds Tab of the Payroll Properties Screen. Select one of the pay options from the drop down list.
Other Pay Types: These additional settings help to define how the other pay is processed for the payroll check calculations:
●Hourly - W/H: This option represents the hourly and withheld setting. With this option, the pay amount is included as pay on the employee check, and then also withheld as a deduction. These are typically referred to as In and Out Pay types where the amount shows up as a pay amount on the payroll check and is then deducted from the net amount of the payroll check.
●Hourly - Not W/H: This option represents the hourly and NOT withheld setting and is typically how the other pay transactions are set up. The amount of the other pay is included in the pay amount on the payroll check and NOT withheld from the net amount of the check.
Transaction Type Settings: The Department Code Advanced Settings are stored in the Department Master Table using the associated time card transaction type for other pays. The various transaction type settings are listed below and are stored in the INTEGER1 Field of the Department Master Table:
●0 = Not Enabled
●11 - Misc Pay 1 - Hourly - W/H
●17 - Misc Pay 1 - Hourly - Not W/H
●12 - Misc Pay 2 - Hourly - W/H
●18 - Misc Pay 2 - Hourly - Not W/H
●13 - Misc Pay 3 - Hourly - W/H
●19 - Misc Pay 3 - Hourly - Not W/H
●71 - Misc Pay 4 - Hourly - W/H
●77 - Misc Pay 4 - Hourly - Not W/H
●72 - Misc Pay 5 - Hourly - W/H
●78 - Misc Pay 5 - Hourly - Not W/H
●73 - Misc Pay 6 - Hourly - W/H
●79 - Misc Pay 6 - Hourly - Not W/H
oProcess: The timecard worksheet screen is where the other pay transactions are processed. This process takes place during the Import option where the timecard worksheet entries are imported for processing payroll checks. As each worksheet record is imported, the department code for that record is checked against the department master record setting for that department. If the department is set up with an transaction override setting (as indicated on the Advanced Settings Tab of the Department List), AND the worksheet record pay transaction is set for Regular or Overtime Pay, then the transaction type on the worksheet record will be changed to the Other Pay setting from the Department Master List.
Salaried Employee Time: This transaction code override feature will also work for timecard worksheet entries that are entered for salaried employees that are set up for Salary - Distributed Hours or Salary @ 40 Hrs - Mobile.
Overtime Pay Transactions: The pay rates for the Other Pay transactions will be based on the employee’s regular pay rate. It is important to note that all overtime entries will be processed for the department code override feature, however, the Other Pay amount will be computed based on the regular pay rate only and the overtime factor for the computed other pay amount will be ignored.
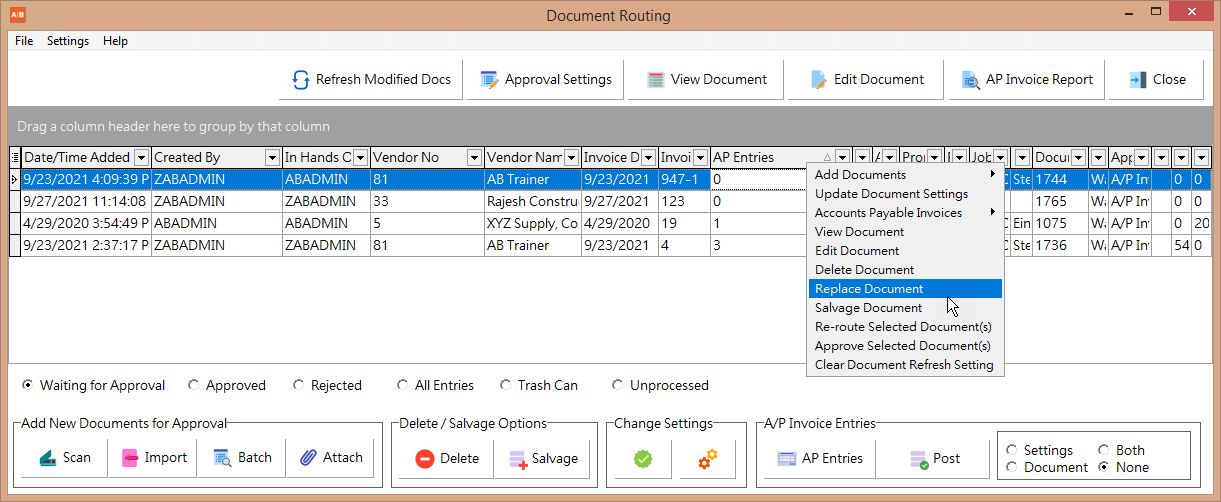
Document Management (ADMS) - New Feature
●Overview: A new replace document feature has been added to the document management system that allows for the replacement of an existing document with a new document. This feature eliminates a lot of extra steps that are necessary to fix the situation where a document is processed through the system, and later it is discovered that the attached document was the wrong document. With the replace document feature, you can replace the existing document without the need to create a new document record and then update all of the necessary document tags. For example, when using the invoice approval process and attaching documents, if you discover that the attached document is the wrong invoice (even after all of the entry screens have been updated), you can use the new replace document feature to change the invoice document without having to do all of the invoice entry and approval work again.
●Setup: Currently there is no setup required. If the AccuBuild user has access to the attach document menu in the document management system, then they will have access to the new replace document menu option.
●Process: The process of replacing a document is a simple two step process as outlined below. In addition to the replacement operation, an extensive audit trail process is carried out by the system in order to track the replacement operation including information pertaining to the original document being replaced:
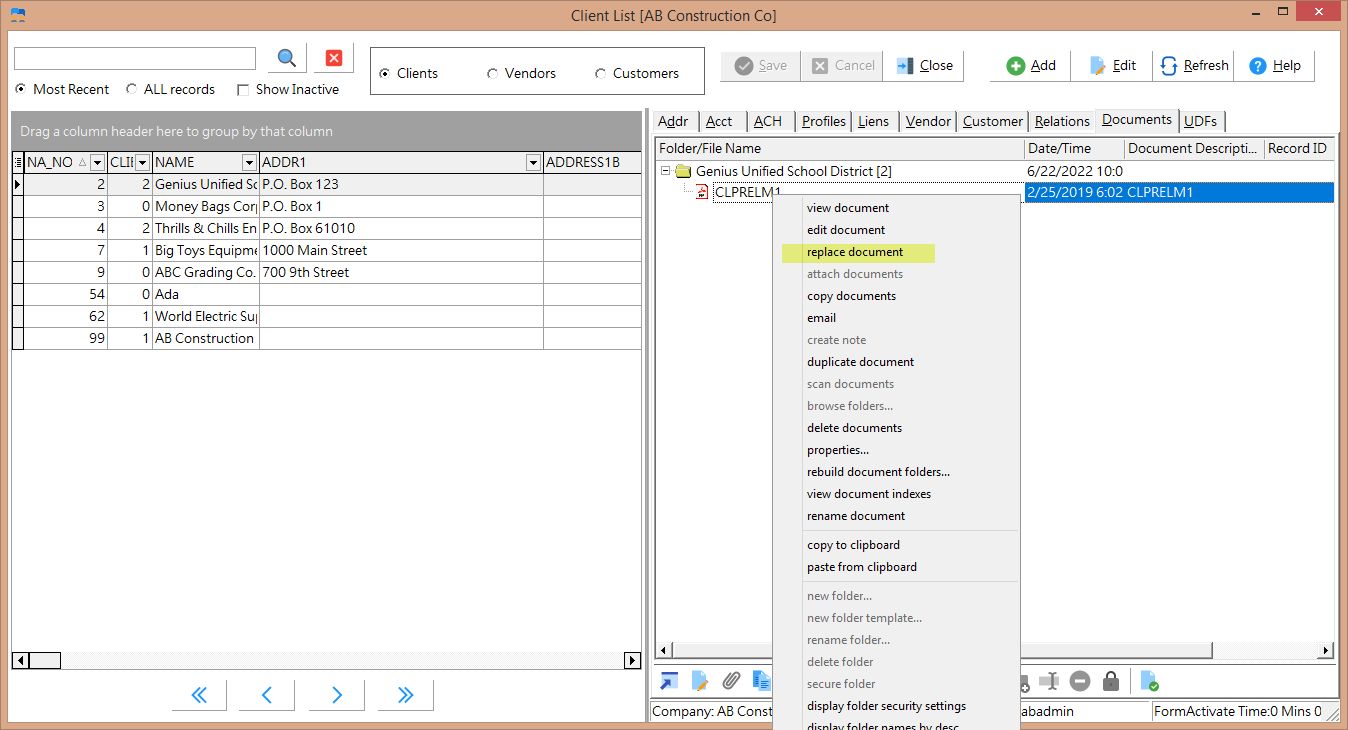
1.To replace a document, right click on the document from the document explorer window and select the replace document menu option.
2.An explorer window will be opened for accessing the new document. Locate the desired document and click the Open Button to replace the document or click the Cancel Button to cancel the operation.
Note: The replacement document does NOT have to be the same type of document as the original document. In other words, if the original document was a PDF document, you can replace it with a Word Document or Excel Spreadsheet.
Replacement Operation / Audit Trail: The process that is carried out for replacing a document involves several steps behind the scenes:
●The document window will show the new document name the next time the screen is opened. You can also use the Refresh Button located at the bottom of the document window to update the display immediately.
●Two document transaction records are created for the document in order to build an audit trail for the replacement operation. You can view these document records by right-clicking on the document and selecting the properties… menu option. Once the Document Properties screen has been loaded, you can click on the Document History Tab to see the transaction records:
○Duplicate Transaction - The first record is a Duplicate transaction record (Trans Code = 5) and shows a new ADMS Record ID which represents the original document that was replaced. The first step in replacing a document is to make a copy of the document and the associated ADMS Record which contains all of the original document tag settings.
○Replace Transaction - The second record is a Replace transaction record (Trans Code = 10) to note that a document has been replaced.
●The duplicated document record (representing the original document being replaced) is then marked as a deleted record (DocumentRecStatus = 1) and the physical document is moved to the user’s TrashCan Folder. This original document can be recovered if necessary by using the attach documents menu option and browsing to the user’s TrashCan Folder.
The actual steps that are carried out for the document replacement operation are documented in the following:
○Duplicate the document that is being replaced as an ADMS duplicated document - same process as duplicate document option. A new ADMS Record is created to represent the new document.
○Mark the new document that was created in the previous step as deleted - same process as delete documents option. This new document record will NOT be visible in the Document Management System after being deleted. This deletion process causes a copy of the original document to be placed in the user’s ADMS TransCan Folder which can be browsed and reattached if a document is ever accidently replaced.
○Replace the original document on disk with the new document and update the ADMS record with the new document name and file extension information.
○Create 2 transaction records for the original document that was replaced to keep an audit trail of the activity. A duplicate document transaction record (Trans Code = 5) is created so that the record number for the duplicated record in the first step is saved. This record number is kept in the transaction record description and is enclosed in brackets [nnn]. The second record is the replace document transaction record and is used to record that the original document was replaced.
●Feature Access Points - The new replace document feature is available on all of the document explorer windows including the Master List screens such and employees and jobs, the project management log, and the document routing screen (pop up menu on the document grid).
Equipment List - Cosmetic Changes / Bug Fix
●Bug Fix - In the previous update, a new feature was added to equipment relocation process to allow a job cost phase to be included in the transaction record. When a phase code was used in this new feature, an additional transaction record was being added to the EQTRANS table with blank fields. This issue has been corrected.
●Cosmetic Changes - The following cosmetic changes were made to the Equipment List Screen:
○The Equipment List now opens with the first piece of equipment at the top of the screen.
○The Equipment Master Record will now contain the most recent location entry including the phase when applicable.
○The equipment list transaction grid is now sorted in descending order by transaction date and transaction sequence number to have latest entries at the top of the screen.
AccuBuild Mobile - MAR Reports BUG FIX
●Then MAR Report for AccuBuild Mobile was not working correctly for any jobs where a blank job description encountered in the JOBLIST table. The mobile report system has been updated to trap that situation and produce the report without errors.
Account Payable - Properties Screen Change
●The option for setting up the Advanced Grid option for the Schedule Payments Screen in the Accounts Payable Module has been removed. The system will now use the Advanced Grid as the default setting. If you have never used the Advanced Grid setting for scheduling invoices for payment, you will now have more features for selecting, sorting, and grouping payable invoices as you prepare for the invoice payment process.
MAR Reports - New Library Reports / Forms
●Payroll Report - EEO - Equal Employment Opportunity - Trans Date - Class 623
●Accounts Payable - Proposed Payments Schedule for ACH - Class 583
●Accounts Payable - Vendor Remittance Statement for ACH Payments - Class 283 - This is a special report and auto-email form for previewing the Vendor ACH Statements and then emailing individual PDFs to each vendor. This form also is supported by under the MAR Form Assignments so that the Vendor ACH Payments can be tailored for individual companies.
Accounts Payable - New Feature for ACH Vendor Payments
●Overview: The accounts payable module now supports ACH Payments for vendor invoices which will produce NACHA files for bank processing in place of paper checks for designated vendors. The payment process and flow is very similar to the printed check process with the exception that no checks are printed and the check numbers assigned for ACH Payments are in a distinct range of 9 digit numbers starting with 8. (80000000). After the ACH Payments are posted through the system, additional steps are required to create the ACH (NACHA) file for your bank to process the payments, and to print and optionally email the vendor remittance statements for the ACH Payments.
●Setup: In order to use the ACH Payment option, several setup steps must be carried out as outlined below:
○Bank Account Setup: One or more bank accounts from the Chart of Accounts must be set up (enabled) for handling ACH Payments. Refer to the ACH Settings Button on the Accounts Payable Properties Screen for more information.
○Vendor Setup: Vendors that will be paid via the ACH Process must be set up for ACH with proper routing and bank account numbers. See the ACH Tab on the Vendor list for more information.
○Report / Form Setup: The ACH Proposed Payment Report and the ACH Vendor Statement Form need to be set up for any users that will be involved with ACH:
■Report Security: The MAR Forms / Reports for ACH will need to be secured for the users that will need access. Refer to the Properties Button on the MAR Report List for more information on MAR Security. The following accounts payable forms / reports will need to be accessible for ACH users:
●APPROPYX.583 - ACH Proposed Payments Report
●APCKACH1.283 - Vendor ACH Remittance Statement
■Report Modification: The above library reports should be reviewed and modified if necessary for your company’s specific needs. Refer to the MAR Documentation for copying and modifying an MAR report or form.
■Form Assignments: Set up the form assignment options for the Vendor ACH Remittance Statement if you would like to assign a custom version of this form to serve as the system default when the Vendor ACH Payment Forms are created. Refer to the documentation on Custom Form Assignments for more information.
●Process: The process for paying vendors electronically with ACH is very similar to the paper check printing process with a couple of additional steps for the electronic file processing of the ACH file and the vendor remittance statements:
○One Time Setup Steps - There are a couple of initial one time setup steps for bank accounts and vendor settings that must be carried out prior to processing any ACH Vendor Payments:
■ACH Settings: In order to use the Vendor ACH Payment feature in AccuBuild, you must provide the following information for each bank account that will be used for ACH Vendor Statements. These bank account setting fields are maintained in the ACH Settings Screen which can be accessed from the Payable Properties Screen using the ACH Settings Button. Use the Add Button to set up a new bank account for ACH Processing, Use the Edit Button to edit an existing bank account record, and used the Delete Key to remove a bank account from the ACH Process. The fields required for each bank account records are outlined below:
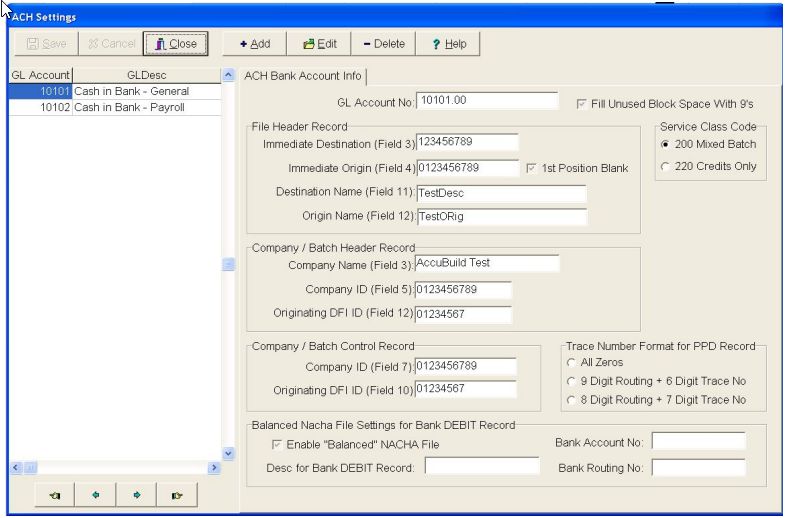
■GL Account No: This field represents the general ledger account in the Chart of Accounts for representing the Bank Account to be set up. Select an account from the drop down list. NOTE: Each ACH Bank Record must contain a unique G/L Account Number. An error will be displayed if you try to add the same account more than once.
■Fill Unused Block Space with 9’s: - The ACH Specification states that the blocking factor for the file is 10 records per block and if the last block in the file does not contain 10 records, then all unused record space needs to be filled with the value '9'. This is NOT required by all banks and if your bank DOES require this, then be sure to check this box.
■File Header Record Settings
●Immediate Destination - This is Field 3 of the File Header Record and represents the 9 digit number that identifies your bank as the destination of your ACH Payment file information. Your bank will provide this information. (Usually the Bank Routing Number).
●Immediate Origin - This is Field 4 of the File Header Record and represents the 10 digit number assigned to your company by your bank. Your bank will provide this information. (Usually your Bank Account Number; may also be your 9 digit Federal Tax ID Number preceded with 1).
●1st Position Blank - Check this box to put a blank character as the first character of the Immediate Origin field which overrides the first digit of this field followed by the remaining 9 digits of this field.
●Destination Name - This is Field 11 of the File Header Record and indicates the name of your bank. Your bank will provide this information.
●Origin Name - This is Field 12 of the File Header Record and holds your company's name up to 23 characters.
■Company / Batch Header Record Settings
●Company Name - This is Field 3 of the Company / Batch Header Record and represents your company's name up to 16 characters as it will appear on the payee's bank account statements.
●Company ID - This is Field 5 of the Company / Batch Header Record and represents the 10 digit number assigned to your company by your bank. Your bank will provide this information. Note: AccuBuild does not support multiple batches in the same ACH File so this field will always be the same as Field 4 of the File Header Record.
●Originating DFI ID - This is Field 12 of the Company / Batch Header Record and represents the 8 digit Originating DFI Identification Number. Your bank will provide this information. (Usually the Bank Routing Number without the last digit.)
■Company / Batch Control Record Settings
●Company ID - This is Field 7 of the Company / Batch Control Record and will be identical to Field 5 of the Company / Batch Header Record. This field is read-only and will be filled in automatically.
●Originating DFI ID - This is Field 10 of the Company / Batch Control Record and will be identical to Field 12 of the Company / Batch Header Record. This field is read-only and will be filled in automatically.
■Service Class Code
●The Service Class Code setting has been added to override the default class code of "200" in the batch control records. Setting this field to "220" may be required by some banks to indicate that the file only contains "Credit" entries and NO Debit entries.
■Trace Number Format for PPD Record
Some bank require a unique 15 digit 'trace' number be assigned to each vendor record in each batch which is similar to a check number. Choose from the following options:
○All Zeros (Default Setting)
○9 Digit Routing Plus 6 Digit Trace Number
○8 Digit Routing Plus 7 Digit Trace Number
■Notes - Bank Specifications
The banks listed below use the following options:
●Inland Community Bank, Ca. - Use the 9 digit company phone number for Fields 4, 5 & 7; Trace number format = All Zeros.
See Also:
●Outline for Setting Up the Vendor ACH Payment Feature
●Set up ACH Payment Information on the Vendor Screen
●Process ACH Payment File
●ACH File Specifications
■Vendor ACH Settings:
ACH Payments (ACH - Automated Clearing House) is a transaction that deposits the vendor's ACH Payment directly into the designated vendor bank account.
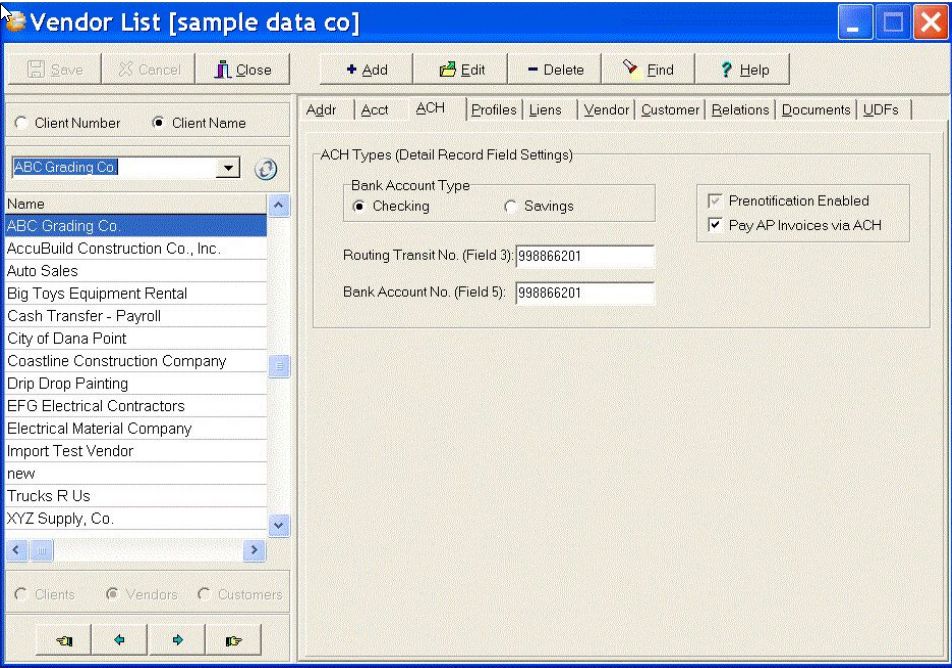
●Complete the account information on the ACH tab of the vendor's record on the Vendor List. You must select either the Pre-Notification or the Pay A/P Invoice via ACH option, these are mutually exclusive options and they cannot both be selected at the same time. In addition, if the vendor is already set up for Comdate Virtual Credit Card payments on the Acct Tab, you will need to disable the Comdata setting in order to enable the ACH Pay option. If the account information is not set up, then the ACH Payment File will not include an ACH record for the vendor. Fill in all of the fields pertaining to the Vendor’s bank account:
○Bank Account Type – Select Checking or Savings. If the account type is not selected, the system will use Checking as the default.
○Prenotification Enabled – Check this box to create a pre-notification record in the ACH file that is sent to your bank.
○Pay AP Invoices via ACH – Check this box when you are ready to begin processing the vendor's payment as a ACH Payment transaction. Note: If the vendor wishes to discontinue the vendor ACH Payment, simply uncheck the Pay AP Invoices via ACH box.
○Routing Transit No. (Field 3) – Enter the vendor's bank account routing number.
○Bank Account No. (Field 5) - Enter the vendor's bank account number.
See Also:
●Outline for Setting Up the Vendor ACH Payment Feature
●Set up ACH Payment Information on the Payables Properties ACH Settings Screen
●Process ACH File
●ACH File Specifications
○Pay Invoices via ACH (same as Schedule Payments)
The Pay Invoice Via ACH option is used to schedule unpaid invoices for ACH payment. This screen is the same screen that is used for selecting vendor invoices for payment with paper checks and works identical with the exception of text labels on the screen. The only real difference on the ACH Invoice Screen is that the payable invoices are only displayed for those vendors that are set up for ACH Payment in the Vendor List. Please refer to the documentation on the Schedule Payments screen for more detailed information, or press the Help Button located at the top of the screen.
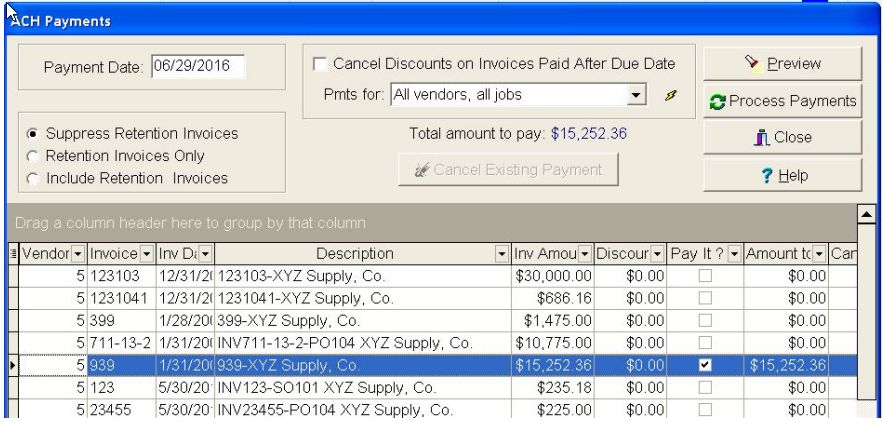
On the ACH Payments screen, enter the Payment Date and press the Enter Key.
1.Select (filter) the invoices for payment using the selection controls:
○Retention Settings - Choose the desired retention option for subcontractor retention payments. By default, retention invoices are hidden from view on this screen. (Refer to Schedule Payments option for more details).
○Cancel Discounts on Invoices Paid After Due Date - If you have set up invoices with discounts, and have not paid those invoices in time to take the discount, then you may click on this option so that the discount amounts will be ignored when the invoices are selected for payment. (Refer to Schedule Payments option for more details).
○Pmts for - Choose from a variety of options to filter the invoices on the screen. Same as the ‘Checks for’ option on the Schedule Payments screen. (Refer to Schedule Payments option for more details).
○Using advanced grid features for invoice filtering - The advanced grid is now the default option for invoice selection which allows further filtering and grouping. You can click on any column to sort the invoice information on that column. You can also group the data by moving any column into the gray area above the columns. Once filtered, use the Pay or Pay All options to select invoices for payment. When using this option to mark invoices for payment, the Total Amount to Pay field will show the totals for the current invoice filter. Hint: You can click the lightning bolt button at the top of the screen to refresh the total for all marked invoices.
2.Use the Pay and Clear Buttons to mark displayed invoices for payment. The Pay All Button will mark all invoices for payment, The None Button will clear the payment setting on all invoices, and the Pay Button allows for individual invoices to be marked for payment. (Refer to Schedule Payments option for more details):
3.After all of the desired invoices have been marked for payment, select the Preview button to display the Proposed Payment Journal for ACH Payments. Review the report to make sure that all of the invoices have been properly selected. If an invoice was missed, simply follow the same steps to add the invoice to the ACH Payment run. If an invoice was inadvertently added to the ACH Payment run, select the invoice and click the Hold button at the bottom of the screen to change the 'Pay It' status of the invoice back to 'False'.
4.Process the ACH Payments - click the Process Payments Button to process the selected ACH Payments which is similar to printing checks except no checks are printed and the invoices are assigned an ACH Reference (check) numbers. A Dialog screen will be displayed for entering the payment information:
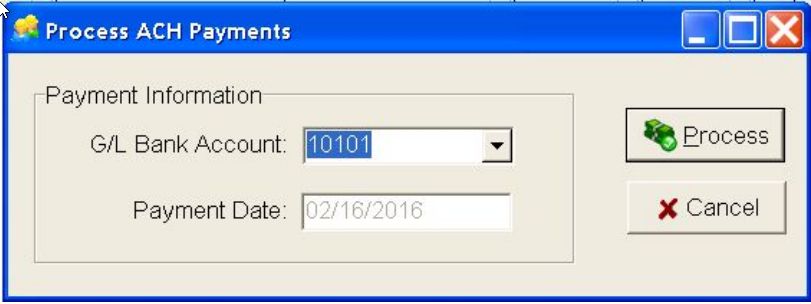
○G/L Bank Account: Select the Bank Account for the ACH Payments. Only the bank accounts that have been set up for ACH Processing will be available for selection on this screen.
○Payment Date: The payment date is copied from the schedule payments screen and cannot be changed at this point.
○Process Button - Click the Process Button to create the ACH Check numbers and process the payments. Each ACH invoice will be assigned a check number based on the ACH check numbering system and a message will be displayed indicating if the process was successful or not.
○Cancel Button - Click the Cancel Button to cancel the operation.
5.If the ACH Payments are processed successfully, you will be prompted to Post the ACH Payments through the accounting system. The posting process is the same as posting printed A/P checks. If you do NOT wish to post the payments at this time, you can do it from the Accounts Payable menu using the Post to Master for ACH menu option. IMPORTANT - You must post the ACH Payment through the system before you will be able to generate the ACH File for your bank and generate the vendor ACH remittance statements .
NOTE: During the posting process for ACH Payments, the APDIRDEP table is updated with the ACH Vendor Payments so that the ACH (NACHA) file can be generated and sent to the bank once the posting is completed. If the posting process is successful, you are now ready to Process the ACH file for your bank and generate the vendor ACH remittance statements.
○Process the ACH File
This option on the Payables menu allows you to process ACH payment and pre-notification records using the Create ACH File option. In addition, you may use this menu to view or reset (rollback) a vendor ACH payment batch that was previously processed for ACH. The Reset option will reset a previously processed ACH vendor payment batch so that the ACH File can be created again.
During the Create ACH File process, an ACH File will be created that can be transmitted by you to your bank for automatic processing of ACH payments. Vendor ACH remittance statements may also be generated after the ACH file has been created that provides a copy of each vendor's payment information. This statement can then be e-mailed (optional) to the vendor and a copy will be stored on the Documents Tab of the vendor's file.
Processing ACH and Pre-notification Records
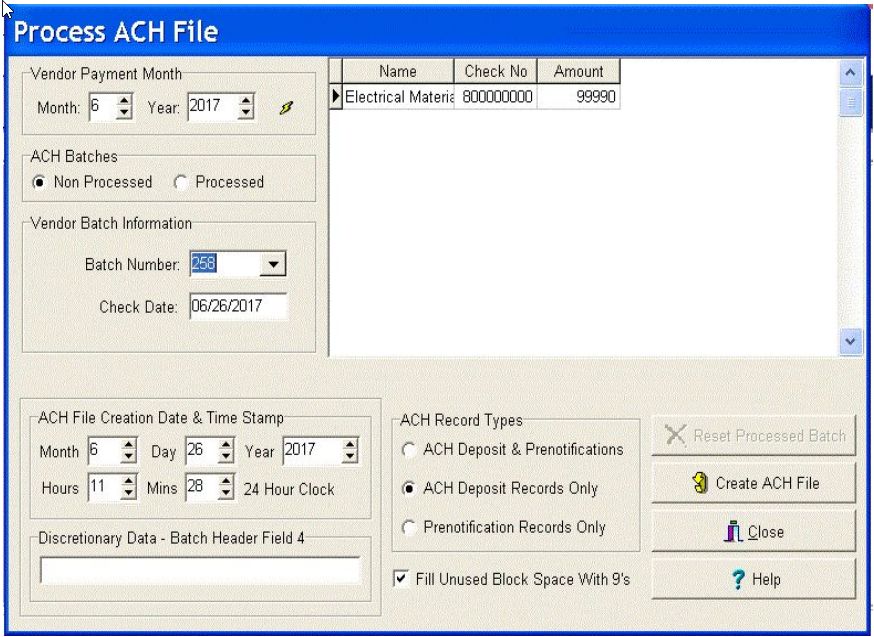
The following outlines the procedures for creating ACH Files for vendor ACH payment batches as well as pre-notification records:
■Vendor Payment Month – Select the desired month based on the payment date of the Vendor Payment to be processed and click on the Refresh Button to list all batches that have not been processed for ACH Payment. Note: Make sure the ACH Batches option is set for Non Processed batches.
■Vendor Batch Information – Select the desired batch from the list of unprocessed batches. The vendor check information for each selected batch is included in the grid on the right-hand side of the screen.
■ACH File Creation Date & Time Stamp – Review the date stamp information for accuracy and adjust if necessary. This information is pulled from the workstation's time and date setting and will be used for the file creation date fields in the ACH File.
■Discretionary Data – Batch Header Field 4 – This is an optional field that can be used for your company's internal purposes and will be included in Field 4 of the Batch Header Record of the ACH File. This field may be left blank.
■ACH Record Types – Select the type of records to be included in the ACH File. The ACH Specification allows you to transfer ACH Payments as well as pre-notification records in the same batch. If you want to process ACH Payments and pre-notification records in separate batches then you may change this selection as desired. Note: Your bank may be charging you a fee for each ACH File that is processed so if you combine these two record types into a single file, you could save on bank charges.
■Fill Unused Block Space With 9's – The ACH Specification states that the blocking factor for the file is 10 records per block and if the last block in the file does not contain 10 records, then all unused record space needs to be filled with the value '9'. This is NOT required by all banks. This setting can be found on the Payable> Properties>Setting tab>ACH Settings screen.
Create the ACH File
Click the Create ACH File Button to create the ACH File and preview the records in the file for accuracy. The file will be created and the Vendor ACH File Screen will be displayed along with all of the ACH File Records in the selected batch.
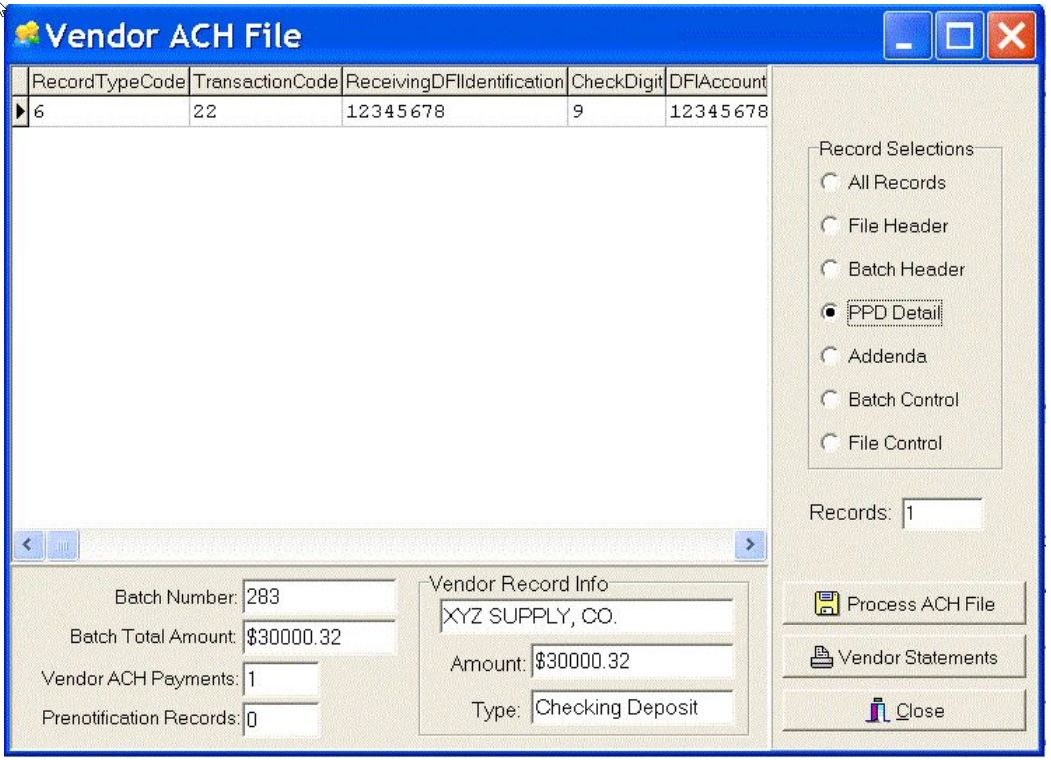
Review the file information for accuracy. The bottom of the screen will show the batch information including the Vendor Payment batch number, the total amount of all ACH Payments, the number of ACH Payments, and the number of pre-notification records. If you want to preview each record type in the ACH File, simply select a record type from the Record Selections list and the selected record(s) will be displayed along with the field headings for each field in the record. If the PPD Detail selection is selected, then the vendor information for the selected record will be displayed at the bottom of the screen.
■Note: The ACH File is a Fixed Format Ascii Text File as viewed under the "All Records" option. When you choose a specific record type, the system will display the record(s) with the Field Names as indicated in the ACH File Specification. This allows you to view each field of each record type for accuracy before transmitting the file to the bank.
Click the Process ACH File Button to save the ACH File and process the ACH information. You will be prompted for a filename and location which you will need to locate when you are ready to transfer the ACH File to your bank. Your bank will provide you with more information on how to transfer the file to them.
■Note: AccuBuild automatically keeps a copy of all processed files so you do NOT need to name each file with a separate file name, you can simply replace the previous file each time you process a new ACH batch. Use the View Processed ACH Files menu option to view previously processed ACH files.
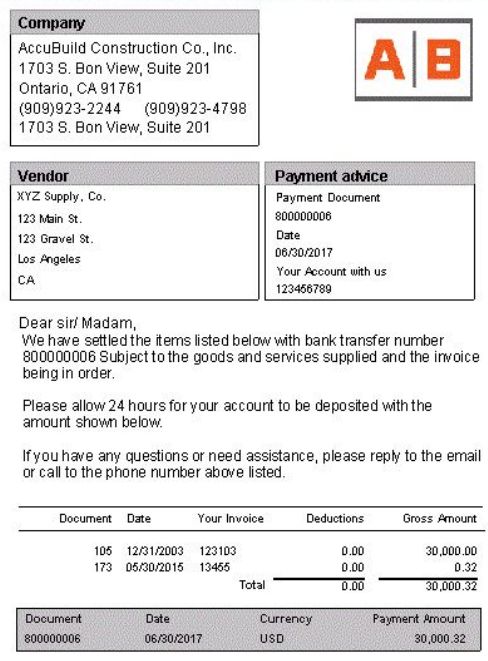
Use the Vendor Statements button to generate a single page report for each vendor that includes the current payment information for each vendor ACH record.
■This form is an automated e-mail / merge form so once the statements are previewed, the statements may be automatically emailed to the vendor and a copy saved under the vendor’s Document Tab. Be sure to set up an email address for each vendor on the Payables > Vendors > Addr Tab. If you do not wish to email the statements, then you may ignore and cancel the email pop up screen, and then print the statements instead.
■In order to utilize this feature, be sure to go to Reports > All Reports > Properties Button to grant access to users that will need to create this form. The Vendor ACH Statement is located in the Accounts Payable Forms group and it may be copied and modified for individual tailoring for your specific company needs.
●To view the Vendor ACH Statements, you will need to either process a new ACH file OR view a previously processed ACH File. Simply click the new Vendor Statements button on the ACH File preview screen and the statements will be generated.
An entry will be made in the company batch log for each ACH batch process. Refer to the Batch Selection control in the batch log for more information.
If you DO NOT want to process the ACH file at this time, simple click the Close Button to cancel the process. Remember: If you process a file by mistake, simply use the Reset Processed Batch option on the Process ACH File Screen to roll back the process.
Reset Processed ACH Batch
The following steps outline the procedures for resetting or rolling back a processed batch of ACH Payments. This step is used to cancel a ACH file for a specific batch so that it can be recreated. Once the reset option has been performed on a batch, the batch will be listed on the Non Processed list of batches again. There is NO LIMIT as to how many times the same batch can be reset which can be very helpful in the early testing stages when the ACH system is first being set up. Reset a processed batch as follows:
1.Vendor Payment Month – Select the desired month based on the payment date of the Vendor Payment to be reset and click on the Refresh Button to list all batches that have been processed for ACH. Note: Make sure the ACH Batches option is set for Processed batches.
2.Vendor Batch Information – Select the desired Batch Number from the list of processed batches. The vendor ACH Payment information for each selected batch is included in the grid on the right-hand side of the screen.
3.Reset Processed Batch Button – Click this button to reset the selected batch. The batch will be reset and a message will be displayed indicating that the reset process was successful. The reset batch will now appear on the Non Processed list of batches for further processing.
View Processed ACH Files
This menu option allows you to view any processed ACH batch (ACH File) for lookup purposes. A list of ACH batches will be displayed on the screen and you can view a batch by double-clicking on the batch number or by selecting the batch and then clicking on the View ACH File Button.
Note: The list can be sorted by File Description or by Date Processed by simply clicking on the title bar of the desired column.
After you view the ACH file, you will have an option to reprocess the Vendor Statements. Simply click the new Vendor Statements button on the ACH File preview screen and the statements will be generated. The statement is a single page report for each Vendor that includes the current payment information.
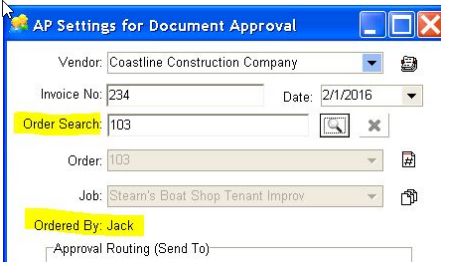
AP Routing Process - Document Approval Settings Screen Enhancement
●The AP Settings for Document Approval Screen has been updated with some new controls to help with locating the proper order number for Vendor Invoices that related to an order in the purchase order system. A new optional Order Search Field has been added to allow the order to be typed in and then located with the Search Button. If the order is located, then the Order, Job, and Ordered By fields will be updated automatically and locked in to prevent these controls from being changed. In addition, the purchasing agent who created the order will be displayed next to the Ordered By label. You can use the Cancel (‘X’) Button next to the Search Button to unlock the Order and Job fields at any time to update those fields manually.
Tailored Solution Framework - New Framework Class Process
●A new development framework class has been added in this release which will allow for tailored solutions to be added on the Form Close events in AccuBuild. The new class code is 119900.
Payroll - State Tax Table Updates for July 1, 2017
●Illinois - State Withholding Tax rate increased from 3.75% to 4.95%
●Idaho - Tax Tables updated
●Kansas - Tax Tables updated
●New York City Tax Tables updated
Payroll - BUG FIX
The Union Screen had some issues with copy button feature:
●A copied set of union codes was not updating the UnionMaster and UnionI fields correctly.
●The Add option for adding a new union code after copying a set of union codes would not allow a new union to be added because of the issues when a set of codes was copied.
●The Add option option was not setting the fields and effective dates to the current active rate set.
These problems have been corrected in this update.