Once the payroll taxes have been calculated, the Print Paychecks option is enabled.
| 1. | Enter the check date. This date is applicable to all checks, including direct deposits, within the batch. |
| 2. | Enter a starting check number. The system will default with the next available check number based on the last payroll batch that was posted but any value between 100 and 99,999,999 can be entered. |
| Note: If the Unique Check Number Sequence for Direct Deposit Checks option in the Payroll > Properties is enabled (recommended), then the direct deposit items will be assigned a unique number starting with 700,000,000 but they will not be printed during this process. Please read the full documentation in the Payroll > Properties section of this manual for complete information on this topic BEFORE attempting to print your checks the first time. |
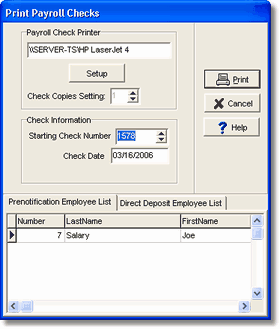
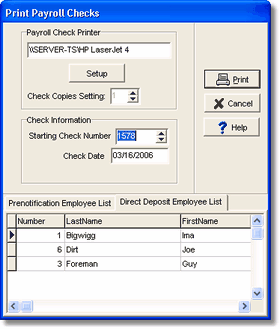
| 3. | The default payroll printer information may be changed to allow the printing of the paychecks on another printer. |
| 4. | The payroll check printing dialog includes a list of employees who are set up for direct deposit processing. This allows you to review the employee information prior to printing the payroll checks in case changes need to be made in the employee file. For example, if an employee's pre-notification record has already been transmitted to the bank, but the employee is still marked for pre-notification, you can cancel the check printing and change the employee setting so that the employee's check will be processed as a direct deposit check. If you need to make any changes to the employee settings for direct deposit payroll, simply click on the Cancel Button and make the desired changes in the employee's file. After all the employee changes have been made, open this screen again to verify the changes before processing the checks. |
| Prenotification Employee List – This list contains all of the employees who are currently set up for pre-notification processing. Employees on this list will still receive a printed paycheck until they are set up for direct deposit payroll. A pre-notification record will be created as a test record for these employees when the NACHA File is produced for the current payroll run. |
| Direct Deposit Employee List – This list contains all of the employees who are currently set up for direct deposit payroll. |
| 5. | Make sure that the payroll checks are loaded in the printer and select Print to begin the check printing process. AccuBuild will print the payroll checks in employee number order. Once all the checks have been printed, the system will return to AccuBuild's main menu. |
| Note: If the Unique Check Number Sequence for Direct Deposit Checks option in the Payroll > Properties is NOT enabled (not recommended), then employees with direct deposit will be printed a receipt which is in the same basic format as a payroll check but has the following modifications: |
•These receipts are intended to be printed on the physical check in order to keep the check sequence intact so be prepared to use up check stock.
•The check number field will be noted as 'DD Ref #' instead of 'Check #' on the check stub
•The check face will print 'Void' in place of the net amount and the check amount literals will be replaced with 'Direct Deposit Pay - Receipt Only'
•Assuming your check style prints two pay stubs, give one pay stub to your employee as required by law. Retain the 'check' portion and the second stub for in-house records.
| 6. | If any of the checks have not printed, or did not print correctly, select the Reprint Checks option. The reprint option is only available after the checks have first been printed with the Print Paychecks option. The screen displays a list of all checks in the current payroll batch and you may select each specific check to be reprinted. AccuBuild will prompt for a new starting check number but the same check number may be used when printing only a copy of the check. The printing process is then the same as in the Print Paychecks option. The reprint option may be repeated as many times as necessary. |
| Hint: The automatic checks are printed with a control number that corresponds to the check number. The control number will be used as the check number when the data is spread through the system. Be sure these two numbers match before going on to the next step. |
| 7. | If all the checks have printed correctly, select the Post to Master option to spread the check entries to all applicable systems. |