|
Note: The Advantage ODBC Driver (Version 8.10)must be downloaded and installed on any workstation that will be utilizing the mail merge functions. The Advantage website can be accessed directly from the Help option on the main screen of the AccuBuild program but you will need to browse to the driver downloads. Save the driver on your desktop and then double click on the saved file to start the installation. Allow the driver to install to the default location on the local drive.
| 1. | Create a new blank document in MS Word and save to any folder on your workstation. |
| 2. | Open the project management log in AccuBuild and drag or attach the new MS Word Document to the document panel on any of the project management logs. |
| 3. | Right-click on the newly attached document and select the update document class option from the pop up menu. |
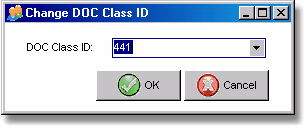
| 4. | Select the desired class option and click OK. The class ID refers to the type of form or report within AccuBuild. For purposes of the email merge, select class 441 - Document Folder Information. |

| 5. | Open the new document from the project management module using the Edit button. |
| 6. | Select the Mailings Tab from the MS Word Menu. |
| 7. | Click on Select Recipients from the Start Mail Merge group. |
| 8. | Select Use Existing List ... from the drop down menu. |
| 9. | The Select Data Source dialog will open up and you will need to navigate to the C:\AccuBuild\ODBCMM folder and change the file type select to *.DQY for selecting database queries. |
| 10. | Select the desired database query file that pertains to the type of data that you will be connecting to. The query files will be named very similar to the log type where the Word Document was attached on the documents panel of the PM log. AccuBuild creates one or more DQY files based on the document class assigned to the document in step 3 above. The DQY files are copied to the user's local hard drive under the C:\AccuBuild\ODBCMM Folder. |
| 11. | When prompted for Word to reopen the .DQY file every time, click Yes. |
| 12. | Create the desired document and insert the desired mail merge fields from the AccuBuild Database using the Insert Merge Fields button from the Write & Insert Field Group. |
| 13. | A pop up dialog will be displayed with all of the available mail merge fields. Be sure to select the Database Fields option under the Insert section. |
| 14. | To preview the mail merge form with the attached data, use the Preview Results Button along with the associated page controls if the document is being merged with multiple records from the AccuBuild Database. Click the Preview Results Button again to return back to the design mode on the original form. |
| 15. | Save the new document and close Word. Note: Be sure the document is CLOSED before continuing on with the next step. |
| 12. | From the PM Log Documents panel (lower part of the screen), select the File Modified Documents in ADMS from the pop up menu. This will file the new word document back into ADMS on your file server. Note: If you forget to do this step, AccuBuild will attempt to automatically file this document into aDMS when the AccuBuild Program is closed. |
Note: At this point, your mail merge template document can be used in conjunction with AccuBuild data and copied and shared with other jobs and even other companies in the AccuBuild System. When copying a document to another job or another company, you will need to set the desired class on the document as outlined in step 3 above.
A new folder entitled MailMergeDocs located under the AccuBuild Program Folder contains sample mail merge documents that can be used for testing this new feature. Please refer to the following list for more information on each mail merge document and the related class code to be assigned to the document:
|
