The Enter Invoices option allows the user to enter new accounts payable invoices into a temporary batch file (appjbat.adt) located in the user's directory that holds the invoices until the invoices are posted through the system. The various data files will not be updated until the posting process is performed. Each invoice that is entered into the system will require a proposed payment date, the vendor name, the vendor's invoice number, the invoice date and amount, and a general ledger expense account. Keep in mind that an individual invoice may contain an unlimited number of cost distributions that may include expensing to job/phase combinations and equipment codes. In addition, discount percentages or flat amounts may be entered, and units may be tracked. As each invoice is entered, AccuBuild will automatically assign an internal invoice reference number to the invoice for future use in paying or voiding the invoice. As invoices are entered, AccuBuild will check the Payables system for duplicate vendor invoice numbers and, if found, will display a warning message along with the previous amount billed.
| 1. | Select Add at the top of the Accounts Payable Invoices screen to enter a new vendor invoice. |
| 2. | Enter the basic information about the vendor invoice. |
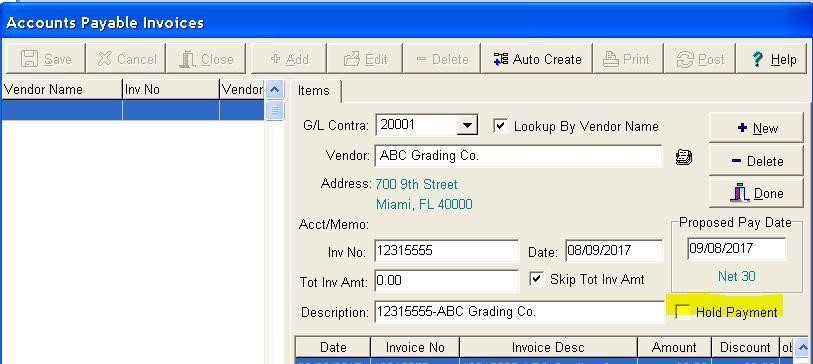
| G/L Contra |
| This field represents the default accounts payable accrual accounts as set up in the Payables > Properties option. The account may be changed as necessary by selecting a new account from the drop down list. |
| Vendor |
| Enter the vendor number (or vendor name depending on whether the Lookup by Vendor Name option is enabled). AccuBuild will automatically display the vendor's mailing address information along with any check memo information that was entered with the vendor information. |
oNew Invoices - when new invoices are entered into the batch, only the active vendors will be available for selection.
oExisting Invoices - If an invoice exists in the batch for a vendor that has subsequently been marked as inactive, it will still show the inactive vendor name and allow the invoice to be processed.
| Inv No |
| Enter the vendor's invoice number. AccuBuild checks for duplicate invoice numbers to alert the user of a possible double entry of an invoice. This feature is just a warning; the user may override the warning and use the same invoice number. |
| Date |
| Enter the date of the vendor's invoice. The transactions for this invoice will be posted through the system with this invoice date. |
| Proposed Pay Date |
| This date is used for reference only and AccuBuild will not force you to pay the invoice based on this date. This field can later be referenced when selecting a group of invoices for payment. Please note that this field will be updated automatically if the vendor has been set up with default payment terms that include the number of days until the payment is due. The default payment terms will be displayed on the screen directly below the Proposed Pay Date field. |
| Description |
| The invoice description will automatically update the vendor's invoice number followed by the vendor's name however this field may be altered as desired. This description will be posted to the expense account(s) in the general ledger and to the job cost detail. Please be aware that the only reference to the vendor will be within the invoice description for these files. Therefore, it is recommended that at least a partial reference to the vendor be included in the description field |
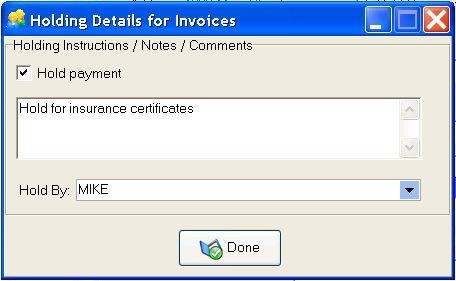
| Hold Payment |
| When the Hold Payment Checkbox is clicked, the Hold Dialog screen is displayed and you can set or clear the Hold option. If you are setting up a payment for hold, then you will need to include the payment hold instructions before closing the screen. The Hold By username will be set to the current user by default, however you can change the name to any user in the drop down list. |
| When the hold settings are updated from the invoice entry screen or the purchase order screen and the invoices are entering from the routing process, then any changes to the Hold Information will be updated in the Approval Settings Screen as well. In other words, any Hold Option changes in the invoice entry screens will be synchronized back the Approval Settings screen. If the hold is cleared, the invoice will be set to Approved Status in the Approval Settings screen, and if the hold is set, then the invoice will be will set to Approved - Hold in the Approval Settings screen. |
| When the payable invoices are posted through the accounting system, any invoices placed on hold during the entry process will be updated in the OPENAPHOLD table in order to maintain the hold setting information. Once invoices are posted, the hold information can be accessed via any of the three Schedule Payments screens including Paper Check payments, ACH payments, or Corpay payments. |
| 3. | The bottom portion of the screen is used to enter the invoice distribution information. One invoice may be split into any number of different expense accounts or jobs. |
•Inv Ref Desc - Enter a new description for the specific line item as desired.
•Amount and Units - Enter the first distribution amount of the current invoice and enter the corresponding units, as applicable.
•Discount % and Discount Amount - A discount percentage or flat amount may be entered. For example, to enter a 10% discount, enter 10.0000 in the Discount % field. To enter a discount of $10.00, enter a zero in the Discount % field and enter 10.00 in the Discount Amount field.
Note: The vendor can be set up in the Clients system with a default discount percentage.
Note: If the current invoice has additional distribution transactions to be entered, then the Duplicate Coding option may be enabled to repeat the job, phase and general ledger account coding based on the last transaction. This option should be enabled before entering either the job and phase or the general ledger account.
•Job - If the invoice is not to be expensed to a job, then skip this field otherwise enter the appropriate job number. Note: If the invoice is to be expensed to a job, then you may wish to enable the Job Master Lookup option. This option will list only the job cost phases that have a budget amount or actual costs charged to them on the select job. This option must be enabled before entering the job number. This option can be set as a default in the System Administrator > Configuration > Accounting option. ** Security Note: If the user is restricted from the System Administrator > Configuration option, then the system will gray out this field and the user will not be allowed to toggle on/off the Job Master Lookup option during data entry. If the user needs access to this field, simply restrict the user from the System Administrator option (not the Configuration sub menu).
•Phase - If a job number was entered, then a job cost phase must also be entered. If a job number was not entered, then this field will be automatically skipped.
•G/L Account Number - Enter the general ledger account where the invoice should be expensed.
| Note: A vendor can be set up with a default expense account in the Clients module. |
•Equip - If the invoice is to be charged to a piece of company owned equipment, then enter the equipment code that the invoice should be expensed to. This will create a direct cost entry (transaction type 10) in the Equipment module on the specified piece of equipment.
| Note: The Equip field is only enabled if you have purchased the Equipment module. |
| 4. | Select the New button in the middle section of the screen to enter another transaction for the same invoice, or select Done to complete the current invoice. Click on Delete to remove the highlighted transaction from the current invoice. If the current invoice has been completed, be sure to select Save at the top of the screen to commit the invoice into the batch. If Cancel is selected at this point, then all transactions entered for the current invoice will be erased. Notice at this point that AccuBuild provides invoice totals at the bottom of the browse screen for each saved invoice. This is provided as a quick check to make sure each invoice has been entered in its entirety. |
| 5. | Select the Print option to generate an edit list of all entries in the batch. All entries should be verified for correct invoice totals and cost code information. At this point, any invoice in the batch may be changed or removed from the batch by highlighting the invoice in the browse screen and then by selecting Edit or Delete. Invoices that have already been posted through the system may not be edited or deleted through this option. Please refer to the Invoices > Void/Change Invoice Info option on the Payables menu for more information on this function. Once all of the entries have been verified, select the Post button at the top of the screen to spread the invoice information to the purchase journal (purchjnl.db), the open payable invoice file (openap.db) and the general ledger detail file (gldetail.db). The invoice information may also be spread using the Invoices > Post Invoices option on the Payables menu. |