This screen is used to edit and view image documents and is displayed whenever the user selects a document from any of the document list screens via the Open or Edit button. If the document is opened for editing, then any changes to the document will be saved over the original copy of the document, or as a new copy of the document depending on the save option selected by the user.
Note: The default Save Option can be set up in the user settings under the System Administrator Menu. Image documents that are viewed with this screen include any of the document types that are set up in the user settings as Image File Types to be processed by AccuBuild. Any image document that is NOT processed by AccuBuild will be opened automatically using the Windows Default Program for the selected document type.
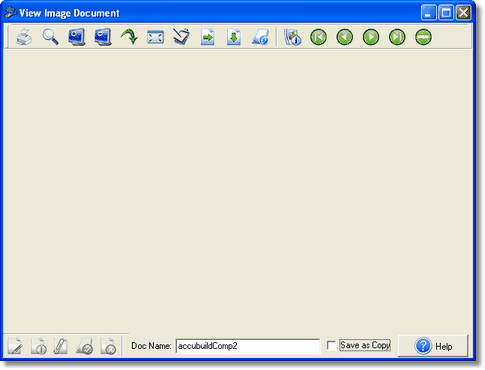
Opening Documents – AccuBuild uses the same screen for both viewing and editing image documents, however, certain options are disabled when an image document is opened for viewing only. Documents that are handled by the AccuBuild viewing screen will load much faster than image files that are not processed by AccuBuild. This difference in timing is due to the lag time for loading the software program used to process the images when they are not handled by AccuBuild. Once an image file has be displayed, the following controls will be available for working with the document:
Top Button Bar – The top of the viewing screen contains a button bar with buttons that can be used to work with the image document:
•Print File Button – Use this button to print a hard copy of the image document. If the document to be printed is a multi-page document, then you will have the option to print all the pages in the document. If you do NOT print all the pages, then only the current page is printed.
•Toggle Magnifier Button – Clicking on this button will allow you to use your mouse as a magnifying glass to enlarge areas of the document that may be hard to read.
•Zoom In Button – Allows you to zoom in on the document making the image larger with each click of the mouse.
•Zoom Out Button – Allows you to zoom out of the document making the image smaller with each click of the mouse.
•Reset Zoom Button – Returns the document to its original size making the document much clearer on the display but will require use of the window scroll bars to view different areas of the document.
•Best Fit Image Button – This button will resize the document image to fit the entire document in the viewing window where no scroll bars are required.
•Copy To Clipboard Button – This button is used to copy the current selected document image to the Windows Clipboard which can then be accessed through any Windows Program that supports graphic images such as Paint or Word for pasting into another program.
•Rotate 90 Button – This button will rotate the image 90 degrees to the right.
•Rotate 180 Button – This button will rotate the image 180 degrees which can be very useful for documents that were scanned upside down.
•De skew Button – This button will attempt to straighten a document that was scanned crooked and is tilted to one side or the other.
•Toggle Annotation Mode Button – This button is only visible when editing a document and is used to enable the document annotation buttons at the bottom of the screen for adding annotations to the document. Annotations that can be attached to a document include highlighting, notes, and user defined stamps (text strings). For more information, see the following section on the Annotation Button Bar.
•Page Navigation Buttons - This series of buttons allow you to move from page to page of a single document. If the document contains more than one page, then the Delete Current Page Button can be used to delete the current selected page. Important Note: Please use extreme caution when deleting pages from a document as the page CANNOT be recovered once it has been deleted. If you do delete pages, you might consider saving the edited document as a COPY of the original document so the deleted page can be accessed from the original document if needed. See the Save as Copy Check box Option for more information.
Annotation Button Bar – The bottom left side of the viewing screen contains a button bar for adding annotations to the document. These annotation buttons are only enabled for documents that are opened for EDITING. Annotations are graphical items that you can overlay onto the document for documentation purposes and include highlighting, note attachments, and user stamp attachments. The annotations that are added to a document WILL NOT be included on the document when the document is printed, they are for notation and documentation purposes only.
•Edit Annotation Button – Use this button for selecting an existing annotation object for editing purposes. After clicking on this button, you will be able to use your mouse to select any annotation object. Once an object is selected, you can use the right-click option to display the annotation menu options when available.
•Highlight Button – Use this button to highlight selected areas of a document. Start at the top left side of the area to be highlighted and hold the mouse button down while dragging the mouse over the desired area to be highlighted. Once you have the desired area selected, release the mouse button to create the highlight annotation object. After the highlight object has been created, you may right click on the object to change the properties.
•Add Note Button – Use this button to add a text note to the document. Use your mouse to create a note annotation object the same way as the highlight object is created with the dragging action of the mouse. Once the note is created, use the right-click option to enter the text of the note and / or change the note properties.
•Add Stamp Button – Use this button to add a stamp to the document. A document stamp is a fixed set of user defined text that is created once and used over and over again. The text in the stamp can contain variables for the current date and time which can be included in the text of the stamp. For example, a user approval stamp could be created with the text: Approved by Joseph Arnold on %D at %T. The %D Variable will be replaced with the current date when the stamp is applied to the document and the %T Variable will reflect the current time when the stamp is applied to the document. You can create a library of user defined stamps and select from your list when stamping a document. Once the annotation stamp has been created, use the right-click option to change the stamp properties.
•Clear Annotations Button – Use this button to clear ALL of the annotations on the document. Note: To delete a single annotation object, select the object and use the right-click menu option.
Doc Name – If you are EDITING the document, you can change the document name used to reference this document by editing this field.
Save as Copy Check box – Check this box to save the edited document as a copy of the original. When this option is checked, the document will be saved using the original document name followed by the characters "_rev" indicating a revised copy of the original. Any document indexes associated with the original document will be included with the revised document.