The Addr Tab contains fields for the client's name, address and phone numbers.
•Number - The program will automatically assign a number to a new entry but you may manually assign a number if desired. Numbers may not be duplicated and may not equal zero.
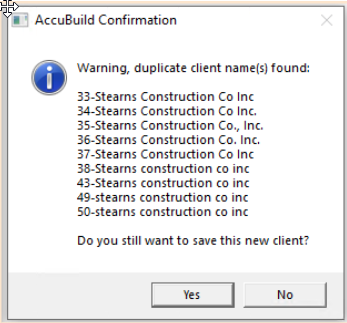
•Name - When new clients (vendors, customers, etc.) are added, the system will check whether the client name already exists on the client list to help prevent duplicate clients from being set up more than once. {Ver. 10.2.0.1] If one or more duplicate names are discovered, a list of the duplicate clients will be displayed and the user will be prompted whether or not the new client should be added.
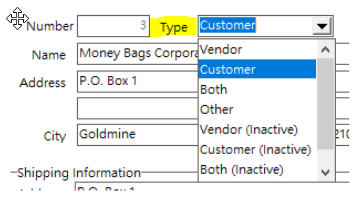
•Type - Choose from the list whether the client is a Vendor (someone you pay), Customer (someone who pays you), Both, or Other (someone you want to list for reference only such as a Lender on a project.)
oNote that there are 'inactive' options for each of the four types. Inactive vendors and customers will not be displayed when adding new invoices, purchase orders and other specific entry types.
oIf you do not choose a type, the system will NOT display the client on the appropriate data entry screens (ie. vendor invoice entry, customer invoice entry).
•Contact Information
oContact - This screen contains one default contact name for each company.
▪For vendors that are paid via Comdata, this field will be the name of the person that will receive the payment confirmation from Comdata.
oE-mail Contact Button - Use this option to attach additional contacts to the selected company.
▪The e-mail option cannot be accessed when in Add or Edit mode.
▪Individual e-mail contacts can be added to groups through the Clients > E-Mail Groups option to simplify the tax of sending documents to multiple recipients.
▪For A|B users that utilize the Project Management Module, project Teams are created from the E-mail Contacts attached to a company.
The Client Center Screen has been updated with a new Inactive Setting which allows for vendors and customers to be marked as inactive and filtered out of the client list and related input screens for vendors and customers as noted below. This setting will make it easier to handle older customers and vendors that are no longer used but need to be retained for historical transaction purposes.
There are three areas on the Client Center Screen that have been modified in order to incorporate this new Inactive Setting as outlined below:
•Active Status Groupbox: These options are only available after a new client has been added to the system. .
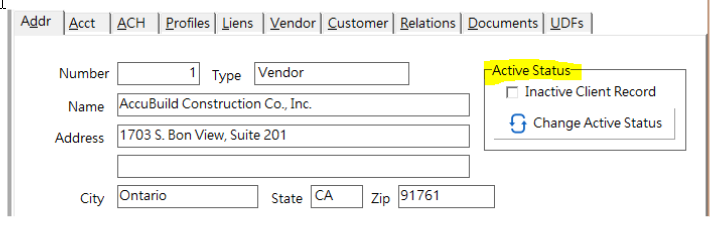
oInactive Client Record - This checkbox indicates if the client has been marked as Inactive (checkbox is checked for Inactive Clients). This is a read only control that can be set using the Change Active Status button or by editing the client record and changing the Client Type setting.
oChange Active Status Button - This button is used to change the Active Status for the client without the need to Edit the Client record. This button only works when the client record is not being edited which makes it very easy to quickly change the Active status. This button works as a toggle setting, if the client is Inactive, then clicking the button will change the client to an Active status, and if the client is Active, clicking the button will change the client to Inactive.
oWhen the Active Status is changed to Inactive, the Type field in the client record is updated to represent the Inactive setting for the original client Type field. For example, if the client is set to a Vendor Type when the button is pressed, the client Type will be changed to a Vendor (Inactive) Type.
The following list details the client type settings:
ACTIVE Settings
0 = Both Customers and Vendors
1 = Vendors Only
2 = Customers Only
3 = Other - Only show when screen is set to Clients
INACTIVE Settings
100 = Both Customers and Vendors - INACTIVE
101 = Vendors Only - INACTIVE
102 = Customers Only - INACTIVE
103 = Other - Only show when screen is set to Clients - INACTIVE
Inactive Client Warning: Whenever an existing client is edited or the client is inactivated with the Change Active Status button, a new warning message will be displayed when the client is marked as inactive and there are open vendor or customer invoices for the client. These messages are slightly different for each situation:
•Edit Option: When you save a client record after using the Edit Button, the system will display a warning about the open invoices but the record changes will be still be saved.
•Change Active Status Option: When you click the Change Active Status button, the system will prompt for a confirmation to make sure you want to continue when open invoices exist.
Related Input Screens: The following screens respect the Inactive setting for vendors and customers.
•Payable Invoice Screen:
oNew Invoices - when new invoices are entered into the batch, only the active vendors will be available for selection.
oExisting Invoices - If an invoice exists in the batch for a vendor that has subsequently been marked as inactive, it will still show the inactive vendor name and allow the invoice to be processed.
•Miscellaneous A/R Invoice Screen:
oNew Invoices - when new invoices are entered into the batch, only the active customers will be available for selection.
oExisting Invoices - If an invoice exists in the batch for a customer that has subsequently been marked as inactive, the screen will still show the inactive customer name and allow the invoice to be processed.
•Joint Check Receipts Screen:
oCustomers - any customer with an open A/R Invoice will be available on the screen regardless of the Inactive status of the customer.
oVendors - any vendor with an open A/P Invoice as well as all active vendors will be available on this screen.
•Document Routing Settings Screen for Payable Invoices:
oInvoices with Read Only Vendor Settings - If the vendor setting is set to read only, this indicates that payable invoices have already been entered for the vendor. These vendors will still be displayed in read only mode regardless of the inactive setting on the vendor.
oInvoices without Read Only Vendor Settings - If the vendor setting is NOT set to read only, then only active vendors can be selected for the invoice being routed.
•Purchase Order Screen:
oExisting Orders - All existing orders will show the vendor on the order regardless of the Inactive setting on the vendor.
oNew Orders - Only active vendors will be available when a new order is created.
oCopy Button - The system will NOT allow you to make a copy of an order when the vendor on the order is marked as inactive. You will need to activate the vendor before you can make the copy.
Note: All remaining screens involving vendors and customers should function as normal without containing any filters for the inactive settings of the customer or vendor. The above list of screens are the only screens that have been modified to respect the inactive setting.