The 1099s option is used to view and print the 1099 Information Report which gathers the miscellaneous payments made to non-employees during the calendar year. AccuBuild tracks the amounts that appear in Box 1 (Rents) and Box 7(Non-Employee Compensation) that appear on the 1099-MISC form only. AccuBuild determines the amounts that are subject to 1099 reporting by referring to the general ledger account number associated with each cash disbursement amount. The general ledger account must be set up with a 1099 code of NEC (non-employee compensation) or Rent in order for the cash disbursement amounts to be included on the 1099 report.
For each vendor that will be receiving a 1099, be sure that the following information has been entered in the Payables > Vendors file:
| 1. | On the Address Tab, be sure a that the vendor's name and address are correct. |
| 2. | On the Account Tab, be sure that the fields on the 1099 information box are filled in correctly: |
•Corporation - If the vendor is incorporated, then check this box to exclude this vendor from receiving a 1099. If a vendor is not incorporated, then its calendar year-to-date cash disbursements (that are subject to 1099 reporting) must be greater than or equal to $600.00.
•Fed I.D. No. - If the vendor is not incorporated, then be sure to enter a valid federal identification number. Check with your local IRS office for tax identification number guidelines.
•Sole Proprietor Name - Enter the name of the sole proprietor as applicable. Per IRS regulations, if a social security number is entered as the tax I.D. number, then the sole proprietor's name must be included on the 1099. If desired, enter "dba" after the proprietor's name so that the "dba" will be included on the 1099. For example: "John Smith dba". The proprietor's name will print first on the 1099 followed by the company name on the following line. If the Sole Proprietor Name field is blank, then only the company name will be printed on the 1099.
•Client Number - This field may be used to link one vendor to another vendor when processing the 1099s. This option is useful if two separate vendor numbers have been set up for the same vendor and checks have been written in the current year using both vendor numbers. Linking the vendors together will produce only one 1099 for that vendor.
Print the 1099 Information Report
The following procedures are used to create the 1099 file that will be used to print the 1099 Information Report. This will be the same data that will be used when printing the actual 1099s through the Aatrix software (Payables > Tax Forms / E-File / 1099s).
| 1. | On the Process 1099s screen, select the 1099 cutoff year. 1099s may be generated for either the current calendar year or for the prior calendar year. AccuBuild will display the selection of possible dates in this field. Enter your company's state tax identification number, if required, in the Payer's State ID field. If you would like to include the vendor's client number in the account number box on the 1099 then be sure to click on that option at this time. |
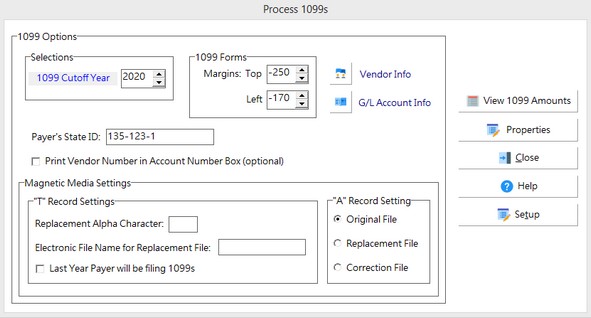
| 2. | Next, review the 1099 Properties. The company and tax ID information entered on this screen will be utilized by the Aatrix software when generating the 1099s. |
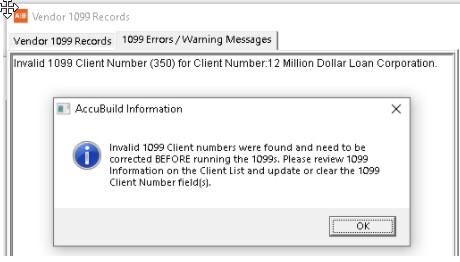
| 3. | Click on the View 1099s button to display the Vendor 1099 Records screen. This screen has two tabs that allow you to review the 1099 information. |
•Vendor 1099 Records (grid format)
•1099 Errors / Warning Messages - Be sure to review the data on this tab prior to printing the 1099s. AccuBuild checks for missing or duplicated identification numbers, missing vendor information, etc. The messages may be printed out if needed. Be sure to make all corrections and then re-check for errors.
•A new test has been added to check for valid client numbers in the 1099 Client Number field (NA_NO_1099). This field is used to link multiple vendor numbers together in order to produce a single 1099) [Version 10.1.0.5].
| 4. | Select the 1099 Info Report Button to print a list of the vendors that are eligible for a 1099 in the selected year. |
| 5. | Go to Payables > Tax forms / E-File / 1099s to print or e-file the 1099s using the Aatrix Tax Forms software. |