This option on the Payroll menu allows you to process direct deposit payroll and pre-notification records. In addition, you may use this menu to reset (rollback) a payroll that was previously processed for direct deposit, so that the payroll batch can be processed again to create a new NACHA File.
|
Processing Direct Deposit and Pre-notification Records |
|
Create NACHA File |
|
Reset Processed NACHA Batch |
When a payroll batch is processed for direct deposit payroll, a NACHA File will be created that may be transmitted by you to your bank for automatic processing of direct deposit information. An Employee Direct Deposit Statement may also be generated after the NACHA file has been created that provides a copy of the employee's earnings along with the detail of the bank account(s) that the employee has elected to deposit the funds. This statement will then be e-mailed to the employee and a copy will be stored on the Documents Tab of the employee's file.

Processing Direct Deposit and Pre-notification Records
The following outlines the procedures for processing direct deposit payroll batches as well as pre-notification records:
•Payroll Month (Week Ending Date) – Select the desired month based on the week ending date of the payroll to be processed and click on the Refresh Button to list all batches that have not been processed for direct deposit. Note: Make sure the Direct Deposit Batches option is set for Non Processed batches.
•Payroll Batch Information – Select the desired batch number from the list of unprocessed batches. The employee check information for each selected batch is included in the grid on the right-hand side of the screen.
•NACHA File Creation Date & Time Stamp – Review the date stamp information for accuracy and adjust if necessary. This information is pulled from the workstation's time and date setting and will be used for the file creation date fields in the NACHA File.
•Discretionary Data – Batch Header Field 4 – This is an optional field that can be used for your company's internal purposes and will be included in Field 4 of the Batch Header Record of the NACHA File. This field may be left blank.
•NACHA Record Types – Select the type of records to be included in the NACHA File. The NACHA Specification allows you to transfer direct deposit checks as well as pre-notification records in the same batch and this is the default setting. If you want to process direct deposit checks and pre-notification records in separate batches then you may change this selection as desired. Note: Your bank may be charging you a fee for each NACHA File that is processed so if you combine these two record types into a single file, you could save on bank charges.
•Fill Unused Block Space With 9's – The NACHA Specification states that the blocking factor for the file is 10 records per block and if the last block in the file does not contain 10 records, then all unused record space needs to be filled with the value '9'. This is NOT required by all banks. This setting can be found on the Payroll > Properties screen.
Click the Create NACHA File Button to create the NACHA File and preview the records in the file for accuracy. The file will be created and the Direct Deposit NACHA File Screen will be displayed along with all of the NACHA File Records.
Review the file information for accuracy. The bottom of the screen will show the batch information including the payroll batch number, the total amount of all direct deposit checks, the number of direct deposit checks, and the number of pre-notification records. If you want to preview each record type in the NACHA File, simply select a record type from the Record Selections list and the selected record(s) will be displayed along with the field headings for each field in the record. If the PPD Detail selection is selected, then the employee information for the selected record will be displayed at the bottom of the screen.
Note: The NACHA File is a Fixed Format Ascii Text File as viewed under the "All Records" option. When you choose a specific record type, the system will display the record(s) with the Field Names as indicated in the NACHA File Specification. This allows you to view each field of each record type for accuracy before transmitting the file to the bank.
Click the Process NACHA File Button to save the NACHA File and process the direct deposit information. You will be prompted for a file name and location which you will need to locate when you are ready to transfer the NACHA File to your bank. Your bank will provide you with more information on how to transfer the file to them.
Note: AccuBuild automatically keeps a copy of all processed files so you do NOT need to name each file with a separate file name, you can simply replace the previous file each time you process a new direct deposit batch. Use the View Processed NACHA Files menu option to view previously processed direct deposit files.
Use the Employee Statements button to generate a single page report for each employee that includes the current payment information along with the checking/savings account(s) distribution into which the funds have been deposited.
•This form is an automated e-mail / merge form so once the statements are previewed, the statements may be automatically emailed to the employee and a copy saved under the employee's Document Tab. Be sure to set up an email address for each employee on the Payroll > Employees > Addr Tab. If you do not wish to email the statements, then you may ignore and cancel the email pop up screen, and then print the statements instead.
oIf you will be using the email / merge form function, then be sure to enable the following Advanced Settings through the System Administrator > Configuration > Accounting > Advanced Settings Button:
▪Direct DepositPDFEncrypt - This setting will enable a process to password protect the Employee Direct Deposit Statement PDF with the last 4 digits of the employee's Social Security Number.
▪DeleteFileAfterEachEmailSendingProcess - This setting enables a process that will prevent any form from being sent to the wrong recipient when a failure occurs in creating the next recipient’s form.
oNote: A unique file name will be assigned for each PDF document that is emailed by this process. The mail / merge process was designed for single processes running from each workstation, however if a user runs this process from the same workstation (Microsoft User Name) using multiple AccuBuild User names at the same time, it can cause file access conflicts over the same PDF file. The unique file name should prevent file access issues regarding the same PDF file name. Version 10.0.0.4 [PMID Ref No 12819]
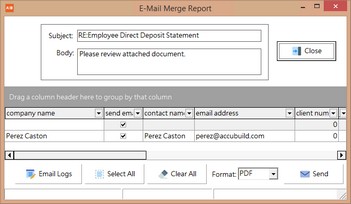
oWhen the preview screen is closed, The system will automatically pop up the E-Mail Merge Report Screen which list each of the direct deposit employees along with their email address. Click the SEND button at the bottom right of the screen to email each employee a copy of their direct deposit statement. There are options at the bottom of the screen to Select All and Clear All and you can optionally check or uncheck the 'send email' box in the grid on a single employee. The Email Logs button will display a Notepad with the results of the email process as confirmation of the number of emails sent and if any errors occurred during the process. Please refer to the Troubleshoot - Email Issues section of the Help System for more information or contact AccuBuild Support at steam@accubuild.com.
•In order to utilize this feature, be sure to go to Reports > All Reports > Properties Button to grant access to users that will need to create this form. The Employee Direct Deposit Statement is located in the Payroll Forms group and it may be copied and modified for individual tailoring for your specific company needs.
•To view the Employee Direct Deposit Statements, you will need to either process a new NACHA file OR view a previously processed NACHA File. Simply click the new Employee Statements button on the NACHA File preview screen and the statements will be displayed.
•Please note that the year-to-date earnings on the statement will always represent the total earnings as of the day that you print the statement. For example, if the current date is 11/30 and you are printing a statement for a batch from September 7th, then the current earnings, taxes and deductions will be based on the actual check data, however, the year-to-date earnings will include all additional earnings as of 11/30.
•An entry will be made in the company batch log for each direct deposit batch process. Refer to the Batch Selection control in the batch log for more information. If the Print Payroll Reports during Posting Process option is enabled in the Payroll > Properties, then a report will be generated for the direct deposit records. You can also generate a report at any time by choosing the Direct Deposit Payroll Report option from the Payroll Reports Menu. Note: This report does not give you the individual checking account distribution information for each employee.
•If you DO NOT want to process the NACHA file at this time, simple click the Close Button to cancel the process. Remember: If you process a file by mistake, simply use the Reset Processed Batch option on the Process Direct Deposit NACHA File Screen to roll back the process.
Reset Processed NACHA Batch
The following steps outline the procedures for resetting or rolling back a processed batch of direct deposit payroll checks. This step is used to cancel a NACHA file for a specific batch so that it can be recreated. Once the reset option has been performed on a batch, the batch will be listed on the Non Processed list of batches again. There is NO LIMIT as to how many times the same batch can be reset which can be very helpful in the early testing stages when the direct deposit system is first being set up. Reset a processed batch as follows:
1. Payroll Month (Week Ending Date) – Select the desired month based on the week ending date of the payroll to be reset and click on the Refresh Button to list all batches that have been processed for direct deposit. Note: Make sure the Direct Deposit Batches option is set for Processed batches.
2. Payroll Batch Information – Select the desired Batch Number from the list of processed batches. The employee check information for each selected batch is included in the grid on the right-hand side of the screen.
3. Reset Processed Batch Button – Click this button to reset the selected batch. The batch will be reset and a message will be displayed indicating that the reset process was successful. The reset batch will now appear on the Non Processed list of batches for further processing.