|
The General Journal option is used to make journal entries to the general ledger and the job cost schedule. Each journal entry can be made to the general ledger only, the job cost schedule only, or both. In addition to entering amounts, the journal entries may also include units as well, which are accumulated in the job cost records.
Journal entries are made up of group entries containing debits and credits, and each group entry must be in balance (debits and credit must be equal). Each group of journal entries will automatically be assigned a reference number by the system. Single sided journal entries are allowed, provided the company global setting for single sided entries is enabled. Refer to the System Administrator > Configuration > Accounting documentation for more information on enabling single sided journal entries. Single sided entries are handy for setting up initial costs to the job schedule when no general ledger accounts are involved.
Creating a general journal entry
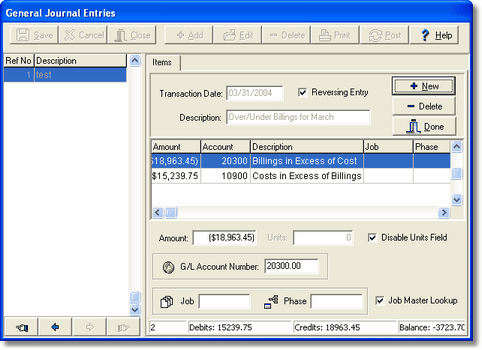
| 1. | Select the General Journal option from the Ledger Menu and then select the Add button to create a new journal entry group. The general journals are entered into a temporary batch file, Gljebat.adt, that is located in the user's personal directory. When journals are entered, they are kept together in reference groups. Each journal entry reference group contains debit and credit entries, and all entries in the group are assigned the same transaction date, and transaction description. |
| Transaction Date - Enter the transaction date of the journal entry. This date will determine the accounting period where the entry will be posted in the general ledger and/or job cost schedule. The very first entry of a journal entry reference group will establish the transaction date for all other entries in the group. |
| Reversing Entry - If this box is checked, and have saved your journal entry, the system will automatically create a second journal entry that will be dated the first day of the month following the transaction date. This secondary entry will be exactly the same as the original entry except that the amounts will be reversed (debits will be credits; credits will be debits). |
| Description - Enter the transaction description of the journal entry. The very first entry of a journal entry reference group will establish the transaction description for all other entries in the group. |
| Amount - Enter the transaction amount. For credit entries, use the minus sign (-) in front of the number. |
| Units - Enter the units associated with the current entry. The units will be accumulated on the job schedule if the entry is assigned a job and phase number. If you will not be entering any units with the journal entries, then the 'Units' field can be disabled by clicking on the Disable Units field option. |
| G/L Account Number - Enter the general ledger account number for the current entry. If this entry will only be posted to the job cost system, then leave this field blank. |
| Job - Enter the job number if the entry will be expensed to a job. If the entry is not job related, then leave the 'Job' field blank. |
| Phase - Enter the phase number for the associated job. If a job number was not entered, then this field will be disabled. Note: The phase list that is provided in the drop down list will depend on the setting of the Job Master Lookup option. If the box is checked, then the drop down list will pull only the phase numbers that have been set up for the associated job, otherwise, the phases will be pulled from the phase master file. |
| 2. | Use the New Button to enter additional entries for the current group, and repeat the above process for each new entry in the group. Use the Delete Button located just below New to delete a single entry in the group if needed. When all entries within the group have been completed, press Done , and then select Save. If the debits and credits are not in balance, a warning message will be displayed. |
| 3. | The Print Button can be used at any time to review the journal entries on the screen, or to produce a printed copy of the entries. Select Edit to change any entries in a journal entry reference group, and select Delete to remove all entries in a group. When all the entries are correct, select Post to process the entries through the system and update the general ledger detail file (gldetail.adt) and the historical job cost transaction file (jobdetl.adt) with the batch information. |
|