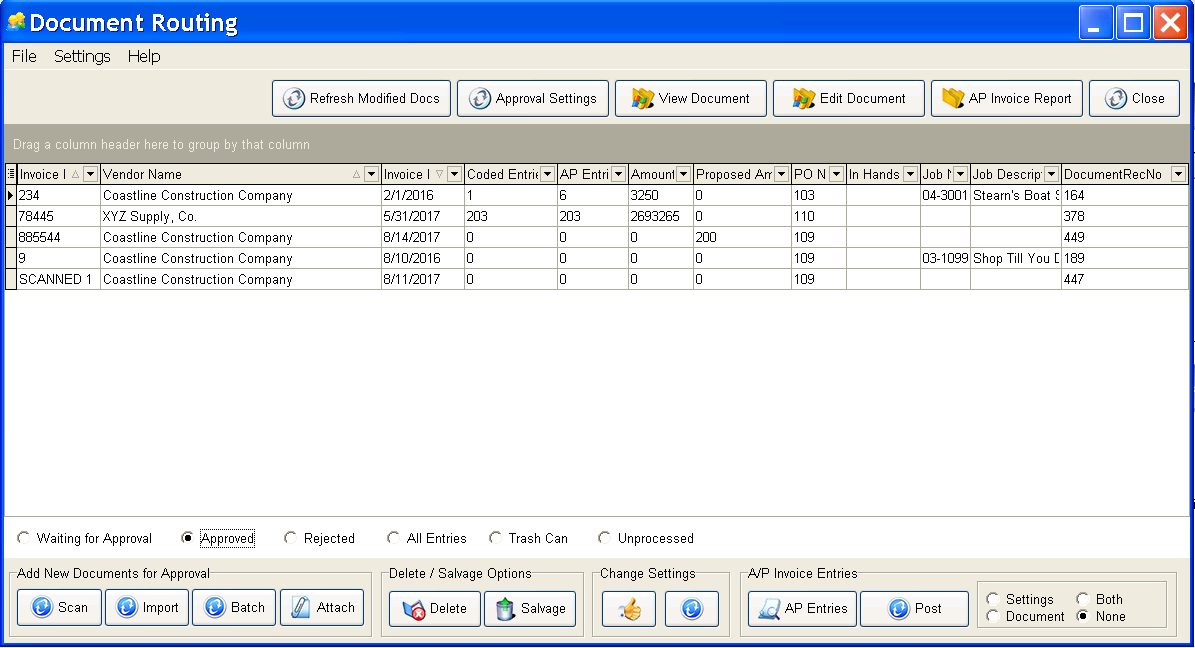
| 1. | Scan, attach or drag/drop payable documents for approval. |
| 2. | Use the Approval Settings Button to enter key information about the invoice and route it to the appropriate person for approval. |
| 3. | After the key invoice information is entered, the invoice details may be entered while the invoice is out for approval. |
| 4. | The users that the invoice was routed to may view the document and approve or deny it. Notes may be entered on the approval screen as needed. |
| 5. | If the invoice is approved, the invoice details may be posted directly from this screen. |
Add New Document for Approval
Scan or attach payable documents for approval using the buttons at the lower left side of the Document Routing screen titled "Add New Documents for Approval".

These buttons work just like the scanning buttons for other ADMS Processes except that the tagging (indexing) screen is designed specifically for payable invoice information. You can also attach any type of document using the Attach Button or drag/drop a document into the grid.
Note: If you use the Attach or Drag/Drop option, then use the Approval Settings Button at the top of the screen to set the tagging fields and routing information. If you use the Scan, Import or Batch options, then you must index the document in those screens and then use the Approval Settings Button to change the Approval Status of the document.
Hint: Use the View Document Button ![]() at the top of the screen to open the document. You may keep the viewer open while you enter the key information and while entering the invoice details for a/p processing.
at the top of the screen to open the document. You may keep the viewer open while you enter the key information and while entering the invoice details for a/p processing.
Edit Documents
•Edit Document Button - The Document Approval Process for AP Invoices has been enhanced to track and save modifications to third party documents such as Acrobat PDF files using a new Edit Document button. When this button is used, all 3rd party documents will now be opened in EDIT mode and these documents will be marked as "In Use" until the modified documents are filed back into the ADMS System. A new button titled "Refresh Modified Docs" has been added to the approval screen which can be used to refresh the modified documents as needed. In addition, when the approval screen is closed, any pending modified documents will be filed automatically.
Important Note: Since these are third party documents, you will need to make sure the documents are closed when they are filed back into the ADMS system as they cannot be filed if they are still open. Use the View Document button for 3rd party documents that you do NOT wish to modify.
•Refresh Modified Docs - This button is used to file any modified documents back into the ADMS System. Any third party documents that have been changed will be filed back into the ADMS System.
•Clear Document Refresh Setting - In addition to the buttons on this screen, there is a pop up menu that is accessed through a right-mouse-click on the screen. The Clear Document Refresh Setting is only found on this pop up menu. Use this option for clearing the modified flag on a third party document if the flag becomes locked and you cannot view the document. When a third party document is modified, this flag is set and the document cannot be viewed or modified again until the documents are refreshed and refiled in ADMS. If the AccuBuild program terminates abnormally, then the modified flag might not get cleared so this function will allow you to clear the modified flag.
Approval Settings Button
Use the Approval Settings Button to update the document settings to identify the key required fields for the vendor invoice information and who to route the document to for approval. Click the View Button to open the image in a separate window.
•Invoices with Read Only Vendor Settings - If the vendor setting is set to read only, this indicates that payable invoices have already been entered for the vendor. These vendors will still be displayed in read only mode regardless of the inactive setting on the vendor.
•Invoices without Read Only Vendor Settings - If the vendor setting is NOT set to read only, then only active vendors can be selected for the invoice being routed.
Note: Be sure to close the image viewer if you make any changes to the image so that the changes are saved with the document. If you do NOT close the image form, it will be closed automatically when the calling form is closed.
•Waiting For Approval – This is the default setting while the invoice is being routed for approval. If you need to forward the document to someone else in your organization for approval, use this setting and change the Approval Routing (Send To) User Name. The send to user can be selected from All User Names or Job Role User Names if a job number is selected. As soon as a document has been set to the "Waiting for Approval" status, it will be immediately routed to the "Send to User" waiting for approval.
•Approved – Use this option to approve the document for processing.
•Approved as Noted - Use this option to approve documents that have special handling requirements. This is used for report filtering processes where these documents can be identified separately from regular approved documents. These documents will be treated the same as regular approved documents for the approval process.
•Rejected – Use this option mark the document as rejected. Be sure to include any notes or instructions for the document administrator as to why the document is being rejected and how to handle the document going forward.
•Send To - Select from All User Names or Job Role User Names if a job number is selected. As soon as a document has been set to the "Waiting for Approval" status, it will be immediately routed to the "Send to User" waiting for approval.
•Routing Instructions / Notes / Comments - Notes can be entered into this field by each user as they review the document.
oTip: Each user should include their name or initials with the notes they enter.
•Approved-Hold - You can place an invoice on hold during the routing process using the option on the Approval Settings Screen called “Approved - Hold” in the Approval Status group box.This new setting is required so that the invoice can still be marked as approved for payment, but set for the HOLD option during the posting process. When this new Hold status is set on the invoice, a new set of Holding Information fields will be displayed so that Instructions and Comments can be entered to document the reason for the hold:
oHolding Instructions / Notes / Comments: Enter any hold instructions in this field which will be saved with the invoice during the posting process so that it can be reviewed from any of the schedule payments screens. NOTE: The hold instructions are REQUIRED in order to use the HOLD option.
oHold By: Enter the AccuBuild User name of the person that is requesting the hold, such as a project manager or the company controller. The current user is set up as the default username for this field.
•Invoice Total - A new Invoice Total field has been introduced for the A/P Approval Screen which can is used during the invoice entry process for regular payable invoices. This Invoice Total field is used for computing running totals on the invoice entry screen to calculate and display the balance of the invoice amount to be entered.This is the same running total process that is currently used in the purchase order invoice screen. The regular payable invoice screen has been updated with a total invoice amount field which will be populated from the approval screen when available. In addition, the invoice entry screen can also be populated manually for this new field as well.
•Phase,Equipment and GL Account - When any of the default fields are set up on the settings screen, they will become the default entry for the payable invoice screen. These are optional fields and are only required for regular payable invoices.If the AP Invoice is relate to a purchase order or subcontract order, then these fields will be disabled.
•NOTE: The Payable Invoice entry screen will still enforce the accounting business rules and will issue warnings as needed for any invalid combination of fields. The invoice settings screen does NOT enforce any business rules for accounting.
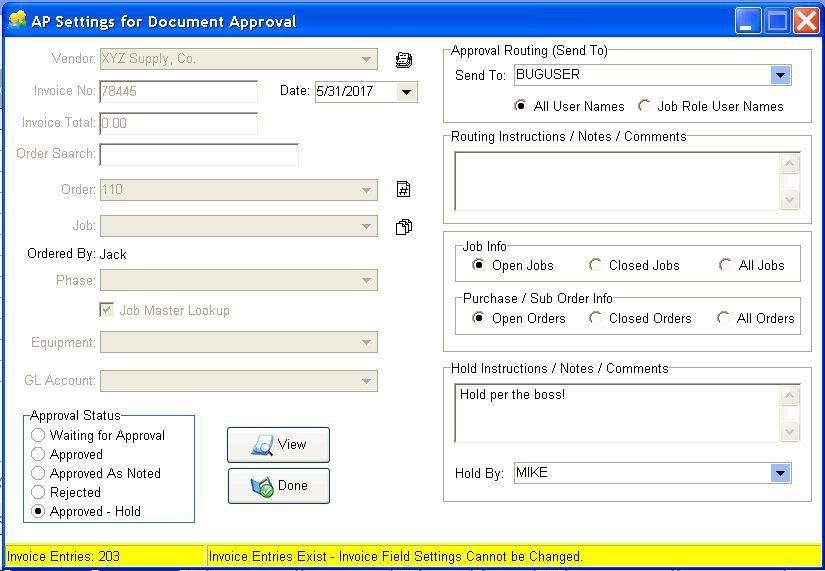
•The AP Settings for Document Approval Screen has been updated with some new controls to help with locating the proper order number for Vendor Invoices that related to an order in the purchase order system. A new optional Order Search Field has been added to allow the order to be typed in and then located with the Search Button. If the order is located, then the Order, Job, and Ordered By fields will be updated automatically and locked in to prevent these controls from being changed.You can use the Cancel ( ‘X’ ) Button next to the Search Button to unlock the Order and Job fields at any time to update those fields manually.
![]()
•The Approval Settings Screen has been updated to disable the invoice field settings for vendor invoices and purchase order invoices when the invoice entries already exist. A new status bar has been added at the bottom of the screen to indicate the invoice entry count. If there are invoice entries, then the status bar will be colored in yellow to alert the user and a message in the status bar will indicate the reason for disabling the fields. NOTE: If you need to make changes to the invoice entry fields, then you will need to delete the associated invoice entries so that these fields can be modified.
•IMPORTANT: The invoice entry fields will also be disabled when the Approval screen is opened for Subcontractor Online Invoices since these field settings are created automatically and should NOT be changed.
Change Settings
The Change Settings Group contains two buttons which are used to route documents and approve documents.
![]() This button is used to approve multiple selected documents. A vendor number must have been previously assigned to the document iva the Approval Settings option before the document can be approved with this option.
This button is used to approve multiple selected documents. A vendor number must have been previously assigned to the document iva the Approval Settings option before the document can be approved with this option.
![]() This button is used to route one or more invoices to another user without opening the Approval Settings Screen.
This button is used to route one or more invoices to another user without opening the Approval Settings Screen.
A/P Invoice Entries
•AP Entries Button - Click this button, or choose the option on the pop-up menu, to enter the payable invoice entries for the selected document. You may only use this option AFTER you have entered the key information through the Approval Settings Button. This system will automatically determine which entry screen (Payables Invoice or Orders Invoice) to use depending on whether or not the invoice is linked to a purchase order.
| Only one user can enter an invoice against a document at one time. The document record will be LOCKED until the user closes the invoice entry screen. Once closed, the LOCK will be removed and another user can enter another invoice against the document. If for some reason a user has ended a session of AB abnormally and the LOCK is not automatically removed on the record, there is an option on a pop-up menu to remove the lock. Be sure to use extreme caution to make sure another user is not currently editing the invoice before clearing a lock, as this can cause loss of data and / or duplication of entries. |
| the invoice is not related to a PO, then the invoice may only be entered against the job that was referenced on the document. If the invoice was related to a PO, then the PO will determine which job the invoice is posted. |
| If the AP Entries column on the grid equals one, then it indicates that an invoice has already been entered against the document and is waiting to be posted. (You may need to close and reopen the Document Routing screen in order to refresh the AP Entries status.) |
Note: This step can be done at ANY time during the approval process but must be done before clicking the Post Button. This step can only be performed by users who have access to the payable invoice entry screens.
Security Note: If the user is not restricted specifically from the invoice entry in Payables and Orders, then the user will still be able to get to the A/P Invoices Button on this screen.
•Enter PO Online Invoice via AP Invoice Screen - Right-click on the Document Routing grid to display a pop up menu. Under the Accounts Payable Invoices menu, you will find the Enter PO Online Invoice via AP Invoice Screen option which allows you to bypass the online payment screen and enter amounts using the traditional PO AP Invoice entry screen. This may be useful in situations where certain line items need special handling or the overall invoice amounts needs to be changes for such items as shipping, sales tax, etc.
•AP Invoice Report - Use the button at the top of the screen ![]() to review all invoice entries that have been made on invoices that have an 'approved' or 'approved as noted' status. Invoices that appear on this report will be processed through the accounting system when the Post Button is used.
to review all invoice entries that have been made on invoices that have an 'approved' or 'approved as noted' status. Invoices that appear on this report will be processed through the accounting system when the Post Button is used.
•Post Button - Use the Post Button to process any pending invoice entries for all invoices that have been marked approved. The system will automatically post both payable invoices and order invoices if they exist, to the various tables in the accounting system. Use this button at any time to check if there are any approved invoices to be posted. If invoices are ready for posting, you will be given a chance to continue or cancel the posting operation. In order for an invoice to be ready for posting, it must be marked as Approved and the associated invoice entries must exist. The posting process will determine the type of invoices that are ready for posting (Payable Invoices and/or Order Invoices) and will process separate posting batches for each set of invoice types. During the posting process, the associated document records will be marked as processed which will remove them from the document approval list and make them available for drill down reporting on vendor invoice related reports that include document drill down options.
| Note: During the posting process, the system will set aside any pending payable invoice batches that already exist in your user table (that were entered through the Payables or Orders modules) and then will restore those batches after the routing invoices have been posted. You do not have to worry about any pending batch records for payable invoices, they will still remain in your entry batches after the routing invoices have been processed. |
Security Note: If the user is not restricted specifically from the invoice posting options in Payables and Orders, then the user will still be able to get to the Post Button on this screen.
•When entering payable invoices from the Approval Screen, you can now set the radio button group control for one of the four options:

oSettings - This option will open the Approval Settings Screen each time the AP Entries Button is clicked. The Approval Settings screen will be positioned on the left side of the screen and the invoice entry screen will be positioned to the right of the approval screen so that both screens are visible during the invoice entry process. This allows you to view and update the routing approval information while entering the payable invoice.
oDocument - This option will open the actual invoice document each time the AP Entries Button is clicked. If the document you are viewing is not being viewed from the AccuBuild Document Viewer,then you will need to close the document screen when you are finished viewing.
oBoth - This option will open both the Settings Screen and the actual invoice document each time the AP Entries Button is clicked.
oNone - This is the default setting each time the routing screen is opened and indicates that no additional screens are opened during the invoice entry process.
RECENT SOFTWARE UPDATES FOR 9.7.0.0 RELEASE