In order to create a Dashboard Chart, you will need to begin by establishing the report which will act as your database for the charts.
See also:
|
Dashboard - Creating a Vertical Table |
| 1. | Through the Reports module, highlight a MAR report such as the Contract Status Spreadsheet, and make a copy of the report. You may want to label the copy of the report 'Dashboard - Contract Status Report' or something similar. Be sure to give access to this report to other users if they will be utilizing this same report to create their own dashboard. Note: Due to the fact that the charts can be very busy based on the level of detail of the report data, the report script for the Contract Status Spreadsheet has been modified to include data pipes for a variety of job-to-date totals. You may need to add these data pipes to the report copy in order to access the proper information, such as totals based on project manager or salesman.) |
|
Dashboard Data Pipes |
| 2. | Right-click on the copy of the report, and select Mark Report as My Dashboard. Only one report per user can be selected for this purpose. You will be asked if you want the system to display the report parameters. If you answer 'Yes' to this question, then the system will display the report dialog so that you can generate the report for a specific date range or other filters. If you answer 'No', then the data will be generated based on current totals. Close the Reports module. Note: To remove the report as your dashboard, right-click on ANY MAR report or MAR report group and select Clear Dashboard Report Setting. |
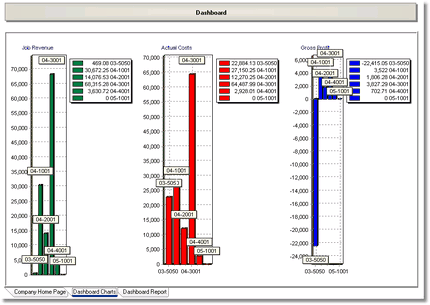
| 3. | Click on the Dashboards Button on the AccuBuild Desktop to refresh your screen. The Dashboard Charts and Dashboard Reports tabs should now appear at the bottom of the AccuBuild Desktop. |
| 4. | Once the dashboard report has been selected, the Dashboard Reports Tab will display the report. The date and time that the report was last generated will be displayed at the bottom of the Dashboard Reports screen. This data will not be refreshed each time you open the screen. To refresh the data, click on the Dashboard Button at the top of the screen. |
| 5. | Click on the Dashboard Charts Tab. Right-click on the screen to display the pop up menu. Begin by selecting 'chart panel settings' so that you can define how many charts that you wish to create and display. There are three panels (rows of charts) that can display up to three charts each for a maximum of nine charts on the screen. Note: When designing your charts, always start with the first chart on the left of each panel. If you first set up your screen to show three charts on the first panel and then changed your mind to show only two charts, the chart on the far right would be the chart removed from your view. |
| 6. | Choose the look of your chart (bar, pie, etc.) by choosing the 'chart series & graphics' option on the pop up menu. You can have multiple series on a single chart. For example, a bar graph might have three series (bars) to represent Sales, Costs and Gross Profit. Be sure to label each series by clicking on the Title Button. You can also name your chart by clicking on the Titles Tab of this screen. Click Close to save your settings. |
|
Chart Editor |
| 7. | On the pop up menu, choose 'chart data connections'. Any data pipe in the dashboard report is accessible for making a chart. Select the series (refer to step 6) and choose a table name from the dashboard report. Then define the X and Y field values. Explore the other fields on this screen for items as changing your chart name or labeling each series. |
| 8. | All of the chart settings that you create will be stored in a .txt file in your user directory on the server (ie. P:\Accubld8\ABCCompany\John\UserDash\DashBoardChartSettings_DBChart1.txt) This same directory will contain a configuration file named DashBoardChartSettings.ini which contains the data connections to each of the user's charts plus all of the panel settings. |
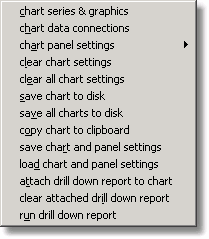
| 9. | Other Dashboard Chart Tab Menu Options: |
•'clear chart settings' - Remove one chart from the highlighted panel.
•'clear all chart settings' - Remove all charts from the Dashboard Charts Tab.
•'save chart to disk' - Save an image (.bmp) of the chart a disk drive.
•'save all charts to disk' - Save an image (.bmp) of all your charts to a disk drive.
•'copy chart to clipboard' - Save the chart as an image so that you may paste it into a document.
•'save chart and panel settings' - AccuBuild does this file save automatically but this option forces the settings to be saved to the ini and txt files in the UserDash folder.
•'load chart and panel settings' - AccuBuild performs this function automatically but this option forces the system to read the ini and txt files in the UserDash folder.
•'attach drill down report to chart' - While the charts themselves are based on a single MAR report, each chart can be linked to a separate MAR report so that when you double click on the chart, the report can be generated. For example, your chart may be displaying total sales by job based on the Contract Status Report. However, you may link the Sales Journal Report to the chart in order to get detailed information on each invoice.
•'clear attached drill down report' - Remove the attached drill down reports from the chart.
•'run drill down report' - View/Print the attached drill down report.