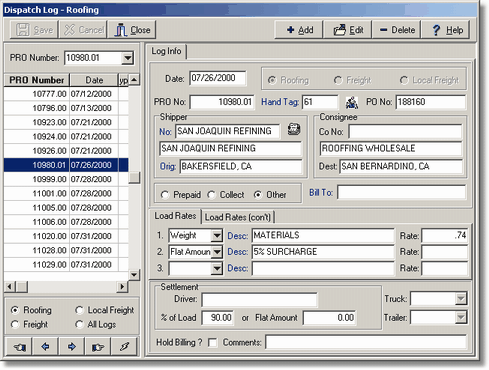
| 1. | Select the appropriate log type from the Trucking > Dispatch Menu. Be sure that the dispatch order type has been selected and then select the Add Button to create a new log. |

| Date – Enter the date of the order. |
| PRO No: – This is the order number or Freight Bill Number. This number must be unique and is automatically generated by the system by using the last entry in the log and adding one to it. If you need to enter a duplicate PRO Number that already exists in the log, you can make the entry unique by using a decimal value such as .01 or .02. When the freight bill is created from a dispatch entry, the Pro Number becomes the freight bill number. |
| Hand Tag – The Hand Tag Code is used to identify the type of load being hauled and it identifies the general ledger accounts that are associated with the order for both the revenue side (receivables and income) and the expense side (payables and expense). Every order must be assigned a valid hand tag code. |
| PO No. – An optional purchase order number can be entered with the order to reference the customer's purchase order. The purchase order number will be included on the freight billed for reference purposes. |
| Shipper – These fields identify the shipper name as well as the location where the shipment is to be picked up. If the shipper's information is entered into the Client List, then the Orig field will be filled in automatically based on the shipper's city and state. If the shipper does not exist in the Client List, then the name and location can be typed in manually in the space provided. |
| Consignee – These fields identify the consignee name (name of the person of company that will be receiving the shipment) as well as the destination location where the shipment will be delivered. If the consignee's information is entered into the Client List, then the Dest field will be filled in automatically based on the consignee's city and state. If the Consignee does not exist in the Client List, then the name and destination can be typed in manually in the space provided. |
| Bill To – This information identifies the company that will be billed for the delivery of the shipment. The Bill To company must exist in the Client List since an invoice will need to be created to this company. The Billing Type control will assist in identifying the proper Bill To company if the shipper or consignee will be paying for the freight shipment. The Prepaid option will automatically copy the shipper's client number to the Bill To information while the Collect option will automatically copy the consignee's client number to the Bill To information. The Other option allows you to select any client for the Bill To information. |
| Load Rates – The load rates are a series of up to six entries that make up the shipment descriptions and quantities. Each of the six load entries contains a load type, a load description, and the quoted rate of charge. The load type defines how the load is charged and is based on one of the following choices: Pieces, Weight, Miles, or a Flat Amount. You may also use the special Comments type to enter additional information about the shipment which will also be included on the freight bill. |
| Settlement – The settlement information defines who will be paid for hauling the load and the amount of payment. The driver can be either a company employee or a Sub Hauler (vendor) and the type of driver is determined by the Hand Tag Code assigned to this order. If a company driver is hauling the load, then the employee list will be displayed, otherwise, the vendor list will be displayed. |
| Hold Billing ? – This field is used to prevent a billing from being created for this order. If the billing needs to be held for any reason, then check this box and the billing system will not be able to create a billing for this order until this box is unchecked. A Comments entry can be used to enter a description as to why the billing is to be held. |
| 2. | Click Save to record your entries or click Cancel to erase your entries. All of the saved dispatch entries are listed in a grid on the left-hand side of the screen and may be sorted by clicking on the appropriate column heading in the grid. Click on the PRO Number column heading to sort by freight bill number or click on the Date heading to sort by the order date. |
| Use the Edit Button to change any information on an existing dispatch entry. Use the Delete Button to completely remove an entry from the dispatch log. Once the entry is removed, it cannot be recovered and must be re-entered if needed. The dispatch entry can now be billed through the Trucking > Freight Bills option. |
| Note: The F7 Key can be used to duplicate fields from the previous entry on the dispatch log. The key is helpful to speed up the input of dispatch orders when several orders are entered for the same company or involving similar types of shipments. The fields that are labeled in navy blue are the fields that may be duplicated and include the Hand Tag, Shipper, Bill To , and the Load Description fields. |
|
