Import AP Invoices from a Spreadsheet
Accounts payable invoices can be imported into the AB program from a spreadsheet using the Accuimport utility. This feature is limited to invoices that are NOT linked to a Purchase Order, Subcontract, or Stock Order. This import function may not be used with the Document Routing system.
AccuImport Spreadsheet Tips
•You may have multi-vendor invoice entries in the spreadsheet and each invoice may have multiple detail items in order to code the invoice to multiple ledger accounts, jobs and job phase.
•The spreadsheet invoices may have different invoice dates but be sure that an invoice with multiple detail items has the same transaction date. The invoices will only post to open accounting periods.
•Vendors must be set up in the Clients system before a vendor invoice can be entered. The spreadsheet will require that you use the assigned vendor number in the spreadsheet. Vendors cannot be set up ‘on the fly’ with the import process.
•Jobs, phases, and ledger accounts must also be set up in their respective master lists before using them in the spreadsheet.
oNote: These fields are not ‘list’ fields in the spreadsheet; they are simply fields that you type in a value. The import function does NOT check whether these values are valid but the entries will be placed in the user’s batch. However, if the vendor, account, job or phase number doesn’t exist in the AB database, then the imported batch will fail to post.
AccuImport Setup
To use the AccuImport utility, each user will need to set up Program Links.
•Note: The Windows Explorer references in this guide describe the AB Cloud user’s experience. If your AB program is installed on your server or another Cloud system, then your directory tree may look different.
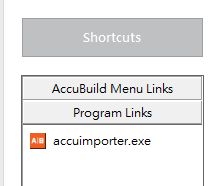
Create a Program Link
Log in to the AB program with your normal username and password. On the main program screen, you will find the Program Links option under the Shortcuts section of the screen. The Program Links option is used to set up easy access links to external programs or locations outside of the AB program.
Program Link - AccuImport
•Right-click on the Program Links option and select Add Program Link.
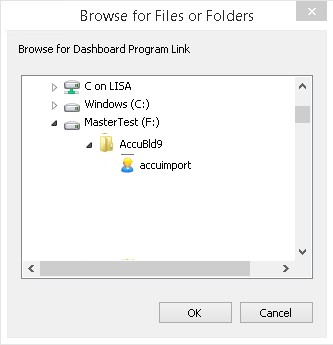
•Browse to the location where the AB program has been installed such as F:\AccuBld9 folder (your folder name may be AccuBld8 depending on how long you have had the AB system).
oIf you are on the AB Cloud, keep in mind that your local server may also also have an F Drive. On the AB Cloud, your drive will be noted with your company name (MasterTest (F:) in this example)
•Scroll down through the AccuBld9 folder until you find the Accuimport option. Highlight this option and then click OK. This will add the Accuimport option as a shortcut under Program Links.
Program Link - User Folder
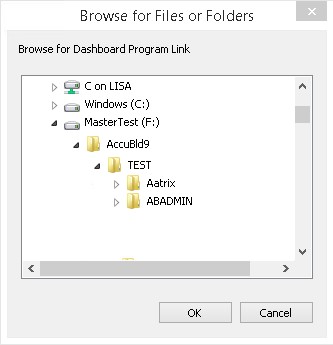
•Right-click on the Program Links option and select Add Program Link.
•Browse to the file path where your data is located (ie. F:/Accubld9/CompanyName). Within this folder is your personal user folder; this is typically the name that you use when you log in to the AB program. In this example, I am logged in as ABADMIN.
•Highlight your user folder and then click OK. This will add a shortcut to your user folder under the Program Links. This is where you will store the Excel spreadsheet that you will use for entering and importing your invoice entries into the AB program.
AccuImport Spreadsheet
The spreadsheet that you will use for your invoice entries will need to be copied into your user directory.
•Click on the Program Links > YOURUSERFOLDER shortcut to open the Windows Explorer on the Cloud.
•Browse up to the AccuBld9 folder and then browse to the Samples folder.
•Locate the APBatchSpreadsheetSample file
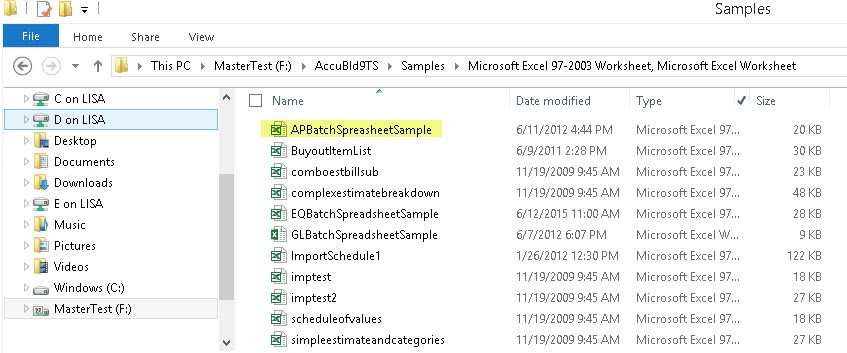
•Paste the file into your user directory (ie. F:\Accubld9\CompanyName\UserName).
•Close the Windows Explorer.
•Open your user folder once more from the Program Links shortcut. Be sure you can see the APBatchSpreadsheetSample.xls in this location. Double-click on the file to open the file with Excel.
Using the Spreadsheet
•The first time you open the spreadsheet you will notice that there is sample data within the spreadsheet which will serve as a guide as to how you should enter your data.
•Do not reformat any of the cells. The cell formatting has already been made for you. The formatting needs to be very simple for the import process.
•The top row of the spreadsheet contains the field names which will be used for the import process. DO NOT CHANGE THE VALUES IN ROW 1.
•Close your spreadsheet before attempting to import the spreadsheet. Failure to close the spreadsheet before importing will cause an error during the import process.
Before Importing a Spreadsheet
•The import process copies the invoice entries in your spreadsheet into your Payables > Invoices > Enter Invoices screen. This invoice screen is unique to you and cannot be viewed by any other user. We recommend that you start with an empty batch when importing invoices. Before using the import process, go to the Payables > Invoices > Enter Invoices screen to verify that there is no data in this screen. If you have data in this screen, it means that you did not post your previous entries.
Importing a Spreadsheet
To import the invoices, go to Program Links and click on the AccuImport option.
1.Select Company and User - You may have more than one company within AB so be sure you choose the proper company name on this screen. The user names are NOT listed alphabetically but you may type in your user name and the system should find it on the list.
2.Select Excel File - Use the browse button on the right to find your spreadsheet in your user folder (ie. F:\Accubld9\CompanyName\UserFolder).
3.Select Target Table: Choose the AP Payable Invoices option on the list.
4.Map Fields - The first time that you use the spreadsheet you may need to map the columns to the fields within AB. The first row of data are the fields names; if they appear in RED text then the field needs to be mapped; if the text is GREEN, then the mapping has already been completed. The fields and column names are very similar. Simply click the drop down list to choose the appropriate field name.
Column Name |
Mapped Field Name |
|---|---|
Invoice |
Choose ‘Discard’ (This column will not be used in the import) |
Vendor Number |
NA_NO |
Invoice Date |
Invoice Date |
Vendor Invoice Number |
VENDORINVOICENO |
Amount |
AMOUNT |
Discount |
DISC_AMT |
Job Number |
JOB |
Phase Code |
PHASE |
Equipment Number |
EQUIPMENT (Choose ‘Discard’ if you do not use Equipment) |
GL Account |
GLACCOUNT |
Credit GL Account |
CR_GL_ACCT (This is your accounts payable account) |
Pay Date |
PAY_DATE |
Invoice Description |
INV_DESC |
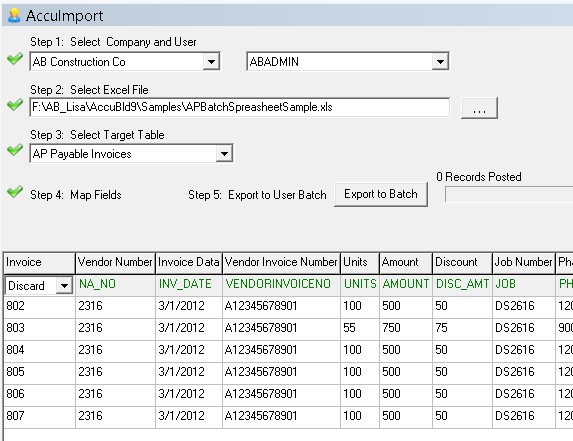
5.Export to User Batch - Click the Export to Batch button to copy your spreadsheet data into your user batch. Close the Accuimport screen once completed.
6.Once the entries have been imported, go to Payables > Invoices > Enter Invoices to view the entries. You may print your list of entries by using the Print button at the top of the screen. Printing and reviewing your entries is a ‘best practice’ in order to catch any mistakes before they are posted. If you do need to make corrections, you can simply edit your entry on the Invoice Entry screen. Or, you can delete all your entries from this screen, make your corrections in the spreadsheet and import the data once again.
7.Use the Post button when you are ready to commit your entries. Depending on the number of records in your batch, this process may take a few minutes. A pop up screen will let you know when the process is complete. If you get a notice that the process did NOT complete, please contact AB for assistance. When the batch is posted, the voice records will be removed from your user batch. The invoice entry screen should be empty after each successful batch posting.